.jpg)
.png)
Link for YouTube Video: https://youtu.be/0xWARcYm2j0
Over a seven-year period from 2008 to 2015, American composer and actor Lin-Manuel Miranda created a musical telling the story of American Founding Father Alexander Hamilton.

Hamilton, An American Musical, premiered on January 20, 2015 at The Public Theater in Lower Manhattan with Miranda playing the role of Alexander Hamilton. With continually sold-out performances Hamilton opened on August 6 that same year at The Richard Rodgers Theater on Broadway and continued its success resulting in recognition and awards including a Pulitzer Prize for Drama to Lin-Manuel Miranda in 2016.

)
In Winston-Salem, North Carolina, just 56 minutes from my home, is the University of North Carolina School of the Arts. Founded in 1963 and the first public arts conservatory in the United States.


What does that have to do with a Broadway production? Well, every Broadway production, as with every theater production, dance production, opera or television has to have costumes for every performer. The Costme Designer for Hamilton was a 1986 graduate of the University of North Carolina School of the Arts. Paul Tazewell.

And who would receive the Tony Award for Best Costume Design of a Musical for the costumes in Hamilton? Paul Tazewell.

Fast forward to 2020 with the world health crisis. Fifty small, unique, independent businesses and artisans creating and supplying costumes for the entertainment industry united in May of that year to ensure their future. The Costume Industry Coalition was formed.

To benefit the members of the Costume Industry Coalition a pattern was created from a design by Paul Tazewell, the Hamilton Spencer. The pattern is offered on Etsy in several size ranges. 100% of the proceeds benefit the CIC. Link provided below!


The Pattern
The pattern is available for download and print. There is the original illustration by Paul Tazewell, a thank you to all who contributed toward the pattern offering, the purpose of the pattern, and acknowledgements. There are the pattern pieces as marked with fabric and lining pieces required. Finished measurements for each size are listed. There are suggested fabrics and notions. All markings, abbreviations, and seam allowances (which vary) are outlined. There are layouts for fabric and lining. The instructions are broken into manageable segments. And lastly, a glossary for the terms used in the instructions.

The pattern pages overlap and I cut off the lower and right edges.


I tape the pieces together beginning at the lower right of the page and overlap matching the stars (what else, stars!). Once the entire lower edge is lightly taped, I continue with the row directly above. Only when the page is completely lightly taped do I firmly tape the pattern pieces as necessary before cutting.


The Fabrics and Notions
I was gifted a beautiful ivory and red mid-weight linen a while ago and used it for my first pair of stays. I used a cotton blend bias binding for the stays. I still have some of the linen and binding left and decide to use them for the Hamilton Spencer. It will be fun with this silk skirt and the stays in a history-bounding way and, after all, this entire project is just for learning and is entirely a mock-up for a much larger project scheduled for 2025.

Instructions for the bias binding are a 2 inch width. I have some .5 inch double fold which opens to 2 inch. And I find some .875 inch in a matching brick color which opens to 3.5 inches. I purchase the additional I will need and crossed fingers there is enough.

There are some notions I have to purchase. I find the cotton piping for the rouleaux supplied by Great Lakes Cordage in a 4/32 inch (3mm) diameter 90 yard roll. The thread is polyester Gutermann. The Italian lightweight linen canvas interfacing and tailor's tape are from Bias Bespoke on Etsy.


Some of the pattern pieces are for lining only and I have just enough of a smooth rayon in the right color which will make for ease in putting the Spencer over any blouse or sweater.

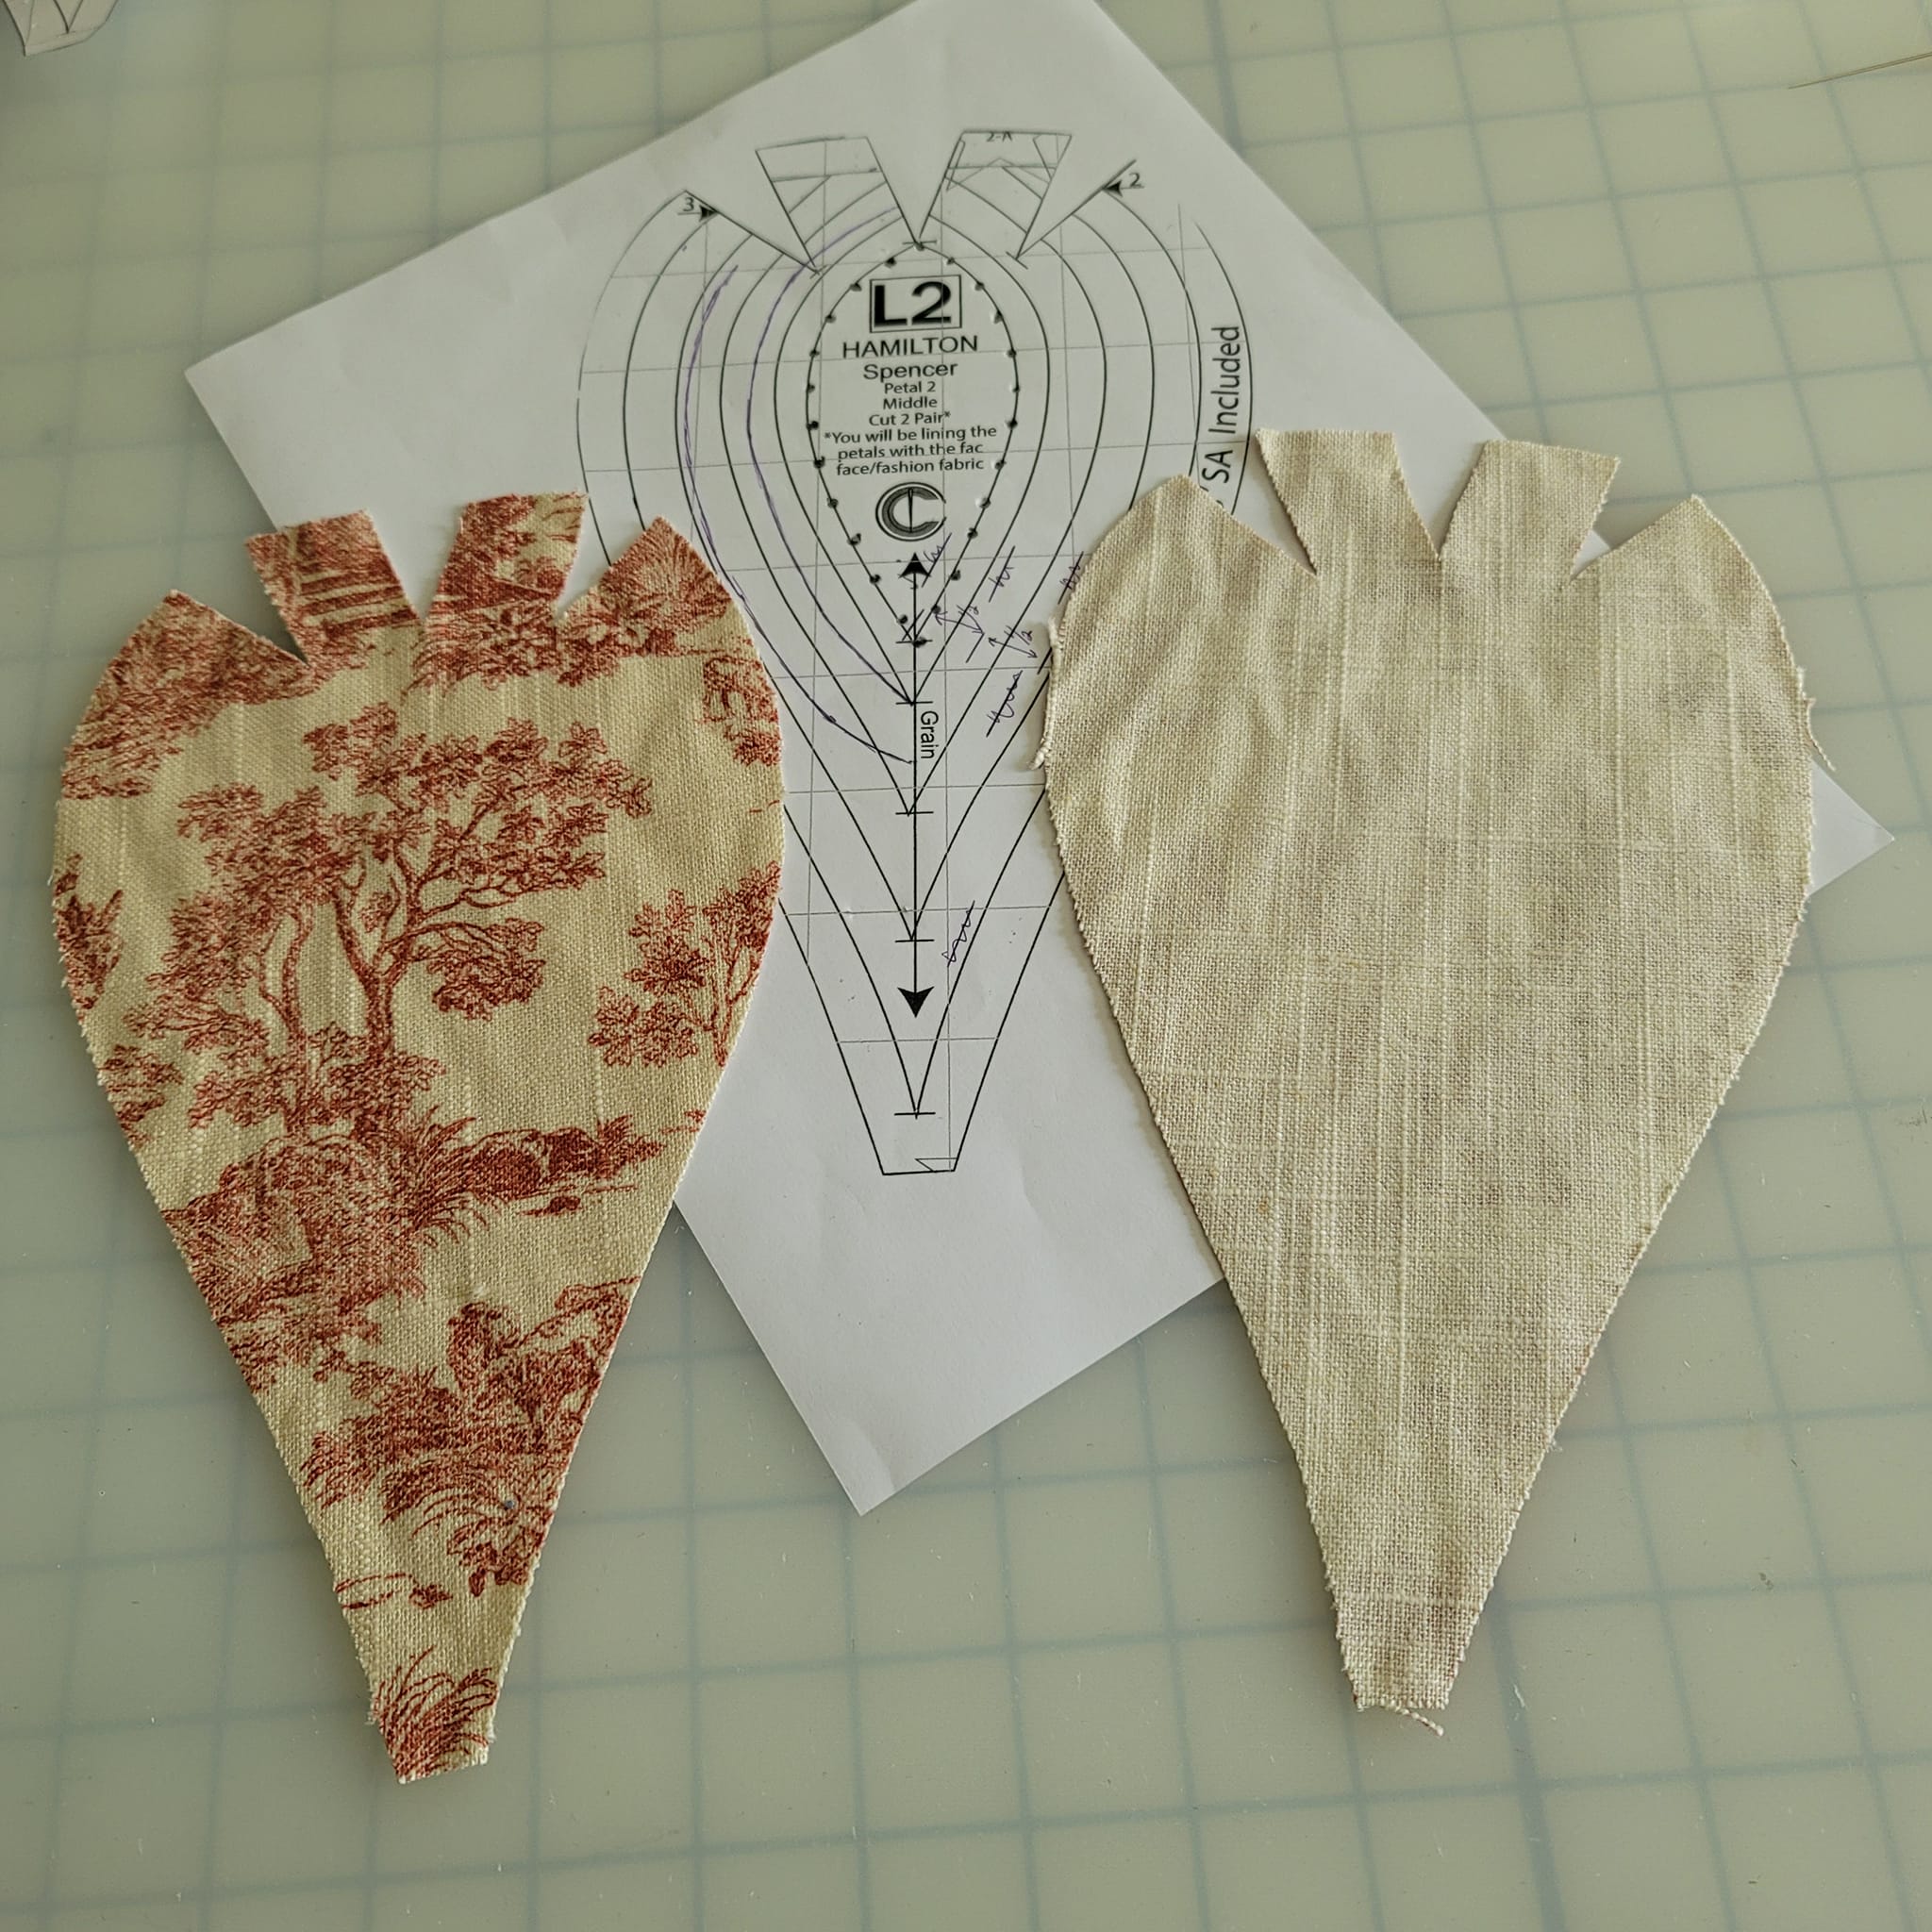
Cut Fabric and Lining
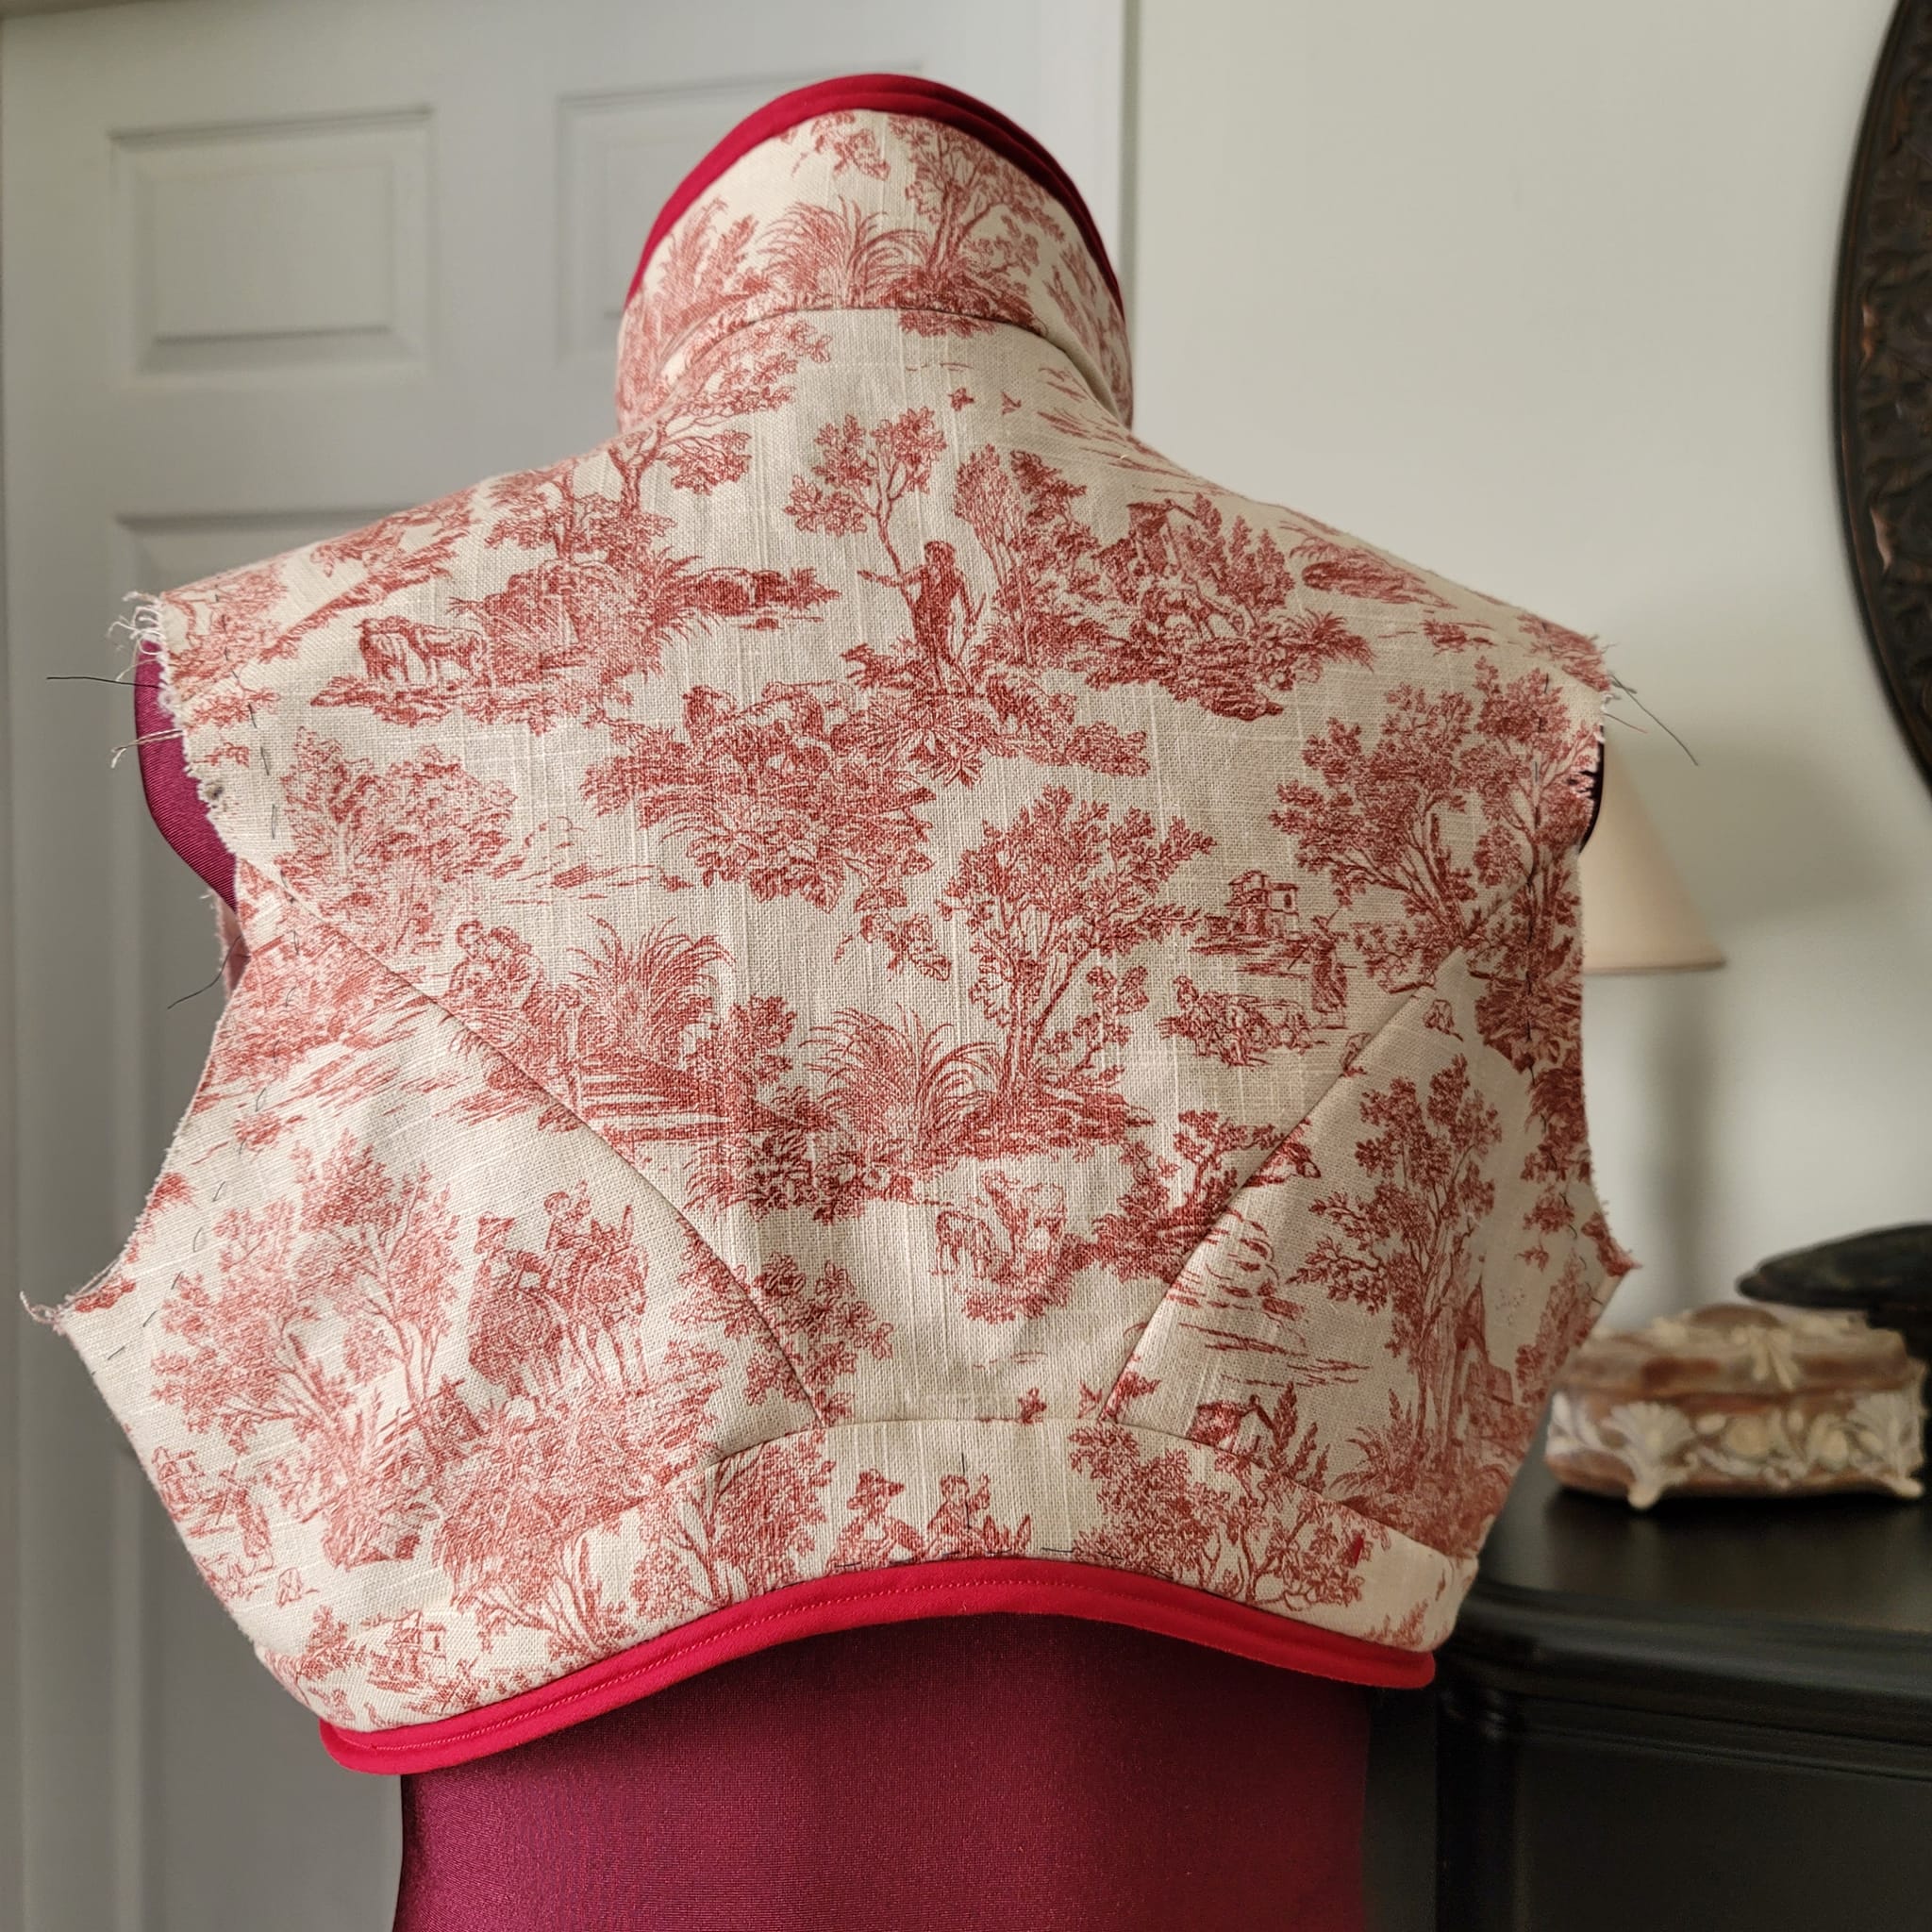
With the supplies ready it's time to cut the fabric and lining. The fabric design and the center back of the Spencer are perfect to highlight this idyllic scene of a young person and pup. So that is where I make my first cut.


I also choose a scene for the collar back and cut one-half of the collar, fold it onto itself, and cut the other half. I'm paying attention to the grainline arrows on the pattern pieces.


With the center back and collar cut I cut the remaining pieces without much attention to the fabric design as now it is simply paying attention to the grainline and getting all the pieces from the remaining fabric.


Collars, center back, side backs, and belt.

Upper sleeves, lower sleeves, sleeve puffs, sleeve bands, petals including lining from the fashion fabric.

Center fronts and front facings.

Lining for all pieces as instructed.

The remaining pattern pieces are templates for the petal placement, the leaf and ball motif, and the sleeve lattice.

With the supplies on hand, the fabric and lining cut, and the instructions carefully read, it is time to begin the Hamilton Spencer. I will number the sections 1 through 15 as the instructions were numbered in my pattern.
1. Prep Double Cord
Because I'm using pre-cut and folded bias I have to steam and press the packaged supplies to remove the fold lines. I do this for all that I've determined I will use for the entire project including the double cord, the rouleaux, and the balls. I label the pressed bias needed for the collar, sleeves and sleeve bands, and the fronts and lower edge of the Spencer. The instructions are to press and stretch while pressing for ease in stitching so this step doesn't take any more time.


Never having sewn a double cord before, I take a scrap piece of bias with a join and practice. I fold the bias in half, wrong sides together, place the cotton piping cord tight in the fold, and stitch close to the cord using the zipper foot. Then the second cord is laid next to the stitching and sewn tight to the stitching using the zipper foot again.


The instructions recommend gently pressing the second cord so it sits right above the first. After a few trials I end up standing the cords upright and lightly pressing the upper cord. The pressing eliminates the small gap created by the first row of stitching and the result is wonderful. The first of many lessons I will learn from this pattern.


2. Prep Rouleaux Trim for Leaf Motifs
The motifs will use 30, 35, and 40 inches of trim for the three size leaves. I increase the length of that to make sure I have enough for the inevitable mistake. The bias is cut to the length necessary for each leaf being careful to avoid any joins in the bias. The cotton cord is cut double the length of each bias strip. This is the cord and bias ready for each leaf.

The bias is sewn over the cord with right sides together using the zipper foot.

At the end of the bias strip the stitching turns to sew across the bias where it ends on the cording.

The seam allowance is trimmed to reduce bulk when turning the rouleaux right side out but not narrow enough to pop open with tension. I cut to 1/8 inch.

Then the bias is gently teased to begin its turn inside out over the uncovered cord.

I found it best not to try to pull too far ahead but to use the seam allowance to gently pull the sewn bias down the cord. Once the bias has moved past the sewn end it turns quickly.

All the rouleaux is sewn and hung and ready! Another lesson learned!

3. Prep Balls for Leaf and Sleeve Motifs
The instructions for creating the fabric balls are simple using a fabric square, a quarter for sizing, and a stuffing. I admit I changed techniques after just a few tests. The fabric square leaves just enough unused fabric after stitching and stuffing that rather than cutting off the excess and having an unfinished edge, I turned the excess into the circle before pulling the thread tight and knotting off. The excess fabric became my stuffing. This gave me a clean edge for attaching to the Spencer. I also left my thread attached after knotting to use to sew the ball to the Spencer. I used 36 balls for the leaf and sleeve motifs.


4. Stitching Leaf Motifs
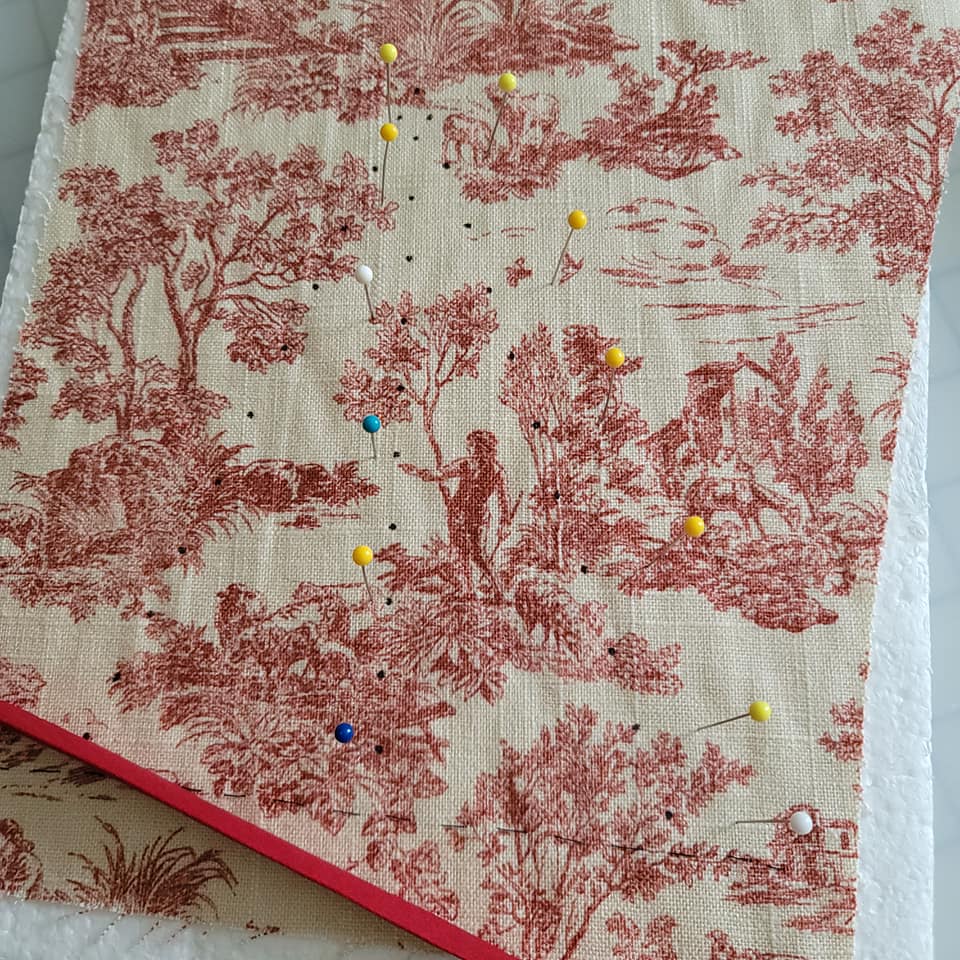
Since my fabric is a mid-weight linen I did not flatline any of the pieces. Paul Tazewell had recommended a silk taffeta which would definitely benefit from flatlining. The original design also envisioned a tone-on-tone with the embellishments made from bias strips of the same silk taffeta. My cotton blend bias is also a heavier weight than silk taffeta rouleaux and double cord would be which necessitated some design changes for me. Without flatlining I was able to begin my motifs. I began with thread marking the hem, lapel roll line, center front line and notch, and armscye.


One great thing about downloadable patterns is being able to reprint portions as mistakes or trials are made. I tried several ways of transferring the pattern and stitching rouleaux. I tried transferring the pattern to tissue and stitching through the design onto the fabric. I used an embroidery hoop which distorted my fabric. I used my tambour beading frame but as the pattern piece was already cut it would mean stitching it on all edges to a larger piece of fabric and then cutting that fabric away.

In the end this is the method I chose. I cut out the leaf design interior and traced the design onto the fabric with heat-erasable marker.


I also learned from my practice piece a method that worked for me to sew the rouleaux. I would catch a few threads of the fabric at the design line and a stitch in the rouleaux at the seam line. Tightening the thread brought the seam close to the design line. I kept all the rouleaux slanting in the same direction through all the turns so that I could maintain the same stitch pattern. The rouleaux seam is always folded to the design line and then a few stitches made and the technique continues. With this method I did not have to hoop the fabric and was able to always work all the stitches from the right side of the fabric. Is this the right way? I have no idea! But it worked for me and I love the result. Another lesson learned!


After the rouleaux is sewn and still slanting in one direction, it is easy to fluff it to stand upright on its seam covering the design line.

The beginning of the rouleaux motif will be covered by a ball. The end will not be covered and I remove some of the cord, turn in the raw edge, and stitch it to the fabric.

With the leaves finished on one side it is time to attach the balls.

Using the thread left on the balls I tack down the underside of each ball.

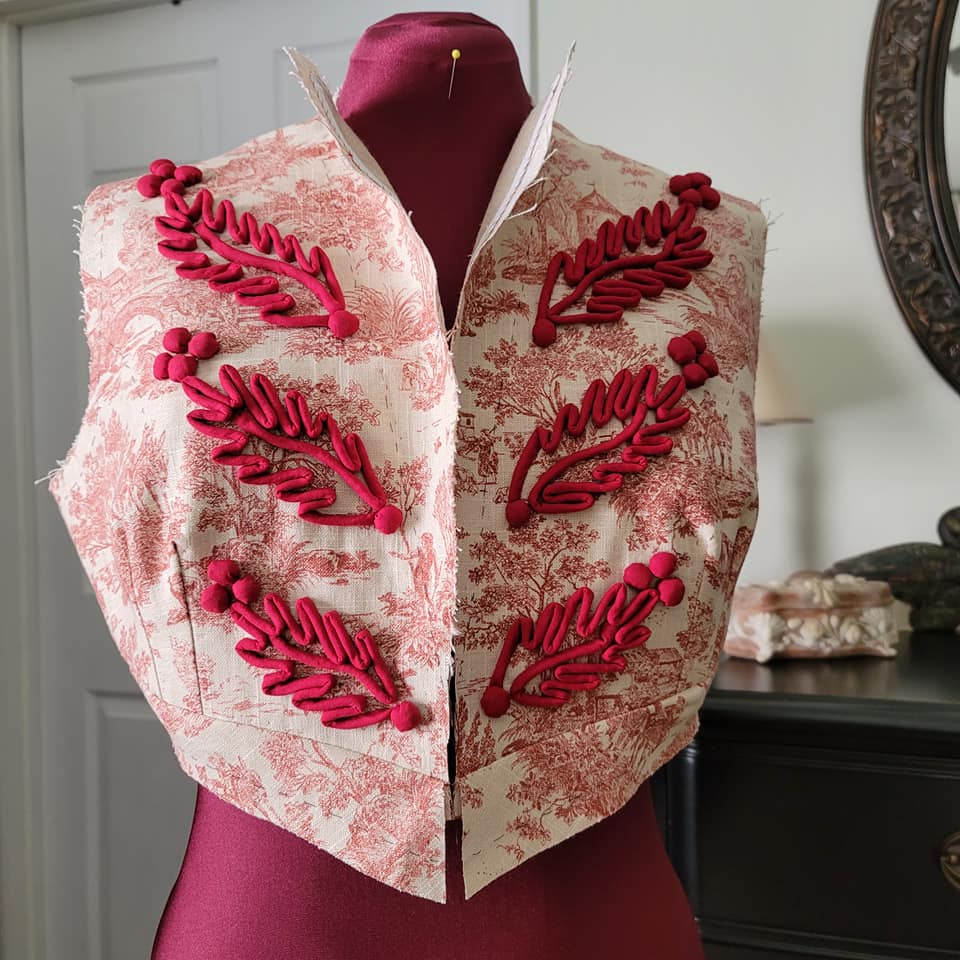
Yay!! A finished leaf and ball motif!!

Three finished!

And all six finished!!

I know this is just a learning piece and not what the designer envisioned, but I do love how all that embellishment shows up on the toile fabric.

Just for my own peace of mind, each knot gets a dab of glue.

5. Prep Front for Stitching
Front darts are stitched and pressed to one side.


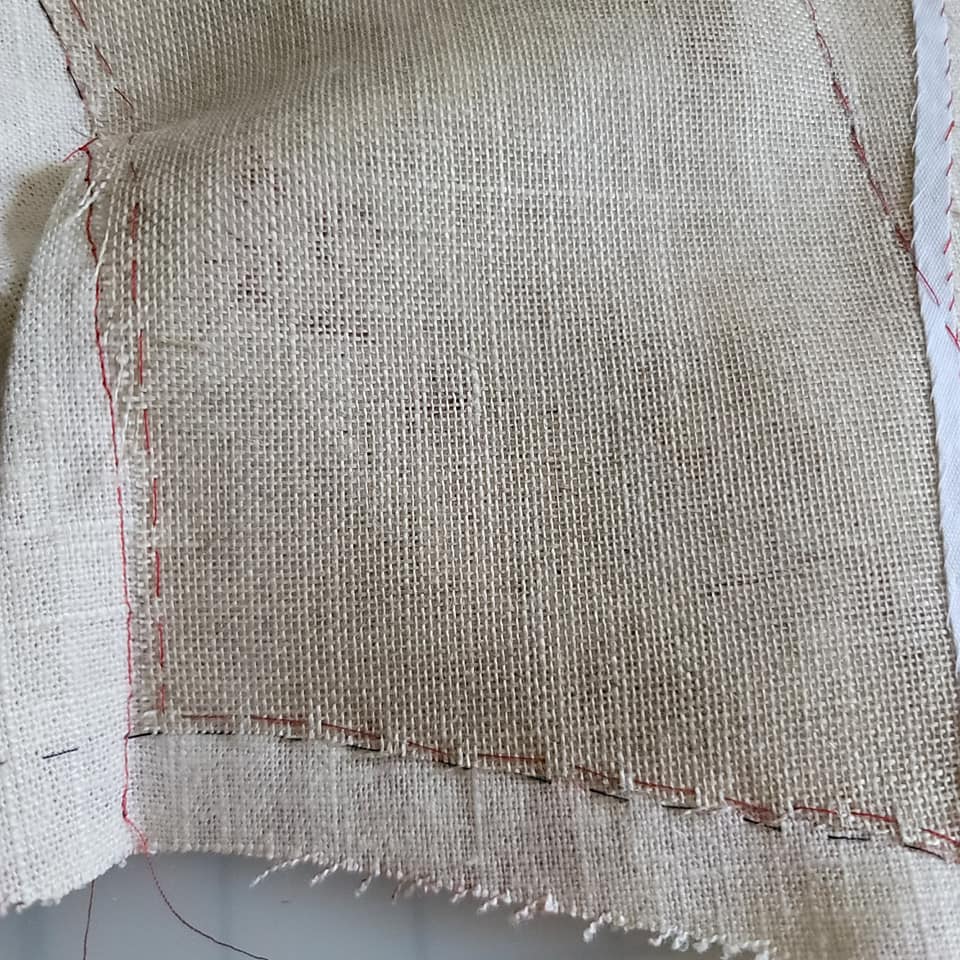
The interfacing is cut for the fronts and collar. Pattern markings are transferred to the fronts and seam allowances marked as directed.


The 3/16 inch white tailor's tape is stitched to the interfacing just at the edge of the seam allowance at the neckline, lapel edges, and down the center front.

The interfacing is pinned to the fabric rolling the lapel at the roll line before pinning.

The interfacing is cut at the hem and side front.

The lapel already has structure with the interfacing just being roll pinned.

The interfacing is then stitched to the fabric by hand at the edge of the tailor's tape. The cut edges are basted. The shoulder and armscye are left unattached. The roll line is pick stitched.


The tailoring portion of the Spencer is complete and so many lessons learned.


6. Body
Again, I did not flatline the mid-weight linen fabric pieces. So I can move to the next step in this section which is to thread mark the hem and armscye on all pieces.

The side backs are sewn to the center back.

The side seams are sewn.

The shoulder seams are sewn leaving the interfacing free.

And all seams are pressed open or to one side as instructed. The interfacing is laid across the shoulder seam and gently tacked to the seam allowance.


7. Belt
The hemline and center front are threadmarked.

The top of the belt is sewn to the bottom of the body matching notches. The seam allowances are pressed down toward the belt.


8. Collar
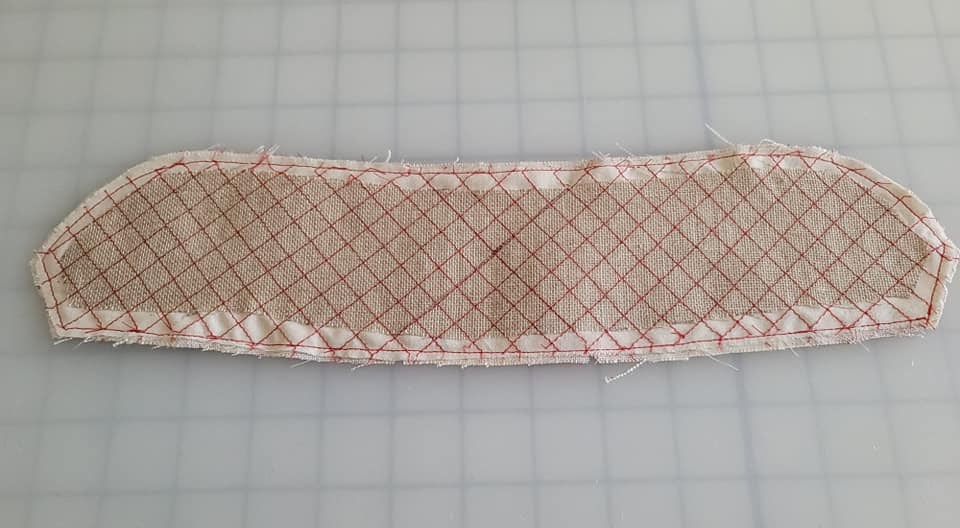
The parts of the collar consist of the outside collar, a fashion fabric inside collar, a length of the double cord, the interfacing marked for seam allowances and quilting direction, and I've cut a piece of muslin as flatlining for the collar as it will be used as the base for quilting the interfacing.

The interfacing seam allowances are cut away and the interfacing quilted to the flatlining according to the pattern instructions.

The quilted piece is then flatlined to the inside collar.

For ease in attaching the double cord to the collar (and in all subsequent pieces where the double cord is used) I measure, mark, and trim the allowance to the required seam allowance for the collar. This allows me to simply align the raw edges and the stitching will be on the seam line.


9. Cord and Lining
A stay stitch is sewn at the corner of the neckline and lapel and then clipped. Double cord is prepared by trimming the seam allowance paying close attention to the varying seam allowances of the parts of the body. The double cord is then sewn across the top of the lapel, down the front, around the hem and up the other side and across the top of the opposite lapel. The cord is clipped in the seam allowance as necessary to curve or turn.
Hmmm, no photos. Sorry!
The collar is sewn on and the seam allowance clipped and the seam allowance tacked to the collar facing.


This is how the double cord met the corner of the neckline and lapel.

I placed the Spencer on the dressform and marked where the collar and the lapel overlapped and marked that point. The collar is positioned behind the lapel. I tried the Spencer on to doublecheck how comfortable with the forward tilt of the collar and the stand of the lapel. Once I adjusted and was satisfied I tacked that point together with a few stitches.

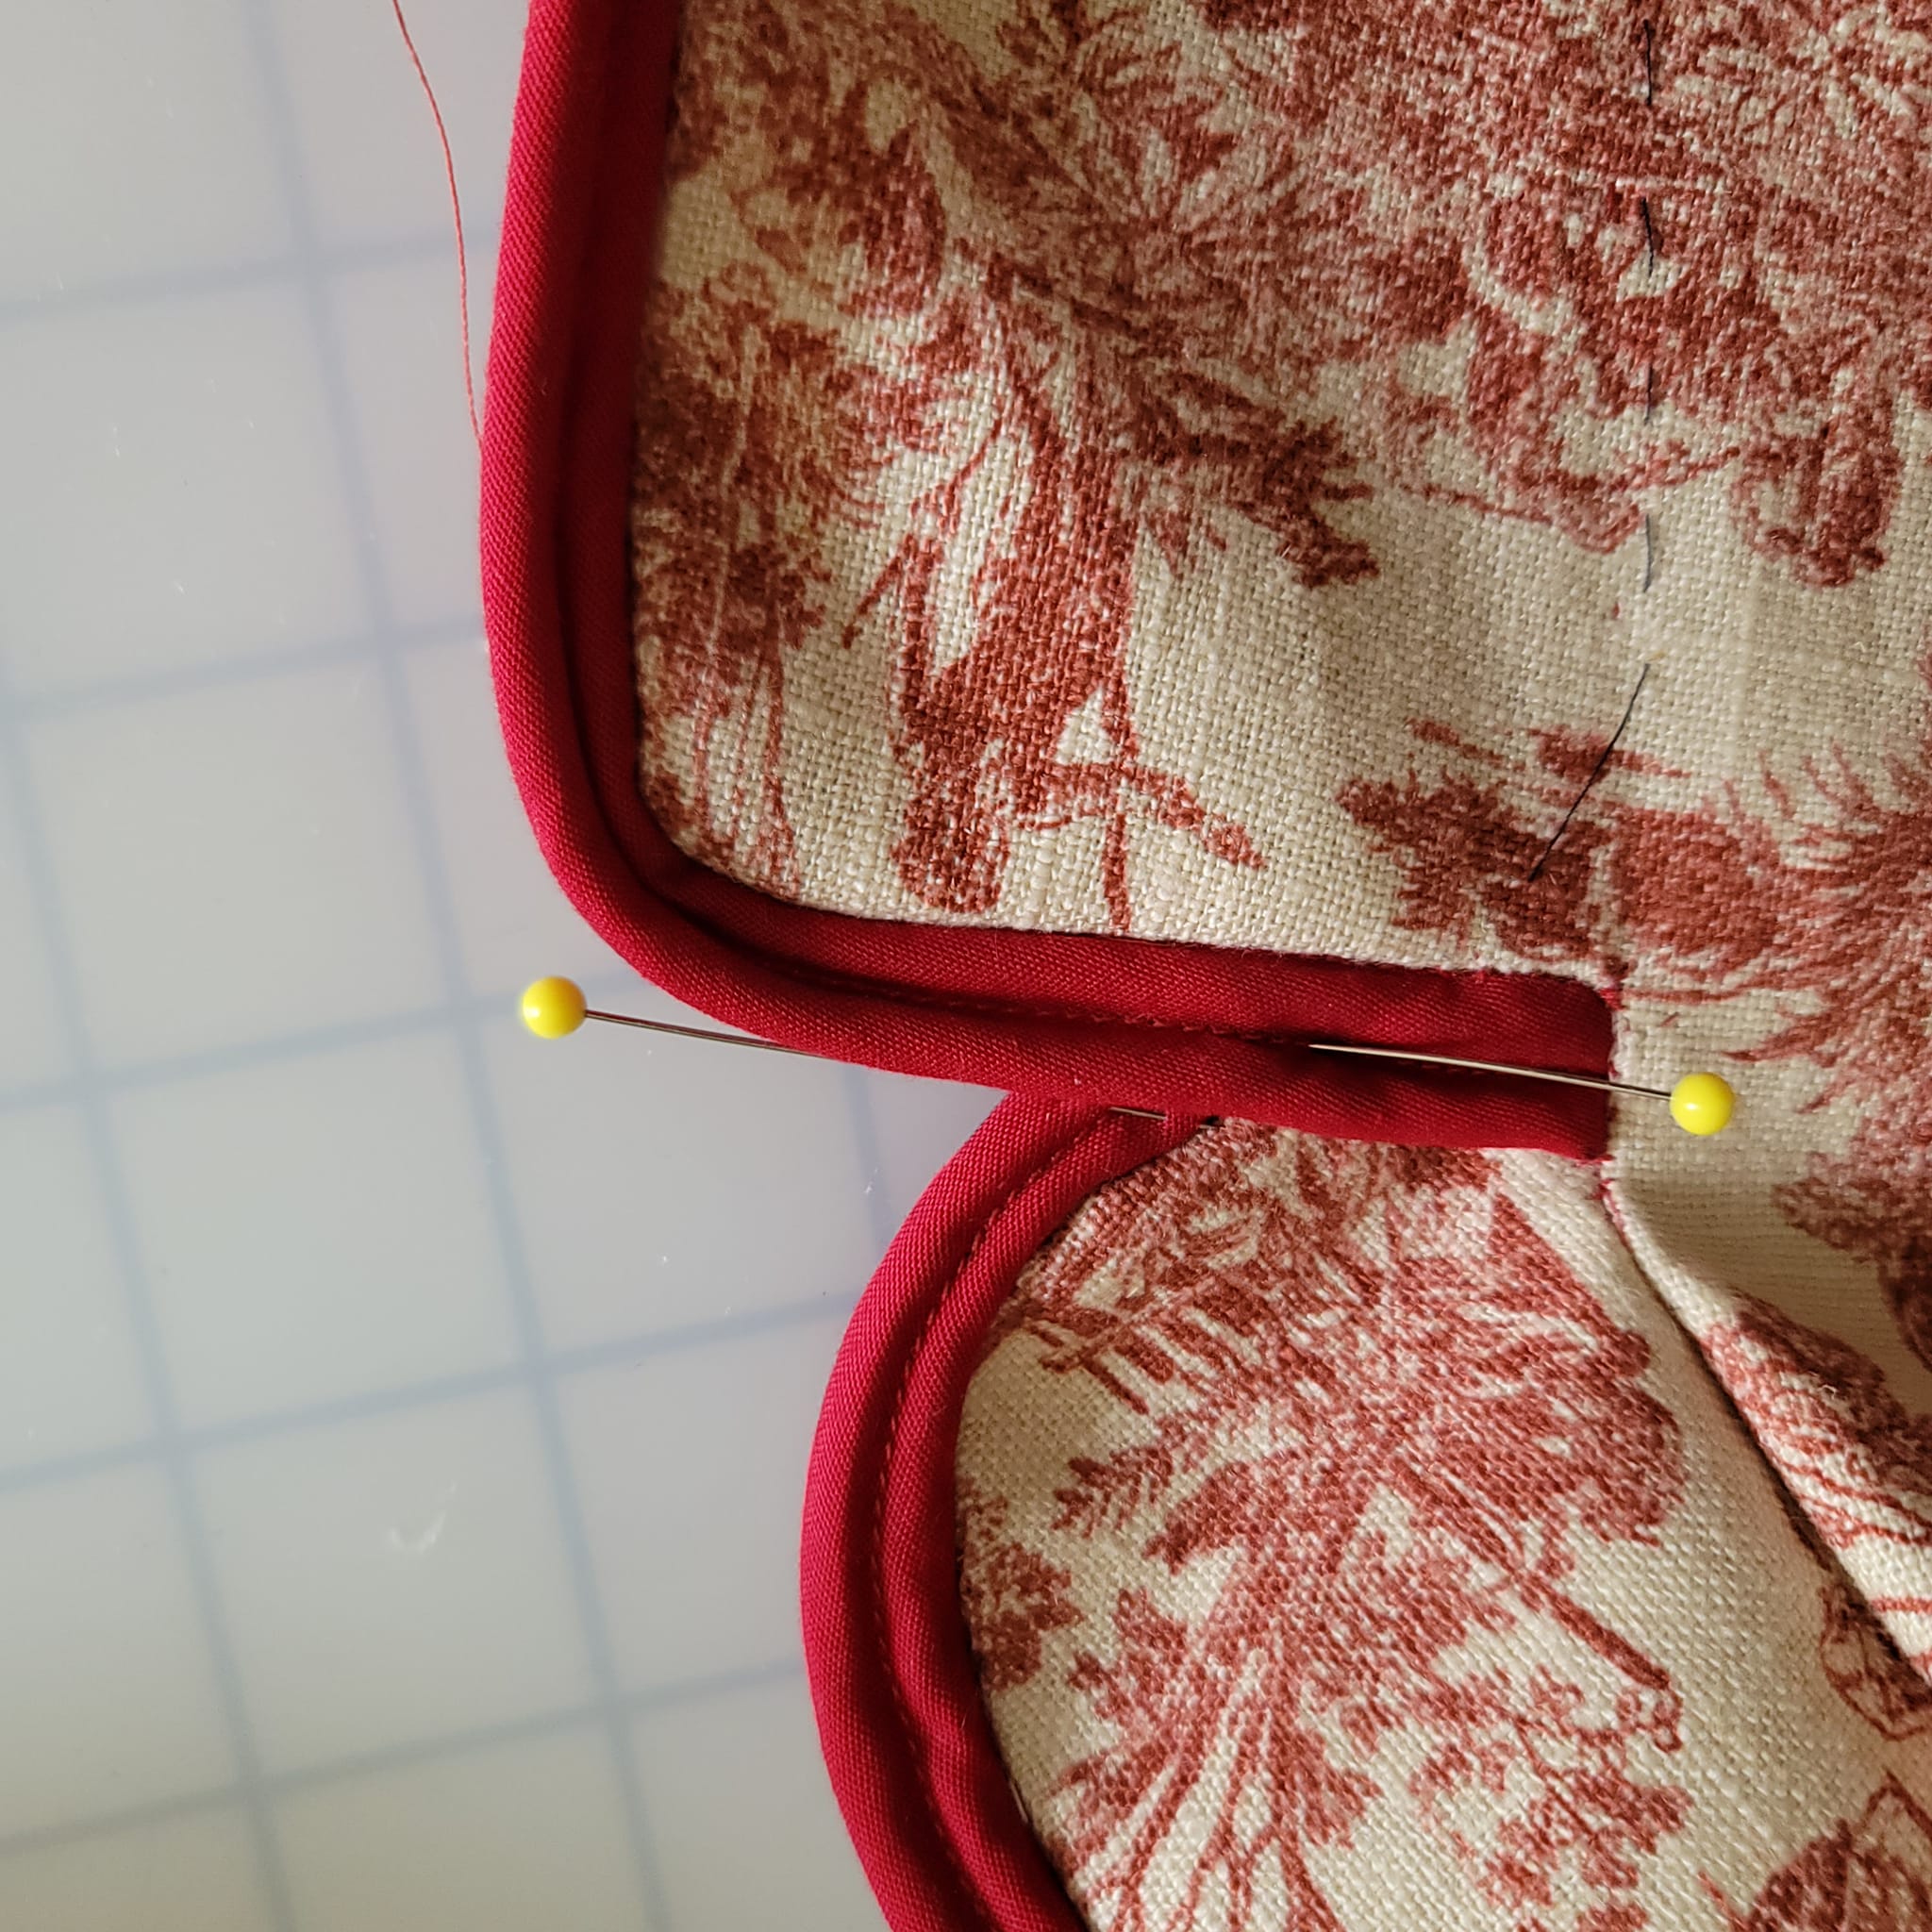
Here you can see the double cord from the corner of the neckline and lapel, across the top of the lapel, down the front, across the lower edge, and up the opposite side.


Lining the body begins with the belt lining. It is stitched at the center front and hem of the belt. The belt lining is turned up and basted into the ditch of the seam between the belt and fronts, sides, and back.


Markings are made on the lining fabric with a white heat-erasable marker and a white thread used for thread marking.

The lining is sewn in a manner similar to the exterior. The bodice fronts consist of two pieces from lining and a facing of the fashion fabric which will show with the standing lapels.


The interior collar is sewn to the lining.

The lining is ready to sew to the body interior. First all thread marking is removed.


For other fabrics machine sewing may work to attach the lining to the body exterior, but I decide to turn in the seam allowance on the lining, pin, and hand sew the lining and exterior. This gave me better control of the the seams especially at the Spencer front where it was very visible at the lapel and my double cord and fashion fabric were so contrasting.


The lower edge of the lining is also hand sewn to the belt lining taking 1/4 inch out of the seam allowance for ease.


The embellished body of the Hamilton Spencer is complete! Now would be a good time for an intermission before we start on those incredible sleeves.


Intermission


10. Sleeve Lattice Motif
The pattern instructions include a detailed photo of the sleeve lattice motif.

The pattern instructions also have an illustration using red and blue marks for the two separate pieces of bias used to create each half of the motif.

Using the pattern template included in the pattern I practiced the motif with two pieces of bias. My sample didn't look like the photo illustration until I realized that the photo has 13 points and the template only has 11. I closely followed the template and the illustration with the red and blue lines using my red and white bias.


The bias is pressed and stretched. Then folded in half lengthwise with right sides together and stitched. The silk taffeta recommended in the pattern is to be sewn at 1/4 inch from the fold but with my heavier cotton blend I opted to sew 1/2 inch for ease in turning. Then the seam is trimmed to 1/8 inch, the tube turned and pressed with the seam along one edge.
.jpg)


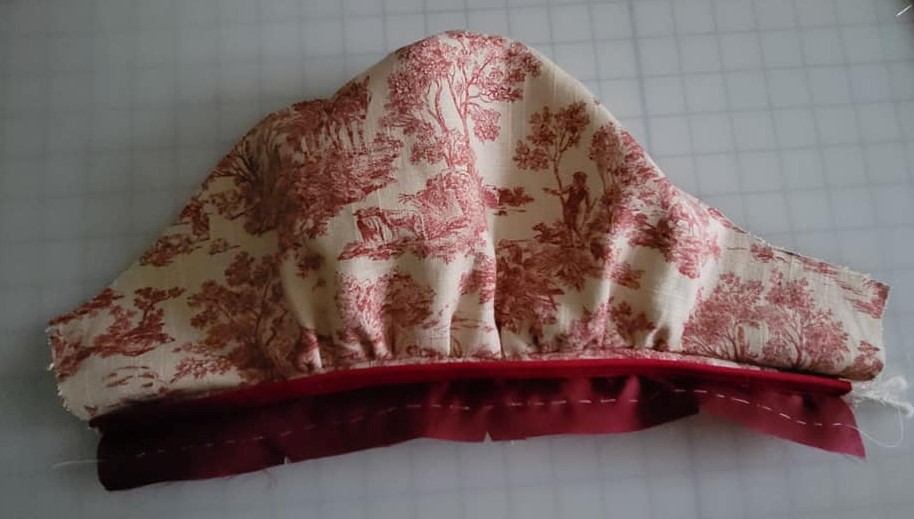
The hem of the upper sleeve is thread marked. I also stitched the upper sleeve shirring at the top edge while I was working on this piece even though that step was included in the next section.

To transfer the template pattern to the fabric I use an awl to punch holes in the template and transfer the markings to the upper sleeve using heat-erasable marker.

I used a styrofoam panel to pin the upper sleeve and template and used the panel throughout creating the motif for ease in securing the bias.


The pins on the right mark the point where the bias will make the turn on itself and the pins on the left are staged to pin where the bias will turn at the center of the motif. Now it just closely following the instructional diagram.


First layer, both sides.

The overlap to start the second layer.

And the second layer is complete on both sides!

With the motif pinned I'm able to pull the sleeve off the styrofoam and secure the pins to the bias and fabric. A tack stitch is made at the outside where the bias strips form their loop and also in the center tacking down each strip at the fold.

A small dab of fabric glue on the knots gives me peace of mind.

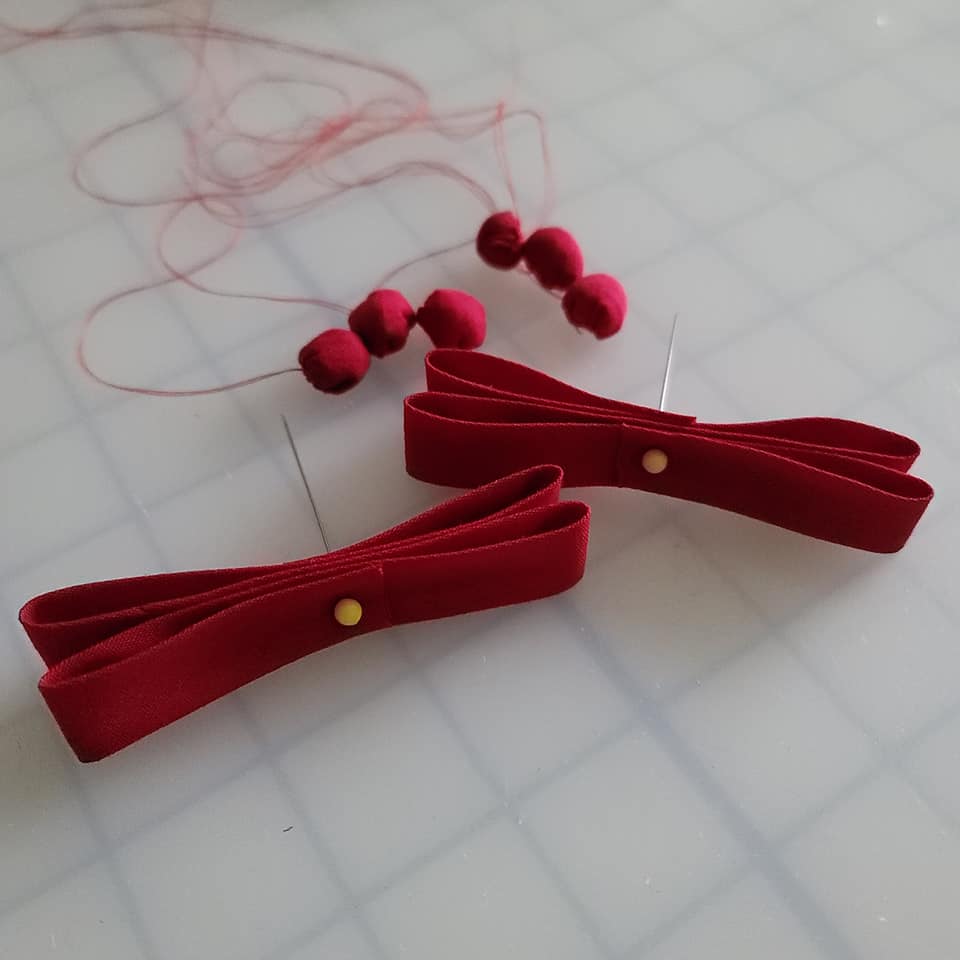
Bows created with bias and the bows and balls added to the motif.

The process repeated for the other upper sleeve. Another extraordinary embellishment lesson learned!


11. Sleeve
With the shirring stitch made in the previous step, the upper and lower sleeves are now joined at one seam.

Double cord is sewn to the hem.

The sleeve is sewn closed at the other seam.


The sleeve cap of the lining is thread marked and the shirring stitch sewn in the cap. The seams are sewn in the lining.


The lining is slipped into the sleeve, wrong sides together. The lining hem is turned to the inside and hand sewn to the edge of the double cord.

12. Sleeve Puff
A shirring stitch is sewn at the cap and hem line of the sleeve puff as indicated on the pattern. Measurements are provided so that the threads can be pulled to length and knotted off. For the sleeve puff, a well as the sleeve and lining in the previous section, I pulled the threads at the cap to the approximate length. I knotted one end but left the other end secured to a pin. This allowed me to make final adjustments at the time all three layers will be inserted into the armscye. The hem line is gathered to the given length and knotted off.


The top of the band lining is thread marked.

The double cord is sewn on the bottom edge of the band.

The band is sewn to the sleeve puff.


The lining is sewn to the bottom edge of the band.

The lining seam allowance is folded under at the thread mark and hand stitched to cover the band seam allowance. The thread marking is removed. My method varies from the directions as I sewed the seam after hemming the band lining. I then pinked the seam allowance.


The finished sleeve puffs just slip over the sleeves.


13. Inserting the Sleeve
The sleeve with lining and sleeve puff are aligned to all marks.

The sleeve is positioned into the armscye and both sleeve and sleeve puff are pinned into the armscye up to the point of the shirring.

The shirring is adjusted for the sleeve puff first and pinned to the armscye.

Then the shirring is adjusted for the sleeve and pinned.

Lastly the shirring is adjusted for the lining and pinned.

Leaving the body lining free, the sleeve is sewn to the armscye.


The seam allowance is graded and pinked.

The body lining which was left free is now turned under at the thread marking and hand stitched to cover the seam. The thread marking is removed.


Now there is a finished Spencer body with sleeves and lining!


14. Sleeve Petals
From the pattern instructions: "One petal takes approximately 60" of bias." Heavens! It was tempting to stop right here as I already had learned so much for a garment I was probably never going to wear.
There are three petals on each shoulder and I started by pinning the pattern pieces on the jacket to see if I really liked the effect of the extra embellishment. With my wider bias on the sleeves I had to admit it seemed like a perfect balance.


The bias is pressed and stretched and then folded wrong sides together and stitched 5/8 inch from the fold.

I photocopied the petal pattern pieces and punched holes with the awl to use the heat-erasable marker to mark the innermost petal and petal overlap. The fabric is pinned to the paper, the marks transferred, and then thread marked.


The darts are stitched.

One front petal and lining prepared and pinned back in place on the Spencer until needed again.


The same process is followed for L2, the middle petal.


Then L3, the back petal, fabric and lining is prepped.


The right shoulder petals from left to right: back, middle, front.
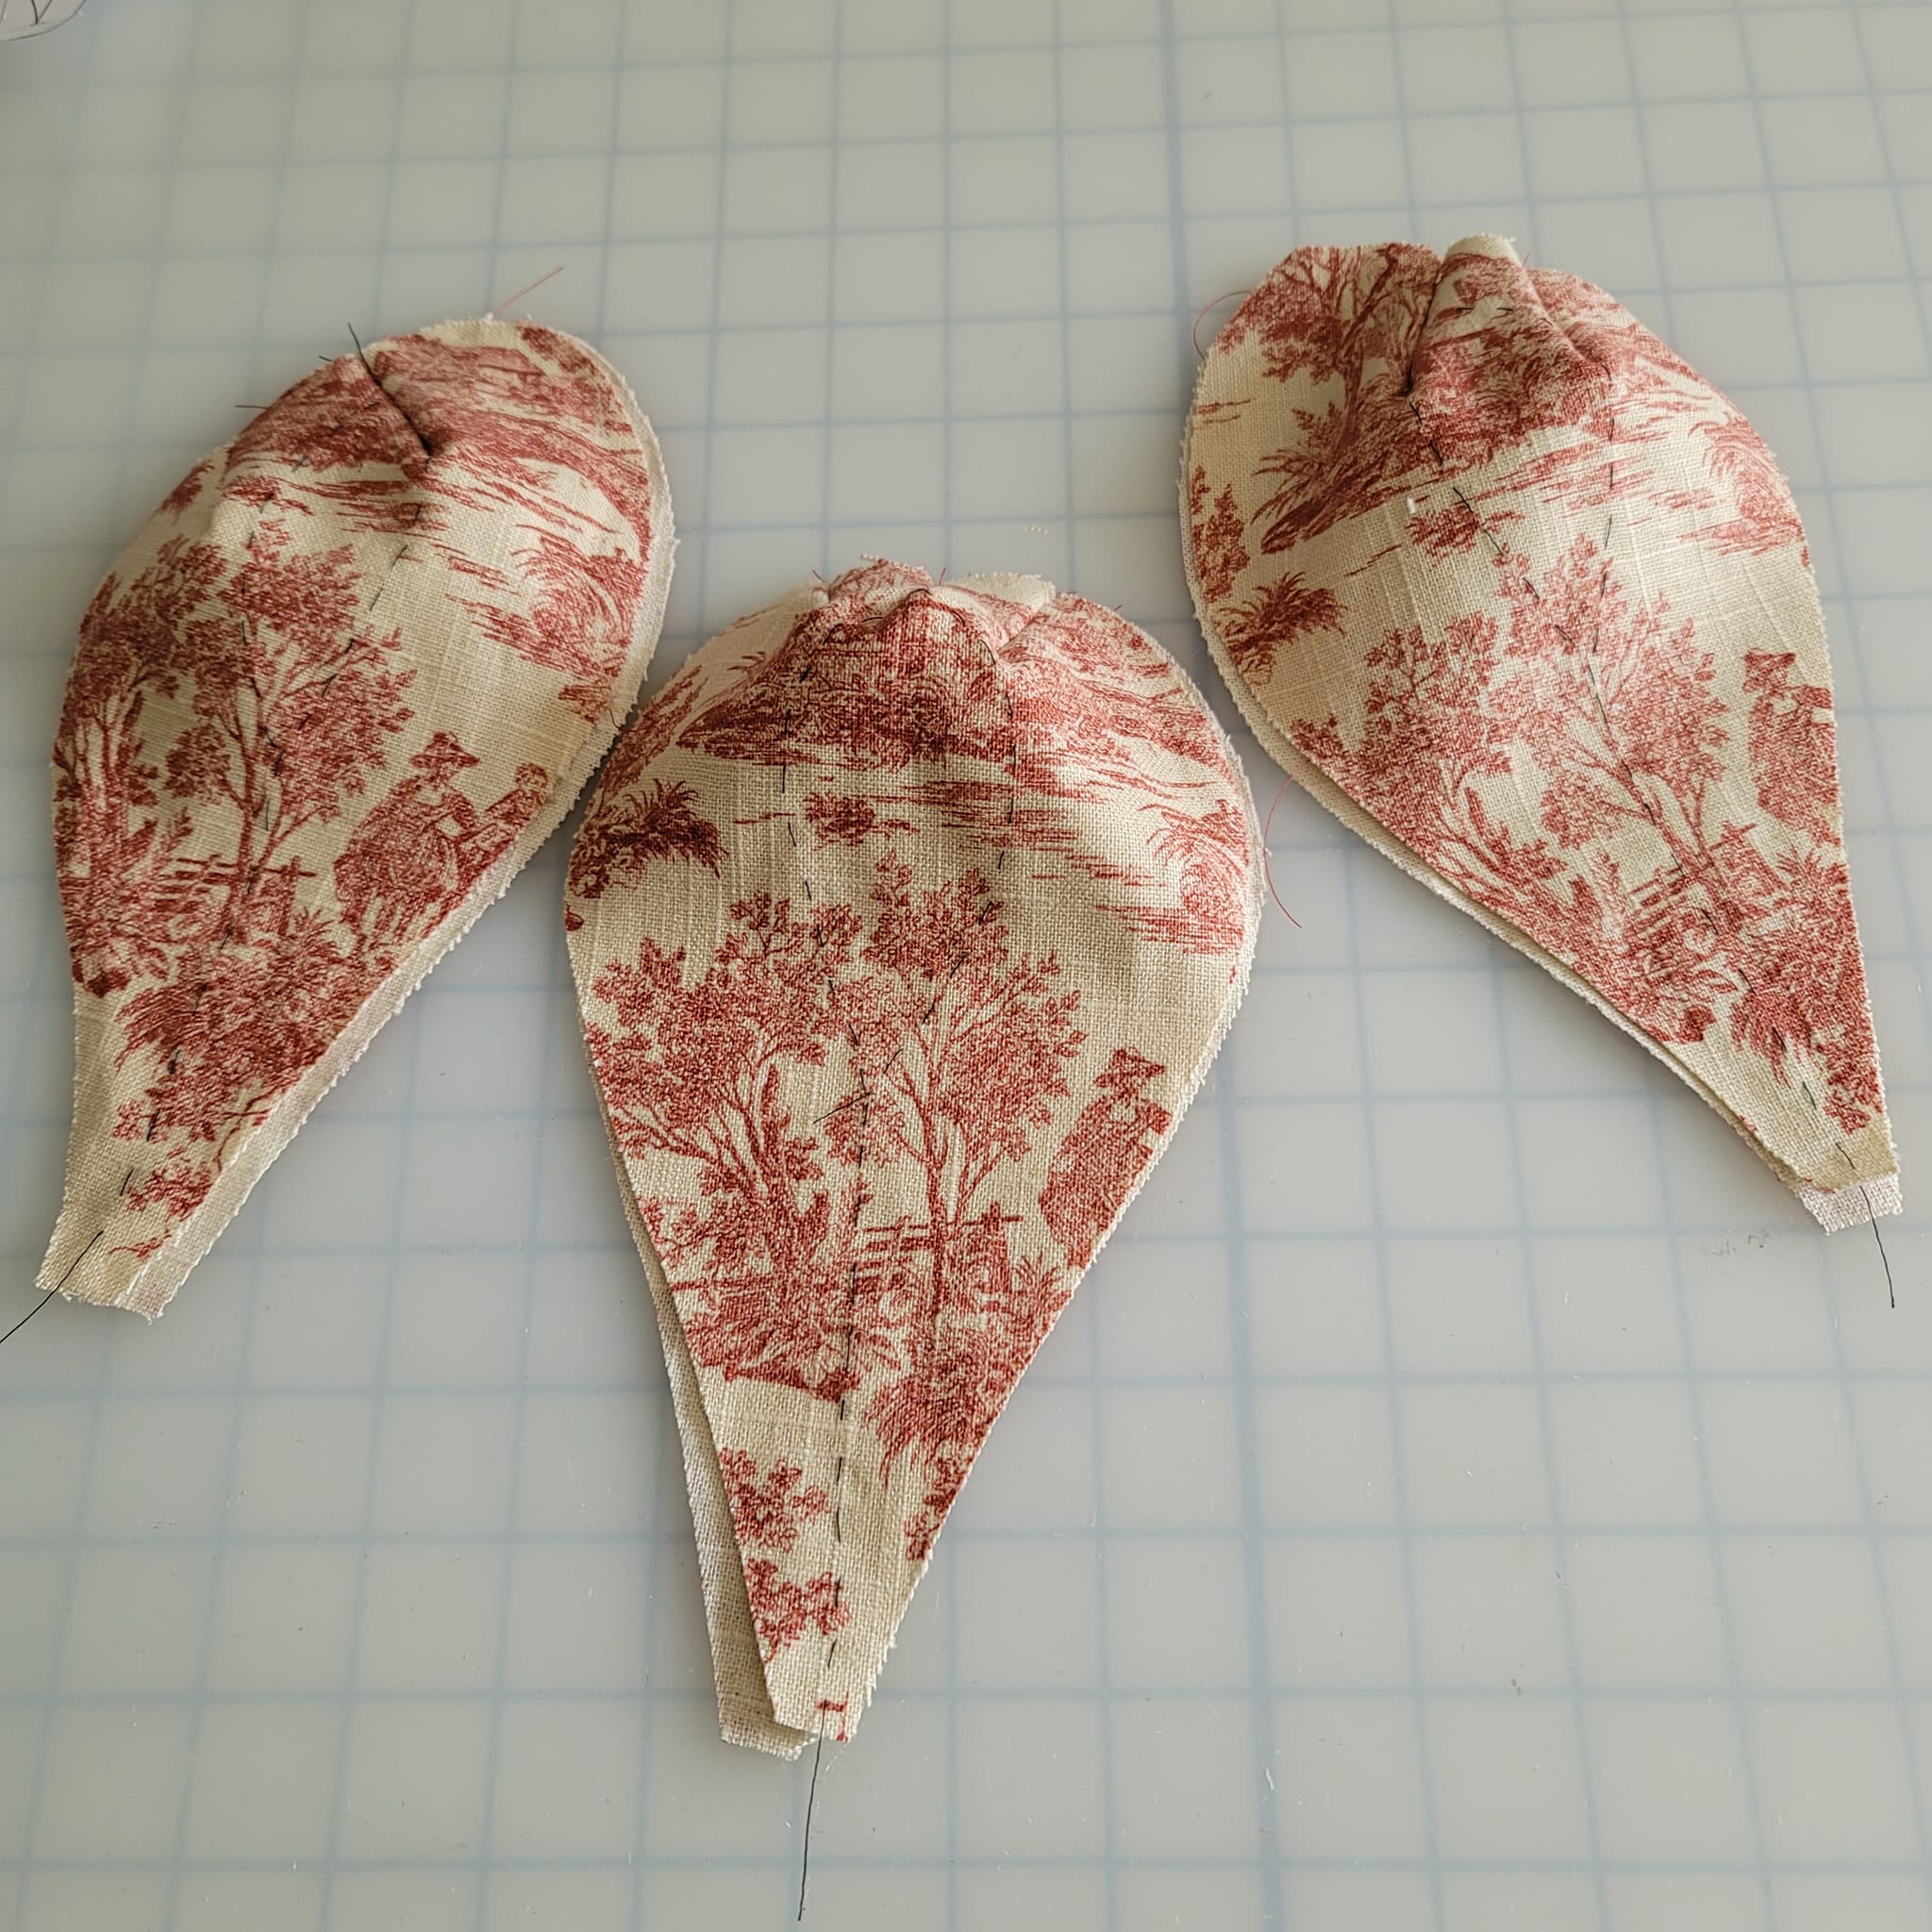
Then the process is repeated for the left shoulder using the reverse of the pattern pieces.

Because I had increased the width of the bias on the sleeve lattice to 1/2 inch and the finished width of my double cord is 1/2 inch, I tried some alternative measurements for positioning the bias on the sleeve petals and found that I could space them 1/2 inch in a crossed pattern rather than using the method in the instructions. I will share that here as it worked well for my heavier bias fabric.

The bias is clipped and pressed into a curve.

The first bias strip is sewn on one side following the thread marking of the innermost petal. Then another strip is sewn to the other side overlapping the top and bottom points and following the thread marking. A second set of strips is sewn leaving 1/2 inch of the first strip showing. On this petal I've sewn a strip on the left side, then on the right, then again on the left, and next will sew on the right. I continue that until the entire piece of fabric is covered. Some strips will only be partial.


The lining is pinned to the front and the excess bias trimmed.


The petal and its lining are sewn around the outside edge leaving an opening for turning right sides out.

The thread marking is removed from petal but left on the lining.

The petal is turned right sides out and the opening stitched closed by hand.

The thread marking that was left on the lining is now used as the mark to stitch through to the front side. This will make the petal overlapping easy.
.jpg)

As I've mentioned before, my mid-weight linen and cotton blend bias created enough bulk at the petal point that even with careful trimming the point could not be ...well....pointed. So I had to cut through the entire tip to allow the fabric to lay smoothly. My cure was to sew the blunt tip to the edge of the sleeve puff band and cover it with a fabric ball.

With the three petals finished for the right shoulder I can now begin the petals for the left shoulder. I followed the same process but began to sew my strips on the right side of the petal first and then overlapping with the left side. The opposite way I sewed the bias for the other shoulder. Would anyone ever notice that? Probably not. But it just seemed like the right thing to do and so....here it is.

And then there were six petals finished!


15. Applying Petals to Caps
The petals are pinned with the center petal on top and overlapping at the thread marks at the front and back petals.


The pattern template is placed on the Spencer with a mark for #1, #2, the natural shoulder, #3, and #4. These numbers will correspond with the numbers on the petal patterns.


The petals are gently stitched to each other where they overlap at the upper edge and then tacked to the sleeve seam.


The petal points are tacked to the band seam above the area indicated on the pattern. The fabric balls are stitched over the petal point through the sleeve band.


Certain Sundries Hamilton Spencer Sew-a-long
Can you believe it! The Hamilton Spencer is finished!! And we need some finished photos of the Hamilton Spencer being worn! But before I do that I want to tell you about Maeri of Certain Sundries. Maeri hosted a Hamilton Spencer Sew-a-long and although I was only able to attend a few sessions, some beautiful Hamilton Spencers came out of that group.


Maeri made a gorgeous tone on tone with a hand dyed velvet and short sleeves.

Claire also made an incredible tone on tone with long sleeves.

Jen was using the most beautiful combination of amethyst brocade with a lighter color for her embellishments.

Julia used a rich color and fabric for her tone on tone.

The Costume Industry Coalition has been sharing creations from this pattern on their Instagram page @costumeindustrycoalition. Although this same pattern is used, every creation is so unique!
The Finished Hamilton Spencer and an Historical Find
And here is my finished version on the dressform.


Although this is a modern pattern the silhouette and pattern pieces are very like an historical garment. The embellishments also have their roots in history. From the Metropolitan Museum of Art, an 1820 Spencer, with rouleaux, double cord, and lattice with bows on the sleeves.


The Hat
When I purchased the white embroidered linen used for my Regency gown I purchased a hat made by the same costumer. I've used this hat for several costumes changing the embellishments to coordinate with the costume. I had a bit of rouleaux left over from the Hamilton Spencer project and using it with some braiding and single rouleaux, and some more fabric balls, I created this hat.


Wearing The Hamilton Spencer
.png)


With the red silk skirt and the stays made with the gifted fabric also used for The Hamilton Spencer:


And in the style of Paul Tazewell's illustration:


Thank you for joining me on this journey!
Hugs,
Jeanette
The Historical Sew Monthly - 2022
The Challenge: June: At the Museum: Be inspired by the items and research available in museums and archives.
A modern pattern developed and offered as a fundraiser by the Costume Industry Coalition during the World Health Crisis. The double piping, rouleaux, and sleeve motif are directly inspired by an 1820 Spencer at the Metropolitan Museum of Art. The link is in the blog post and video.
Material: Linen, rayon lining, cotton bias
Pattern: Hamilton Spencer by Costume Industry Coalition
Year: 1820
Notions: Linen canvas interlining, tailor's tape, cotton cord
How historically accurate is it? The pattern and embellishment are very historically influenced. The fabrics and sewing methods are modern or self-determined.
Hours to complete: 168 hours
First worn: Only for photos
Total cost: $27


No comments:
Post a Comment