Sunday, June 2, 2019

Historical Sew Monthly 2019 - May - Florals

Historical Sew Monthly
May 2019
Florals:  Create an item that features flowers in some way.
The Dreamstress


Imagine that in the 18th century a young lady, or even a young girl maybe even 5 or 6 years old, might have been started on her sewing journey  She might have sat with her hoop, a square of linen, some scraps of ribbon and thread and created her first project.  She may have practiced on scraps of fabric for many days before and now she will create something special just for herself.  Her mother would be sure that any mistakes would be hidden from the world to keep budding confidence high and so a pocket would be a perfect.  Personal, used daily, something of which to be proud.

With that image in mind I embark on my 18th century sewing journey.  Something simple while learning the basics of handstitching a complete project, something beautiful, and something useful.  And something I, too, can keep hidden from the world.

My question was this:  Was ribbon embroidery a form of embellishment in the 18th century?  The answer is yes with my first find, a baby bodice from the RISD Museum 1790.


And this Woman's Stomacher from the LACMA Collections 1775.


Feeling confident that I am on an historical path I begin.  Using the pocket pattern from Simplicity 3635 I begin my first 18th century project.


I find online a sample of a monogram using Jasmine flowers surrounding the J and Mallow flowers surrounding the M.  Also online is a supplier of silk ribbon in 4mm widths perfect for ribbon embroidery.  I create my color choices and practice a bit with some polyester ribbon.


There is a wealth of information online for stitch instruction both in verbal and visual form.  While I may not have a mother sitting beside me guiding my hand, I have the online community with me at my beck and call.  Such a wonderful time we live in!


I trace my monogram onto an ivory linen fabric.


And within hours I have learned the twisted straight stitch and twisted stem stitch for the initials, a straight stitch, ribbon stitch, and French knot for the flowers and leaves.  By mistake I've also learned the pierced loop stitch which I rather love.  Sometimes our mistakes are our best teachers!


J is for Jasmine

M is for Mallow

I learn the basic backstitch while encasing the pocket opening in bias binding.


Needing some confirmation of my stitching I post this photo to the 18th Century Sewing group on facebook and receive some great tips and feedback on my progress.  When it comes to the online community, we are never alone unless we choose to be!


This is the back side of the backstitching...


...and this is the front side in the bias binding.


The bias binding is placed around the entire outside of the pocket front and back, the upper band is sewn on, and a length of tape is strung through the top to be tied around the waist.  The pocket is finished and ready to carry the essentials of daily life.  I'm pleased to have made this with all historical techniques and fabrics as close as possible in this time and ready to continue down this 18th century creative path.


Historical Sew Monthly

The Challenge:  Florals
What the item is:  18th century silk ribbon embroidered pocket
How it fits the Challenge:  Silk ribbon embroidered flowers with each flower representing the initial.
Material:  Linen, silk ribbon
Pattern:  Simplicity 3635
Year:  18th Century
Notions:  Thread, tape
How historically accurate is it?  This is where I feel a sense of accomplishment.  While I strive for an historical impression in much of my work, it is difficult to feel I have reached the goal of historical accuracy due to fabric and time constraints.  With this small project I can say that from the fabric to the stitching I have maintained a true accuracy.
Hours to complete:  10 hours
First worn:  Costume College 2019
Total cost:  $10

Saturday, June 1, 2019

Historical Sew Monthly 2019 - April - Upping Your Game

Historical Sew Monthly 2019 - April - Upping Your Game
Make something that really stretches you and
that works on the bits that you tend to rush through or skimp on.
The Dreamstress

Earlier this year I entered the Foundations Revealed Competition 2019 and wrote about it on this post:


While I learned so very much and enjoyed participating, I had stretched myself too thin.  A trip to Chicago was postponed to see the renovation of the Robie House whose art glass windows by Frank Lloyd Wright inspired my creation.  I was so disappointed and actually lost some enthusiasm in the project when that occurred.  Then I had organized and would be teaching three classes for a Victorian Valentine Weekend social and educational event.  Victorian millinery, fans, and parasols are not light subjects and I had not taught them before so it was preparation from the very beginning for classes that would satisfy beginners and experienced costumers.  Attendees had paid for this event and I owed them my very best which meant putting the Competition entry secondary.

But through all of that I did finish an entry and displayed it on my antique early 1900s caged dressform.  I did not place in the Competition.  The makers range from absolute beginners to professionals and there is so much creativity and sharing and learning just by participating.  I was pleased.  But I wasn't satisfied.  I knew I had not stretched myself as I had planned and even though the Competition was over I was determined to finish my dream.

There were items I wanted to enhance on the entry:

1.  Corset:  Revised lacing from standard to fan lacing.
2.  Corset:  Addition of a modesty panel to emphasize the lacing which was inspired by the art glass windows.
3.  Corset:  Addition of a belt and closure.
4.  Corset:  Additional flossing.
5.  Addition of a coordinating petticoat/skirt.
6.  Enhance the level of presentation.

This is the inspiration for my entry:


This is my entry before my enhancements:


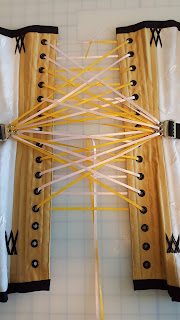
I loved the black flossing on the lower edge of the boning and repeated the same flossing across the upper edge of the corset.  Next step was to learn the fan lacing.  Sliders, the ingenious apparatus in the center of the corset in the following photo, were patented by Samuel Camp in 1921.  The fan lacing method can also be completed by attaching the lacing to a fixed side piece.  Both methods then allow the lacing to be threaded through the grommets and guided to the sides of the body where they become a belt.  This is then tightened all at once by the wearer.  It is an incredible idea!!  Although my corset is representative of early Edwardian, 1908, much earlier than Samuel Camp's patent, there is evidence of fan lacing on corsets in the Symington Collection  Those corsets use the fixed side piece I mentioned earlier.  With the guidance of an online tutorial in Foundations Revealed I practiced fan lacing using two different colors of ribbon so that I can easily see the method.


With the fan lacing practice complete I add the foundation belt and place the corset on the dressform.  I add the gold silk fabric I intend to use for my modesty panel.  The fan lacing works!  I'm so stunned by this method!!  A little tug on the side belt and the lacing smoothly tightens.  It's amazing!!


To make this more of a complete look I've designed a petticoat using black cotton overlaid with the same white embroidered organza I used over the corset coutil.  I want to highlight the hip pads in this revision as they were completely under the corset in the original entry.  The hip pads and bust pads were made from the same gold silk as the back of the corset and it's a beautiful third color.  It also matches the vintage belt buckle I've won on auction and the antique embroidered velvet ribbon I will use over the functional belt..


With the petticoat finished it is time to complete the corset with the black fan lacing.


I've put a year into the thought, research, design, and creation of this entry.  While I didn't have the time to create my original dream, I loved the display of the 1908 recreated corset on the antique caged dressform.  These new design elements have made the creation decidedly more modern and I need to revise my presentation as well.  The only other option I have is my standard dressform.


In an etsy online shop I discover a pattern to cover the dressform and think that would be a beautiful way to make changes for any costume or corset I create.  Time to up my game with my dressform!  An inexpensive online pattern and $1.50 for fabric with the correct stretch is a perfect way to do this.


In a few hours there is a complete transformation!


Now is the time to assemble everything into the entry I had envisioned so many months ago.  Please enjoy my revised Foundations Revealed Competion 2019 entry in the second of five levels - Apprentice.


Historical Sew Monthly

The Challenge: Upping Your Game
What the item is: Early Edwardian corset and petticoat.
How it fits the challenge: The corset was created for the Foundations Revealed 2019 Competition in February. Since then I have learned fan lacing which is exhibited on corsets in the Symington Collection from 1911 although I used sliders patented by Samuel Camp in 1921. I added a modesty panel to highlight the black fan lacing. I also added the petticoat which is cotton overlaid with the same organza used in the corset. I had flossed the lower boning edges previously and added the same flossing to the upper edges. The hip and bust pads were part of the original corset creation but I'm displaying them differently here for visual emphasis. The front organza trim is reflective of the corset garters that would be worn on this corset and I've used them to lift the front edge of the petticoat to display the layers beneath. One of the things that I tend to skimp on is display of my finished creations. For this Challenge I made a cover for my adjustable dressform and added the leaf embellishments. I also added a vintage buckle with antique embroidered ribbon I've been saving for years.
Material: Coutil, silk, organza, cotton.
Pattern: Truly Victorian TVE01 1903 Edwardian Corset and Edwardian Rose Antique Patterns 1903 Ladies' Petticoat
Year: 1903
Notions: Steel corset boning and busk, channel tape, grommets, embroidery floss, thread, poly fill for hip and bust pads, vintage buckle, antique embroidered velvet ribbon.
How historically accurate is it? All technique and pattern detail is historical. The display tends toward a more modern appearance.
Hours to complete: Heavens!! I've lost count!! I've been working on this since last summer!!
First worn: Somewhere In Time Event October 2019
Total cost: $325