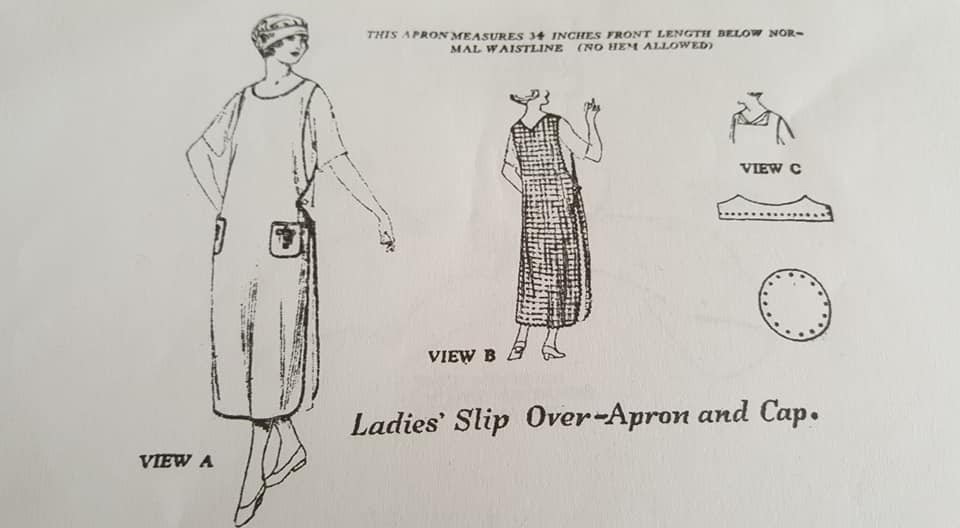
It's been a dream of mine to create aprons from many decades. For no reason. I don't wear aprons but I remember my grandmother who was born in 1897 always, always, wearing an apron. Nothing fancy but she cooked on a wood stove and had 13 children and I imagine an apron came in very handy. When I found this 1924 Apron and Cap from Repeated Originals on Etsy I immediately purchased the downloadable pattern.
Then I printed it, cut it for assembly, found a twin size sheet that had been on the guest room beds in a previous home, and immediately moved on to another project. That happens sometimes, doesn't it?
And here I am many years later with a project that is perfect for this apron and cap. I locate all my stashed items and it's time to sew this little beauty. The February 2020 Historical Sew Monthly Challenge (we can do any of the 12 Challenges in any order) is called Re-Use: Use thrifted materials or old garments or bedlinen to make a new garment. Mend, re-shape or re-trim, an existing garment to prolong its life. My 1924 apron and cap will be perfect for this Challenge and my project!
The downloadable pattern is easy to assemble. Every piece is shown on a scaled diagram and the pieces line up easily and perfectly.
In a few minutes the pieces are assembled and cut.
The sheet is cut for front, back, pockets, and the crown and band for the cap.
Quite a few years ago I purchased some items from an historical costumer in a facebook destash group. If you have read any of my other blog posts you have read that I'm a huge fan of these groups for buying, selling, and trading unused items. When I received my package with my purchase the costumer had included two beautiful embellishments. They were mirror images and I had set them aside for the cap for this project. I was going to remove the pearls but just didn't have the heart. I'm so glad I didn't and I'll tell you about that later. I had bias tape for the edges and while not very elegant or colorful, it was in my stash and would work well.
Other notions included thread and snaps for the cap. I had two unique and matching mother of pearl buttons in my stash and with the pearls on the embellishment I thought that would blend well and pretty up this otherwise plain apron and cap.
I started with the cap. I always start with the headwear and am not quite sure why. Maybe if it doesn't work I won't waste my time on anything else? I don't know! But starting with the cap I marked all the snap placements. 16 around the crown to attach the band, and 2 for the back of the band.
I was very tempted to simply gather the crown and sew the parts together. But I thought about the purpose of this cap and realized how easy it would be to simply unsnap and wash and starch and iron both pieces. So I stayed true to the 1924 instructions and continued with the snaps.
I hemmed the crown with a narrow hand-sewn hem, machine stitched the sides and lower edges of the band, turned the band right side out, and pressed everything. Then I basted the top edge of the band. Ready for the snaps.
The cotton fabric is light and I decided that sewing snaps through just one layer of the band would not be sturdy enough. But sewing through both layers meant the thread would be visible on the outside of the band. Inspiration hit and I remembered having a few leftover freshwater pearls from a previous project. These would be beautiful to cover the thread on the outside of the band and add a perfect touch with the pearls on the band embellishment and the pearl buttons.
I tried my idea and loved it!
Now to settle in sewing snaps.
As I was sewing snaps I started to realize that the crown diameter seemed small compared to the band height. I tested the fit on my headform and cut 1-1/2" off the band.
I like this better!
With the band height adjusted I again basted the top edge of the band and then sewed the bias binding along the top edge. The fabric was just sandwiched between the bias tape with the shorter edge to the outside. Then I sewed by machine with a zipper foot for a clean edge on the outside of the band knowing that since that was the shorter side I would definitely catch the longer inside edge of the tape. I finished sewing my snaps and pearls to the band.
The cap is complete! Outside of crown and back of band where snaps will meet.
And inside of crown and front of band.
When snapped together, even gathers are created in the crown.
Finished cap underside.
Finished cap front, back, and side. A pretty cap for working in the kitchen, don't you agree?
Now for the apron. This pattern is a sewing tutorial all by itself. The Finishing page explains how to sew a French seam, how to sew snaps, how to finish the edges with bias fabric or bias tape in several methods, and even directions for hand sewn buttonholes. A very inexperienced seamstress could be successful with this pattern.
First step is French seams to attach the front and back at the shoulders.
Using the same method for binding the upper edge of the cap band I added bias tape to all edges of the apron and the pockets. The pockets are sewn to the apron where they seemed natural for me. Lastly I sewed two buttonholes on the back sides of the apron and added the pearl buttons to the front.
The 1924 apron and cap are ready to wear!
Time to wear this fun apron and cap in the kitchen.
I hope you enjoyed this little project! Thank you for being here!
Hugs,
Jeanette
Historical Sew Monthly
The Challenge: February - Re-Use
How this fits the Challenge: Made from bedlinen
Material: Cotton
Pattern: Repeated Originals
Year: 1924
Notions: Bias tape, thread, snaps, buttons
How historically accurate is it? Created from an historical pattern with period appropriate techniques as outlined in the pattern.
Hours to complete: 5 hours
First worn: This past week to create a video
Total cost: Bias tape $4.50, snaps, $1.50, thread. Under $7.00 total.
.jpg)