.jpg)

A Modern Sutler Parasol Gets an Historical Impression
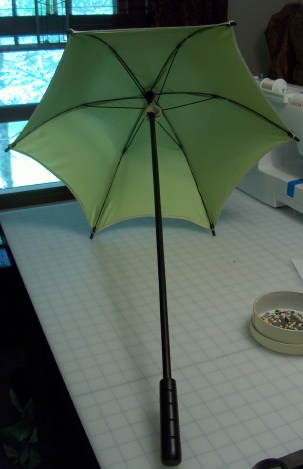
Here's the sutler parasol. It's inexpensive, wood handled,
silver-toned ribs, nylon covered, with plastic tips and ferrule. It's
32-1/2" long, with 14" ribs. These parasols can be found by searching any costume online retailer and come in ivory, white, pink, or black wood handles and canopy.


The ferrule is just glued on and comes off easily with a
twist. Then the glue just peels off.

The tips and cover come off as one piece. Hold onto the rib with one hand, the rib tip with another, and gently pull the rib tip off the rib.


The cover will be stitched to the rib near the rib support.
Cut the stitches and then the cover will slide off the end where you removed
the ferrule.


The entire rib frame will probably be held in place with a
single nail. I used a screwdriver to pry under the nail head to loosen and then
pulled it out with a pliers. Remember to save all the parts for later!

So now it's completely destroyed! Time to paint. The appropriate colors for this era would be gloss black, ivory,
or gold. So I'll need some steel wool and paint thinner to rough up and clean
the plastic parts so they will accept paint, and a good lacquer spray paint.

Remove all your rib tips from the parasol cover by clipping
the stitches. Pay attention to how they were sewn on so you can sew them onto
your new cover the same way.

Painting
Now on to painting and making this destroyed parasol back into something beautiful. After looking through my 1879 Peterson's, I decided to paint my handle and the mechanism a dark color. I found some satin black in the paint stash so that is what I'll use and I'll probably "antique" it when I'm finished with a little sanding.
Gather some steel wool or sandpaper, paint thinner, your spray paint, some paper towels or rags, some small nails that the rib tips and ferrule can stand on and some old cardboard. Place everything in an area where you can work on the project from all sides so you don't have to move anything.

Sand the plastic parts lightly with the steel wool or sandpaper to give the paint something to bite into, then clean everything with some steel wool or rag dipped in the paint thinner.

Stand the rib mechanism in a teepee and the rib tips and ferrule on your nails. Allow everything to dry for a few minutes while you shake the paint.

Then spraying in very short bursts work your way all around giving everything a light coat. Don't worry about making sure everything is covered because we'll put on another coat later.

Now we'll let this coat dry and add another according to the paint's directions. The destruction and the painting has taken about half an hour.
Covering The Canopy
There is a lot of pressure on the parasol fabric so find
something that will hold up to that pressure and has no stretch. Silk, silk
satin, Kona cotton, cotton twill, linen, or eyelet. If you want a sheer or lace
parasol, use an organza or organdy base. 1-1/2 yards of fabric will work for
most basic parasols of this size but if you are going to make ruffles from the
same fabric which are cut selvedge to selvedge, you may need as much as 3
yards.
A ruffle of 1-1/2 to 2 times the circumference looks nice. If you desire knife pleats you will need 3 times the circumference.
This is where I found some great information about pleats: http://www.elizabethancostume.net/pleats/
A ruffle of 1-1/2 to 2 times the circumference looks nice. If you desire knife pleats you will need 3 times the circumference.
This is where I found some great information about pleats: http://www.elizabethancostume.net/pleats/

Fold the piece in half and place the folded edge on a folded
edge of the paper or pattern saver you will use for your pattern. I did this on
the ironing board because I could stick the pins straight down to get the best
duplicate.

Trace your original piece onto the paper/pattern saver. Extend the top point about 1/2" and add about 1/4" for the bottom hem. Remove the pins, and cut out your new pattern.


Draw a grainline on your new pattern where the piece folded
in half. Cut 6 panels from your fabric with the grainline parallel to the
selvedge (finished edge) of the fabric. This is the strongest direction of the
fabric and will put the edges of each panel on a slight bias so they can fit
over the curved rib of the parasol.

Also cut a 2" circle and a 3" by 6" strip.

Hem the bottom of each of the 6 panels.

Like the fabric, the seams on a parasol take a lot of
pressure. So I've used a "parasol seam". With two panels right sides
together pin lengthwise about 3/4" away from the edge. These pins will
stay in while you are sewing so they need to be clear of the presser foot.

Turn the edge in 1/4" and pin.

Starting at the hemmed edge and working up, sew the seam together about half-way inside the turned edge. The stitches are through 4 layers of fabric for strength and when the seam is pressed to one side there is no need for a further finished edge.

Sew all 6 panels together using the "parasol seam"
and sewing from the hemmed edge upward. I made two sets of three panels and
then sewed the two sets together.

Now for a test fit. Assemble the handle and rib mechanism
together with the original nail. There might have been a small plastic ring
that came off when you took off the rib mechanism. That was there so that the
parasol would not overextend itself. You can toss it. Period parasols just had
a small nail with a head for this purpose. I didn't use anything for the test
fit.
Attach the rib tips to the cover with safety pins through the hem of the cover and the hole of the rib tip.

Slide the cover over the top of the parasol. Position the rib tips over the ribs. Gently start to raise the cover. This part was nerve-wracking! I was prepared to duck in case the whole thing flew apart! But it didn't!! So I'm just thrilled to get it this far!

The most difficult thing at this point was squashing the
desire to machine sew the trims on the cover before attaching it to the frame.
But it can't be done! The parasol has to be completely open and locked and all embellishments hand sewn in place. Close your parasol, remove your new cover and continue.
Reassembling
This picture shows the small rubber or plastic piece that
you removed when you disassembled the parasol. It is so that the parasol
doesn't overextend. Period parasols had a small nail with a head and that is
what I used and you see on the right side of the picture. Reattach the rib
mechanism to the handle with the original nail.

Now it's time to press everything. Not just so it looks good but because pressing actually sets the stitches so that they become part of the fabric.

Fold the rectangular piece inward 1/2" on each long edge and over 1/2" on one short edge and press.

The 2" circle will be the parasol wear piece. It will replace this small plastic piece that was on the original parasol. This will be placed over the top of the parasol before you put on your cover and protect your cover from the rib mechanism. You can pink the edge.

Then sew your rib tips onto the cover. I turned the corner
in a bit, made a few locking stitches, and then put the needle through the hem,
through the rib tip, and through the hem on the other side. Then brought the
needle back and repeated for six stitches, then made a locking stitch to
finish.

Slide the parasol wear piece over the top of the parasol.
Slide the cover on inside out. Stitch with a gathering stitch about 1/4"
from the opening in the cover, pull tight, cut the needle off the thread, and
loop the threads around the fabric in different directions, knot and cut thread.

Drop the cover over the ribs and adjust so that your seams
line up with the ribs. Slide the rib tips on each rib. About 1" down from
where the rib supports meet the ribs place a few loose stitches to catch the
rib sewing only through the parasol seam.

To protect m'lady's gloves from getting caught in the parasol slide, take your rectangular piece and loop it and pin it and slide it over the handle. Gather the bottom edge and pull tight. Whip stitch the side opening. Gather the top edge going over a rib every few stitches. Pull tight and knot off.


You did it! Your parasol has new paint, a new cover, historically accurate touches and is beautiful!

If you are like me, the fun is just beginning with embellishments! I pleated some trim for the outer edge, added a lace edge on the inside rather than a full lining, a tassle topper, and a lace closure with button and buttonhole. Yes, hand sewn so the stitches wouldn't pop as the parasol is opened.


The end result is a parasol that will shade you while bringing beauty to your historical costume!


Enjoy your parasol journey!
Love always,
Jeanette


