.jpg)

First there was an inspiration. A 1996 Hallmark Holiday Homecoming Collectors Series Holiday Traditions Barbie.

As the cover says "arriving home for the holidays dressed in her finest traveling attire, featuring a plum-colored jacket over a full skirt, and a velvety wide-brimmed hat embellished with a glamorous feather."

Hoping to travel to visit friends for the holidays I created a plan to bring the Victorian Barbie to life.

The Plan Blog Post: http://theperfecttouchvictorian.blogspot.com/2021/11/bringing-victorian-barbie-to-life-plan.html
The Plan YouTube Video: https://www.youtube.com/watch?v=AVUuXQtvN_A

Then I made the "velvety wide-brimmed hat embellished with a glamorous feather".

The Hat Blog Post: http://theperfecttouchvictorian.blogspot.com/2021/12/bringing-victorian-barbie-to-life-hat.html
The Hat YouTube Video: https://www.youtube.com/watch?v=rMK8rkWFSog

Next, the "full skirt".

The Skirt Blog Post: https://theperfecttouchvictorian.blogspot.com/2022/01/bringing-victorian-barbie-to-life-skirt.html
The Skirt YouTube Video: https://www.youtube.com/watch?v=4RO8cTgaXE0
I'll share links to the blog posts and videos for The Plan, The Hat, and The Skirt.

And now for the last piece to bring a Victorian Barbie to life - the "plum-colored jacket".
I'll be using the same silk velvet I used for the hat...

and the mauve satin I used for the underlayer of the skirt.

The pattern is a bit different than the jacket our Barbie wears. Her jacket has the large puffed leg-o-mutton sleeve with a straight hem and center back closing. I'll be using a pattern I've used before with a wide sleeve, scalloped hem, stand-up or fold down scalloped collar, and double-breasted front closing. The pattern is Wearing History 1007 Sophie - 1899 French Jacket in bust sizes from 30" to 46".
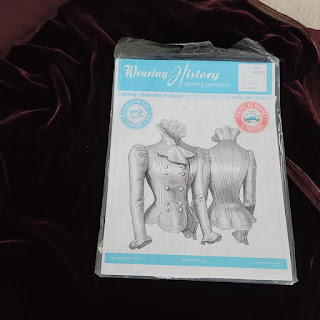
I originally purchased this pattern in pdf format.

On the Wearing History blog are links to several tutorials with specifics on creating the collar and the link to a vlog about this pattern. Link provided: https://wearinghistoryblog.com/category/tutorials/sophie-1899-jacket/
The pattern was taken from an original historic pattern from La Mode Illustree, an example shown here, which were a work of chaotic art.

Photo Credit: http://www.french-crea-vintage.com/23111-large_default/patrons-de-la-mode-illustree-1910-n26.jpg
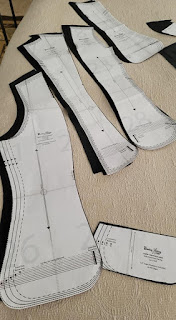
The Wearing History pattern has had seam allowances, markings, and detailed instructions added. When I first made a jacket from this pattern I made a mock-up.

For the collar and cuffs I used a matelasse fabric and carefully positioned the fabric design for each collar piece.
I had three vintage embellishments and hand stitched them to the back and sleeves of the jacket.


The finished jacket was a wonderful piece with the matelasse fabric skirt which also had another coordinating jacket and ballgown bodice.


Having already made this jacket and loving it is definitely a time saver. Having already purchased the pattern and made the mock-up is definitely a money and time saver. So I'm excited to make the 1899 French Jacket in my plum-colored silk velvet.
But.......there is a new problem! The silk velvet of today does not behave like the silk velvets of 1899. Modern silk velvet can be very flimsy, drapey, and even see-through. My velvet, while the perfect color, is all of that. So I set out to learn about modern silk velvet from every source I could find.


An article by Threads Magazine:

And a workshop in Foundations Revealed, an online resource with membership options:

I learn that my modern silk velvet may behave differently with the addition of fusible interfacing. I test a piece of fusible interfacing I have on hand to insure that the process works with my fabric. The result is promising!


As recommended by the Foundations Revealed mentor during the workshop, research and training, I am using a Pellon Specialty Apparel Interfacing SF101 Shape-Flex Fusible with a 100% woven cotton base.


Since there is no shrinkage of the interfacing I decide to cut my interfacing first from the pattern pieces.
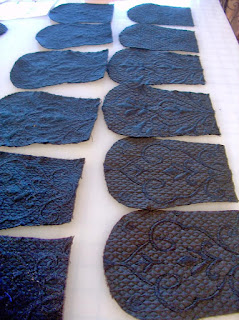
All 37 pieces cut from interfacing:

Pieces for the main body:
Sleeves and cuffs:

Hem facing pieces:
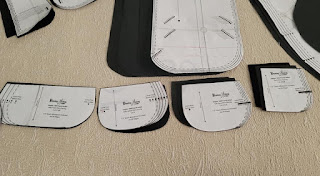
I take care to cut the interfacing correctly for the glue side and non-glue side:

Then I lay the interfacing piece glue side to the wrong side of the fabric following the required grainline.
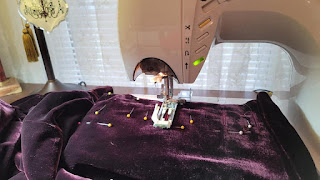
The interfacing is pinned to the velvet.

Each piece is roughly cut from the velvet.

I now have 37 pattern pieces to fuse.

I begin fusing the smaller pieces with the Velvaboard, the damp press cloth, and the iron. The velvet is laid face down on the Velvaboard, the press cloth sprayed with water, and the heated iron held over an area for 15 seconds. The iron is held close to the press cloth but there is no pressure from the iron. I smooth the interfacing to the fabric by hand to insure adhesion of the melted glue.

After the piece has cooled in place I check for full adhesion and repeat the process if and where necessary. Then I can cut away the excess velvet and the piece is now ready for sewing. A note here: this fusible interfacing is also safe for the sewing machine.


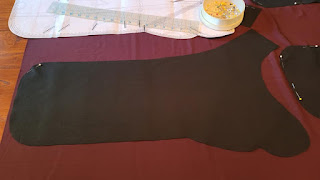
To handle the larger pieces I cover my ironing board with a piece of velvet. Since there is no pressure from the iron there is no damage to the pile of the velvet being fused or the velvet on the ironing board.

I keep my pattern pieces pinned to the fabric piece to keep everything organized until needed. Facings pieces ready for sewing:


Sleeve pieces ready for sewing:

Main body pieces ready for sewing:

Pattern markings transferred using a chalk pencil.

With a beautifully handling silk velvet, all 37 pieces are now ready to create the 1899 French Jacket.

A beautifully coordinating color thread ordered online.

New project, new needle.

I've covered my pressing ham with velvet to avoid crushing the pile when pressing the sewn seam. I'm also very careful to use only the tip of the iron to press a seam open and do that from the inside only. I'm generous with my clipping and notching to allow the curves to fall gently in place.


This is a photo before I join the fronts and back so that you can see the upper dart on the fronts, and the seams for the fronts and back. The jacket has a lot of curve built into the pattern and it is a lovely silhouette.


The jacket can be constructed with or without a full lining. Since I will be wearing this as a jacket over a blouse I decide to use a full lining of the same satin as the underlayer of the skirt. I cut all pattern pieces from the mid-weight satin.

I begin by pinning the center back.

When I'm sewing with velvet I am very generous with pinning. I find it helps keep the velvet from moving around and it slows my sewing because I remove the pins as I sew. I staged this photo for you to show the difference in my pinning of the center back of the velvet outer layer and the satin inner layer.

The lining fronts and back are sewn, clipped, notched, and seams pressed.


The lining sides are sewn together and the main body lining is ready. The outer sides are sewn together and are also ready.


Time to assemble the collar. I have taken a short course in collar preparation during a Costume On virtual weekend. I review my instructions and materials.

I have a very light weight but supportive apparel non-fusible interfacing, an Italian linen lightweight canvas interlining, and 3/16 cotton edge tape. I want my collar to be softly standing and I test a sample of my two options.

I decide to add the non-fusible light interfacing to what will be the underside of the collar. It will provide a bit more support but will not require pad stitching which will be visible on the velvet and I dont want that to show if the collar is worn up or down. I cut the interfacing directly from the pattern pieces and will sew it with the seams. I sew the collar pieces together for both the upper and under collar sections just to the beginning of the curve as indicated on the pattern pieces. Seam stitching is pressed and then pressed open.


When the collar is turned right side out there will be a gentle scalloped edge.

Repeat the process for the all sections of the collar. Pin the seam allowances away from the section you will sew. Begin sewing from the stitching made by the straight seam, follow the curve, and end at the stitching made by the straight seam on the other side of the curve.


To help me create the curved stitching I marked the seam allowance with a chalk pencil and followed that mark.


Then I pressed the stitching, graded the seam allowances, and clipped and notched until I had a smooth outer edge to the collar.


The collar is turned and the lower edge basted inside the seam allowance.

The lapels of the jacket front also follow the scalloped design. I line the area to the roll line with the light weight interfacing and pad stitch. The underside of the lapel will not show and I'm not concerned about the stitches showing but I decide not to stitch the tailor's edge tape at the roll line as I do not need a crisp turn.


As with the collar pieces, each piece is sewn to the next only to the mark.

Bias tape is sewn to the upper (unscalloped) edge of the facing.

The hem facing is then positioned to the lower edge of the jacket right sides together. The scallops are sewn in the same way as they were sewn on the collar. The seam is pressed at the stitching, and the seam allowance graded, clipped, and notched.


The facing is turned right side out. There were some scallops where my stitching was not correct to allow the space between scallops to lay smoothly. In those areas I clipped my stitches and corrected the problems by hand. It's true that it is very detailed work but those details are what make this jacket so special!


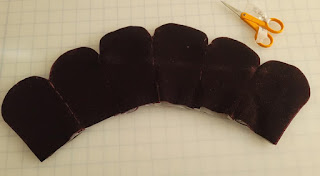
While I'm in the mood for sewing curves and clipping and notching I decide to sew the sleeve cuffs. The cuff is simply two pieces sewn right sides together and the seam allowance stitching pressed then graded, clipped, notched, and turned.


I baste the inner edge of the cuffs and clip generously in preparation for attaching to the sleeve.


As I mentioned before the sleeves are not the large, puffed, leg-o-mutton sleeves. The fullness at the shoulder is created by 5 darts on each upper sleeve and sleeve supports. The dart markings are transferred from the pattern and sewn.


The undersleeve is sewn to the upper sleeve and the seam stitches pressed and clipped.


The cuff is pinned to the sleeve and sewn.


And repeat.


The 5 darts are marked on the satin lining, pinned, and sewn. The inner sleeve seams are sewn and finished.


The linings are slipped into the velvet sleeves. The seam allowance is turned at the wrist and hand sewn over the stitching where the cuff was sewn to the sleeve. The linings and velvet sleeves are aligned and basted between the darts at the underarm. Two rows of gathering stitches are sewn between the darts at the upper arm.


Up to this point the main body and body lining for the jacket are ready. The collar is complete. The hem facing is attached. The sleeves are lined and ready. It's almost time to put the jacket together!


The sleeves are pinned and the gathers are adjusted as necessary. Then both sleeves are sewn to the jacket body.


Progress!


The lining is pinned to the outer body transferring the sewing and cutting marks for the collar notch. The lining is sewn and the seam allowance stitching pressed. The seam is then graded, clipped, notched, and the entire lining and jacket body turned right side out.


I had considered boning the four back seams with spiral boning. Some experimenting showed not much difference with the interfaced velvet and I decided not to bone the jacket. If I change my mind in the future it will be simple to release the lining hem and add boning.

The seam allowance is turned under at the armhole opening and covers the sleeve stitching. Then it is handstitched in place. The lining at the hem facing is also turned under and handstitched to the bias tape at the top of the facing.


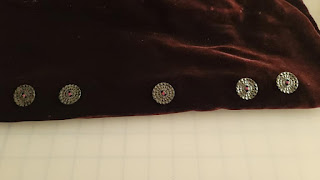
Now it's time for the closures on this double-breasted jacket. The illustration and instructions show two rows of five buttons each. Originally I had planned to cover button blanks with the velvet. Then one day I was scrolling through available buttons on eBay and there they were! The perfect touch! A large handmade beaded button with an eight-pointed star center surrounded by jet black seed beads. The seller is thepinkcaravan on eBay, located in Pennsylvania, and offering free shipping and a discount for my multiple order of 3 buttons. I will need 10 and I order 12 to have that extra button pinned into the inside of the jacket for any emergency.


I practice a machined buttonhole on a fabric scrap. Success!


I mark my buttonhole placement according to the pattern and machine the five buttonholes.


I place a straight pin at the bar ends of the buttonhole and open the buttonhole with a seam ripper. The pin stops the seam ripper from moving beyond the bar.

To relieve stress on the fabric when the jacket is buttoned, I sew the buttons through the shanks and through the holes of a flat button at the back.
With one set of buttons sewn in place I can pin the other row and check for alignment. Then the second set of non-working buttons are sewn on the jacket.

The last item the jacket needs are the sleeve supports. I draft a pattern according to the instructions and cut two buckram and two fabric pieces. The buckram and fabric are folded in half and machine stitched following the curve. The edge is covered with bias tape.


The sleeve support is sewn with the straight edge centered at the armhole shoulder seam and tacked to the sleeve fabric.


This jacket design is for a wide shoulder. The sleeve supports definitely create a beautiful wide line while supporting the interfaced and darted fabric.


When not being worn the sleeve supports can be clipped together at the bias ends to maintain their shape.

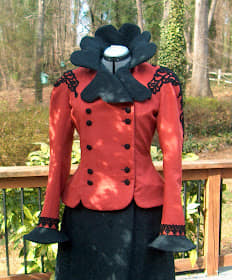
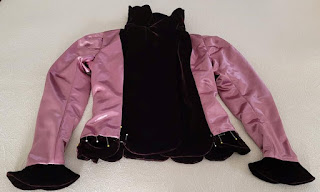
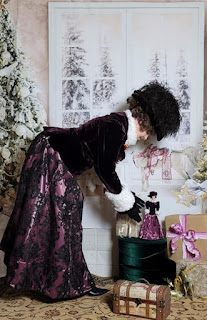
The 1899 French Jacket is complete and ready to wear with the 1898 Walking Skirt. I love the style and color!


The hat, skirt, and now the jacket are ready for their first outing but we are still missing the perfect touches that will bring the Holiday Traditions Barbie to life. First, those fluffy white collar and cuffs.
Years ago I made some stuffed animals in pink and white with a fabric that has soft curly fibers. I cut three pieces to the length and width I determined would most recreate the Barbie look and sewed the fabric by hand. I added 6 layers of apparel batting to the centers of each and tacked the batting in place. I sewed the ends closed and added slip clasps anchored with a satin ribbon sewn through all layers.


The last touch is Barbie's heart pin and ribbon.


I found a puffed heart necklace at a shop in my state and it felt like a special gift just opening the package!


Hugs,
Jeanette
Companion YouTube Video: https://youtu.be/X3EkRMUxufo
Historical Sew Monthly 2022 - Challenge #1
The Challenge: January: Anniversary Choice: It’s the 10th year of the HSM! Go back 10 years and choose any challenge from the 2013 HSF Challenge list, and make something for it! In 2013 we tried to do this fortnightly, so there are 26 options!
From The Historical Sew Fortnightly Challenges 2013:
- #2: UFO – due Jan 28. Let’s get something off our UFO pile! Use this opportunity to finish off something that’s never quite gotten done, or stalled halfway through.
2022 began with a huge UFO - the historical recreation of a Holiday Barbie. The hat was finished. The skirt finished. But unfinished (and with me unmotivated) it was a huge challenge!
Material: Silk velvet
Pattern: Wearing History 1007 Sophie - 1899 French Jacket
Year: 1899
Notions: Woven fusible interfacing, beaded buttons, buckram
How historically accurate is it? To replicate historical silk velvet, all pieces had to be interfaced with a woven fusible interfacing. The pattern is from an historical collection.
Hours to complete: 60 hours
First worn: Only worn for photos but still hoping for a special outing after events begin again.
Total cost: $180 for the silk velvet, $64 for the fusible interfacing, $28 for the beaded buttons = $272


