.jpg)

Previously in A Wicked Witch - The Plan:
http://theperfecttouchvictorian.blogspot.com/2021/01/foundations-revealed-is-online.html

Previously in A Wicked Witch - Part 2 - The Gown:
http://theperfecttouchvictorian.blogspot.com/2021/02/a-wicked-witch-part-2-gown.html


The DeviantArt Artist Sedeptra gave her gracious permission allowing me to recreate her illustration of The Supreme Witch. You have seen The Plan. You have seen The Gown. Now it's time. Time to share my favorite parts of any project: the accessories, the perfect touches.
Brew your tea or your magic potion and I will share details I learned and used to recreate The Hat, The Broom, and we will finish with a touch of The Magic.

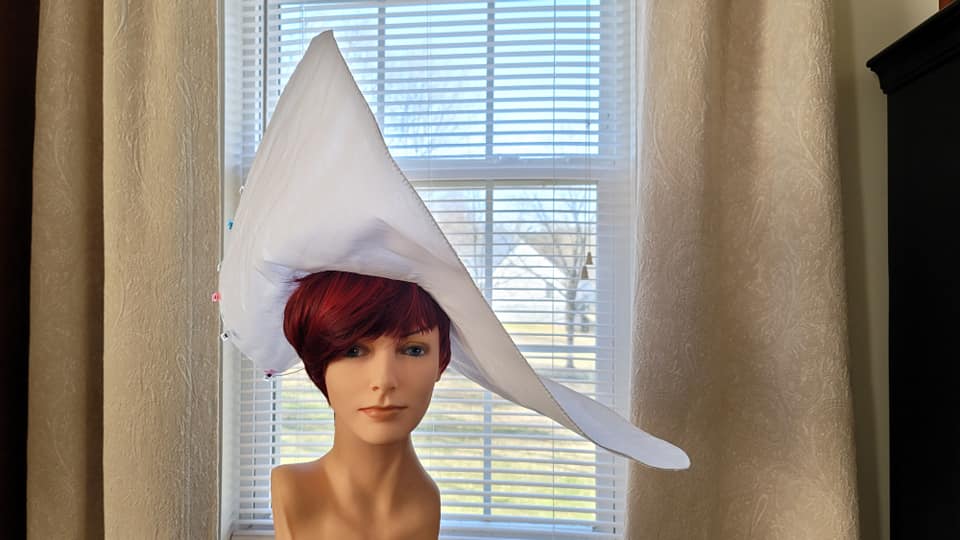
The Hat

That HAT!!! Every costume friend who saw Sedeptra's illustration had the same reaction. The size alone is amazing in both width and height. Such a large luscious confection would mean keeping weight to a minimum and, as you saw in The Plan, I had decided on some basic lightweight supplies to create my version.


I've previously used a Lynn McMasters Out of a Portrait pattern for a Universal Oval Brimmed Straight Sided Crown Hat and knew that this would be a perfect beginning for this creation.

Just as I had used Sedeptra's illustration to determine basic measurements for the gown, I used those same calculations to determine basic measurements for the width and height of the hat.

Using a lightweight buckram from a local fabric store, I cut two pieces of the 24" wide buckram. The pieces were 44" long each and I fused them together with sprayed water and an overnight drying.


The buckram dried quickly but since I had not smoothed it during drying it wrinkled horribly. I wasn't concerned as the design didn't require a smooth surface. Thank goodness! I laid the buckram over the pattern and traced the crown tip and crown side, and the outline for the largest size brim available with the pattern. Then I added my additional width and cut the buckram.

I cut the brim head opening and using my mannequin began to trim the buckram just a little at a time until I had the shape that I felt would work for the upturned side of the hat and to hold all the embellishments on the other side.


To support the curves and embellishments I used a #21 millinery wire around the entire outside edge of the brim, wire where the original brim edge would have been on each side, and a wire to support the embellishment side beginning at the edge and extending around the crown opening and back down to the edge. The crown tip is wired on the outside edge and the crown side is wired at the lower edge.


I'm using a contrast thread, in this case white with the dark fabric, so that I can easily see my seamline when cutting tabs for attaching the crown later.
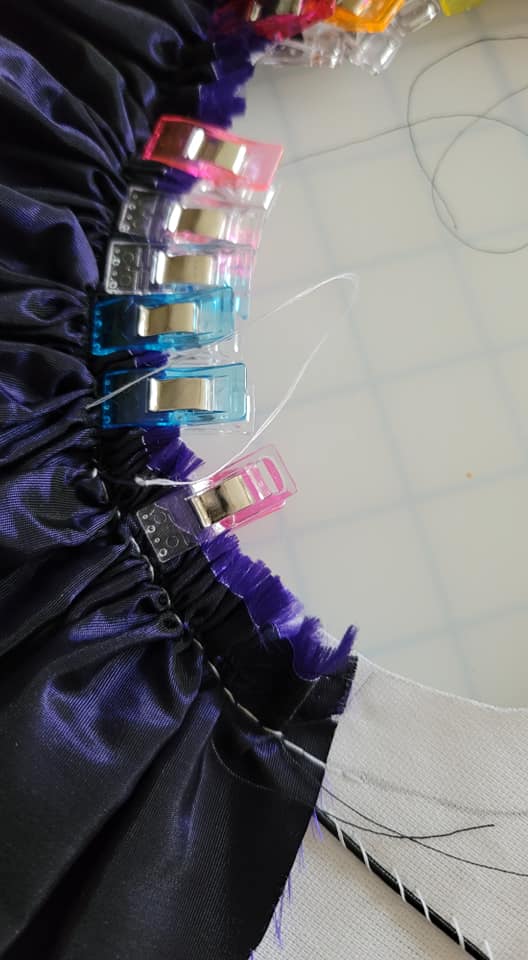


With the under brim finished the smooth upper brim can be basted to the buckram base. This is where the contrast thread helps as now I can see exactly where to stitch at the crown seamline without cutting the crown opening. The outside edge is clipped in place, the crown opening basted, then the outer edge is basted close to the wired edge. And the brim is ready for self fabric bias edging.


Although this hat brim is large and so far I've handstitched everything, I decide to machine sew the first edge of the 2" wide bias binding. I match the brim edge with the binding edge, sew 1/2", then I turn the binding to the upper side, fold the edge under to create a 1/2" band and hand stitch in place.


With a completed brim I can turn to the twisted crown of the hat and the piece I call the spire. A floral foam piece will sit on top of the buckram crown and I lightly cut away pieces to create the turns.


Clearstik Foam Glue will hold my twisted spire pieces in place.


With the brim complete and able to be formed into shape and the crown complete and spire drafted, I can now look at the dimensions of some of the embellishments and make sure that my work so far looks like the illustration before I attach the buckram crown to the brim.

The first thing I will do is cut the hole in the upper brim fabric and cut tabs up to the crown seamline.

The tabs will be bent to the inside of the crown and stitched to the crown. This takes some hand strength and I'm using a strong millinery thread and often need pliers to pull the needle through the layers of buckram and fabric.

And with a lot of stitching and getting poked with pins that are holding the tabs to the crown while I sew I am finally finished! But I'm happy just for a moment as I gaze unbelievably at the mistake I have made. Do you see it? I have sewn the crown to the brim upside down!! What was I thinking?!! Obviously I wasn't and so all the beautiful stitching is cut away. It's a good thing I can laugh at myself!!

Attach crown to brim, Take 2. Much better!


Now back to the spire... I use millinery wire to complete the form that will be the spire curl. Then I create dimension by adding two additional wires which will follow the spire to the buckram crown and then follow the crown sides down to the brim. The wires are held in place with painter's tape.


To reinforce the spire I cut strips of a heavy tulle and wrapped them around the spire. The spire curl is padded with quilt batting and wound with tulle to shape. The tulle will also give me something to stitch to if necessary.


The three wires supporting the spire are long enough to extend down the buckram crown.

Fabric is cut to cover the spire with extra length and width added for the gathers that are created with the ribbon. A single seam is sewn down the side, the cover is placed over the spire, and the spire curl fabric is hand sewn to follow the curl.


Before I attach the spire to the crown I sew a drawstring lining, handstitch it to the brim/crown seam, and add a grosgrain ribbon. The drawstring will allow me to access the interior of the crown for sewing on embellishments and also as a fit adjustment as I'm not quite sure how the hat will sit on my head after I add the additional weight.


The spire covered with the fabric is somewhat adjusted, pinned to keep it out of the way and the wire "legs" are fitted to the buckram crown and sewn on.


The fabric is pulled over the buckram crown, adjusted....

... and lightly tacked to the brim fabric.

Now that there is a basic hat it's time to add the embellishments. There are beaded drops on the under brim, and on the upper brim are books, ivy, roses, parchment scrolls, and burning candles. I've enlarged that portion of the illustration and calculated the size of the different embellishments.

It seems easiest to add the beaded drops to the under brim while the hat is without other embellishments.


I'm using a black chain, AB crystals, and black glass seed beads.

I make a test sample and feel the look reflects the illustration and make the rest. These are stitched through the hat brim. They are fun when they catch the light!


Next I'll tackle the books. They need to be about 4" tall, 3" wide, and 1" thick.

I have foam which I cut to size and glue parchment strips around three sides with the foam glue. This should be very lightweight.

Fabric is cut to create the book cover.

As I test fit the book covers I decide the book needs a little "extra". So I add some quilt batting to the front and sew with contrast thread along the book back to create "spines". I pull all the thread to the inside, knot and cut, and although this took additional time I really love the look!


Before I glue the fabric to the foam, I test if a wax seal will work on my "books". I try my purple wax with my chandelier stamp, I test some purple mixed with silver, and in the end I place a purple wax stamp on all five books. Yes, now there are five. I was sure there were four and one day as I studied the illustration, a fifth book appeared! I don't know how I missed it!! The beautiful part of these books is that they weight almost nothing which is great considering how much embellishment this hat will eventually hold.


This closeup of the book back detail also shows the parchment scrolls and pages. I cut parchment paper to the correct width, set the curl with a sewing clip for a few days, and then tied them to hold their shape.


Now for those glorious candles!

My original plan was to use a battery operated tealight placed in a paper tube and made to look like a melting candle with hot gun glue drops. Then with luck I found the perfect candle! Battery operated, remote controlled, slow or rapid flickers, open from the top to replace the battery, 4" tall candles, perfect for safe candlelight dinners and perfect and safe, too, for A Wicked Witch hat.

They will still require hot glue drips and the leftover paint from my do-it-yourself project of finishing my fireplace is the perfect color.

So I practice my wax drips and my painting while I continue working on the hat.


To add some additional reinforcement to the hat I sew some of the black chain at the points where the additional wire was added.

And I start to layer on a purchased ivy garland and black rose spray, the books, and parchment scrolls and paper.

Once I'm satisfied with the placement I stitch everything in place with a curved needle or with thread that becomes part of the embellishment.


The candles are so lightweight I find they anchor to the hat with the hot glue. What an amazing invention, this hot glue!!

I begin to create the candle drips from the hot glue.

More drips...

... and once dry it is time to paint the drips.

It takes three coats of paint on both the drips on the candle made with the hot glue and where the wax puddles and overflows before I match the candle color.

But all the work is so worthwhile and I love the effect of the candles!

At the curl at the tip of the spire is some beautiful ribbon with beading. I found two Swarovski elements that looked so close to the illustration and added amber crystals and black seed beads to create the beading.

The last piece of embellishment is the ribbon. As you will see in the broom portion of this blog and video, the ribbon I found was the perfect color but wrong width. It was a poly ribbon and had to be cut and melted at the edges but it matched the wax seals exactly which was pure luck.

I make final adjustments to the gathers in the spire fabric and add the ribbon and beading following the illustration.


A Wicked Witch has a finished hat!! Here are photos both outdoors where you can see the color changing fabric, and inside where you can see the fun shape and lit candles.


I love this hat! But after such a detailed project I'm ready for a break and have just the small project to satisfy that break.
The Gloves
The Supreme Witch in Sedeptra's illustration is wearing gloves that appear to be embellished. Of course she would! She is, after all, the Supreme Witch.

I've collected a few white and ivory gloves in varying lengths from yard sales and flea markets. I can always dye these to match my costume and that is what I do here.


After only 15 minutes I can see that my first pair of gloves isn't taking the dye well. I have a Plan B, I usually do because I often make mistakes or have something go wrong along the way, and I throw my Plan B gloves into the dye bath. They aren't exactly the style I wanted but nobody will notice the gloves when I'm wearing that HAT anyway! :)

Look what a difference in color! There must have been some synthetic fiber in the first pair although it felt like cotton, but now I have a nice periwinkle blue pair for a future costume. I still have some applique which I used on the corset and I'll add these mirrored pieces to the top of the gloves.

Some handstitching and the gloves are ready.

The Broom
The final piece in recreating the illustration is that phenomenal broom.

In keeping with the book theme of the hat, the broom appears to be made of parchment scrolls tied with ribbon, ivy, and several pages of paper with writing.

The top of the broom handle is embellished with a beading similar to the beads on the curl of the hat.


The parchment paper was from FineCardstock.com. It had an antique finish and was wide enough for the longest broom rolls and just five sheets was enough for the broom.

Again I used the illustration and calculated the dimensions based on my own height.

The parchment paper had a beautiful stiffness and kept the crisp roll for both the broom and the hat.


I drilled a pilot hole and attached the finial to the dowel and rounded the cut edges with sandpaper. I applied several coats of stain down to where the parchment rolls would fit leaving that area unstained in case it would show through the parchment scrolls. I added the second finial to the bottom of the dowel so that the broom would have something to rest on keeping the parchment paper off the floor or grass. The broomstick is ready to be embellished!


With the broomstick cut and stained and the parchment rolls cut and curled, I gather the rest of the supplies. The purple ribbon that was purchased for both hat and broom, an ivy garland, a piece of brown satin ribbon from my stash, and a picture hanging kit for eyebolts and picture wire to attach everything to the broomstick.


With the broomstick cut and stained and the parchment rolls cut and curled, I gather the rest of the supplies. The purple ribbon that was purchased for both hat and broom, an ivy garland, a piece of brown satin ribbon from my stash, and a picture hanging kit for eyebolts and picture wire to attach everything to the broomstick.

Although I had to cut my ribbon in half lengthwise for the hat, I thought it would be the correct size for the broom. It was not and the smaller width more closely matched the illustration.


The last piece I need for the lower part of the boom are the written pages. Since this story is about a witch, I decide to write the portion of the story from L. Frank Baum's book where Dorothy throws water on and melts the witch. I use the parchment paper and purple ink for my fountain pen.


And both pages are ready to be attached to the broom.


With the addition of ribbon and some beading at the top of the broomstick, the broom is finished!! Again here are photos taken outdoors and inside.


From Part 2 - The Gown
A few photos outdoors of the gown. That purple/black shot faux taffeta is so wonderfully color changing.


And some indoor photos:


The Magic
And Finally, The Hat, The Broom, The Magic! Well, not really magic, but it feels magical to take an artist's imagination and illustration and bring it to life!


But it's difficult to be serious when you are having so much fun!


Thank you for sharing this very long and very fun journey of A Wicked Witch!!
Until the next time...
Hugs,
Jeanette


