.jpg)
“The best laid plans of mice and men often go awry”
~ Robert Burns, To A Mouse
(paraphrased in English)
Celebrated just a bit too soon, didn't I? I've had a dream to recreate the beautiful costume in Manet's 1882 painting, Spring.

I've made the bonnet, gown, and parasol and all that was left were gloves. Easy! Or so I thought. A while back I won a box of gloves at auction. I mean a BOX of gloves. In fact there were so many that I kept a few that fit me and mailed the box to friends who then kept a few for themselves before passing it someone else....and so on. Finally it came back to me and I packed it away. I was sure there would be a pair of gold/yellow gloves in that box and I would adjust for fit or color as needed.
Alas, not one glove was appropriate. I did try to dye a pair of synthetic gloves and while the color was close, the appearance was blotchy. After all the work I had put into this project I just couldn't settle for blotchy. I was so disappointed.
So Plan B. There always has to be a Plan B which sometimes wakes you in the middle of the night whispering in your brain while you are trying to sleep. But it was a good plan!
In my pattern stash was a reprint of Vogue 7708 from 1952 for gloves in 3 lengths, mittens in 2 lengths, and mitts with pointed extension. The pattern is my size, 7-1/2. Some years ago I used some muslin to test the fit. I sewed everything with an outside stitch and remember thinking it was so difficult that I probably would never use the glove pattern again. But here I am, needing this very pattern.
Here is a photo of the pattern and my disastrous attempt at coloring gloves:

To recreate the hat and parasol in the Manet painting I used a silk dupioni from the fabric stash. Although I'm sure the color of the silk is perfect for the gloves, I don't know how to work with a fabric that will fray so badly. I consider a liquid anti-fray solution but decide against that due to the amount of edging required to be treated. I look through my interfacing and find a Pellon brand called Easy-Shaper Fusible Nonwoven Interfacing. It is for light to midweight fabrics - "Dresses, blouses and sportswear keep their soft, supple shape permanently". It's worth a try! I cut all my pieces from the silk on the straight of grain, do the same for the interfacing, and iron. I'm very pleased! The silk has a nice firm feel similar to a soft leather. I believe this will work!

Life is very full during this time and I have very little continuous time to work on this project although that is exactly what I need. Every time I figure something out, I have to leave the project, and then forget what I had already worked out. It is very frustrating and to start with I sew the wrong thumb on the first glove. Silly me!

After a while I get the idea of what is supposed to be happening since I'm sewing everything by hand and from the inside. Here is the right hand glove with the pieces sewn for the insides of the fingers. (one photo with flash and one without flash)


By the time I got to the left hand I was getting a little better and developed an easy way to attach the inside pieces. I'll show those steps here.
 |
| Left hand glove, back of hand, inside piece for ring finger and little finger. |
 |
| Fold inside piece in half, wrong sides together. |
 |
| Open piece and lay on little finger of glove, right sides together, 90 degree point on end of cut edge. Pin. |
 |
| Refold inside piece. |
 |
| Fold the main glove portion so that the right sides are together for the index finger and insert piece. |
 |
| When the ring finger edges are aligned, pin. |
 |
| The pinned insert piece will look like this on the back hand part of the glove. |
 |
| Sew down one edge to the point. |
 |
| Sew down the other edge to the point. |
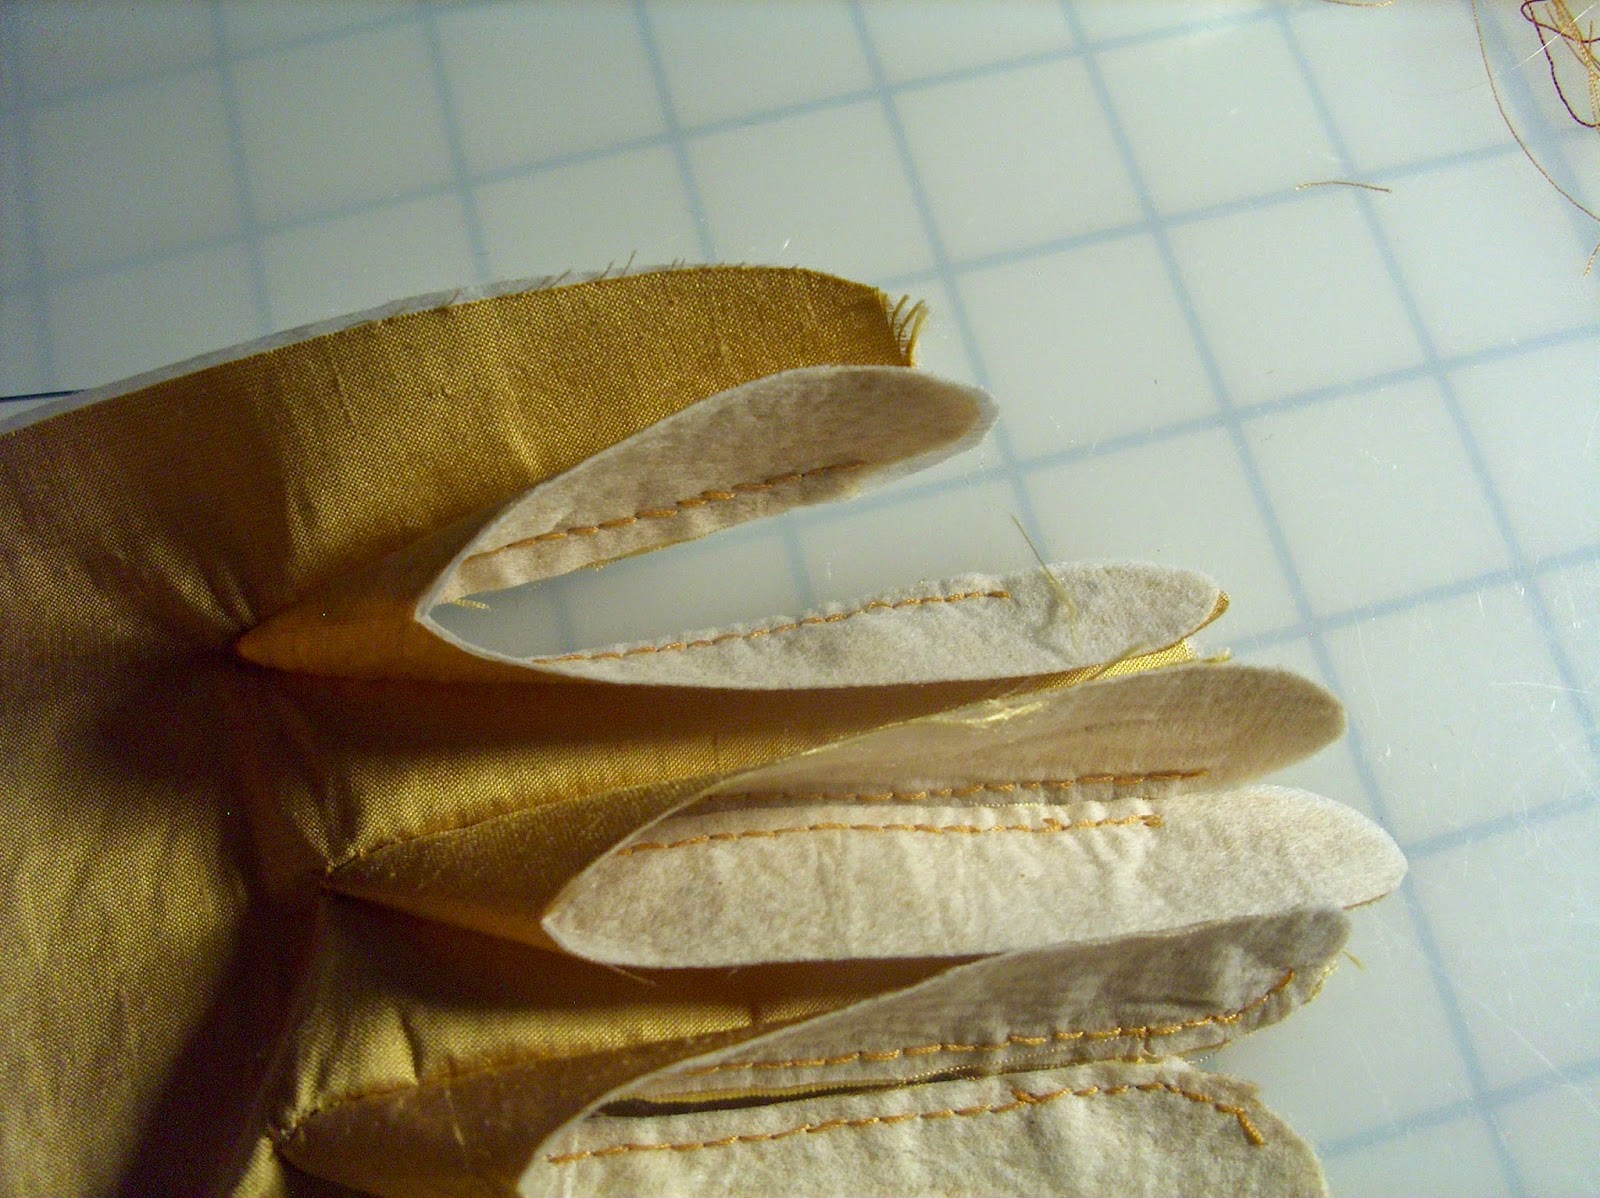 |
| This is the finished insert piece. |
Once all 3 insert pieces are sewn it is much easier to sew all the pieces to create each separate finger. Finally the index finger and long outside edge are sewn and then the glove hemmed. While my new gloves are by no means flawless, I'm super excited that they are finished! They don't fit me perfectly as I have long fingers and the index fingers of the glove are too short. But they are wearable and with a little adjusting I will have my own custom fitted glove pattern. I learned so much and am now well prepared to make another pair, although that won't be any time soon. Haha!

Here they are ready with the other items for the Manet painting photoshoot! Although it is fall and very close to winter I have some wonderful evergreen ivy and holly bushes that will give us a spring background and I look forward to sharing some finished photos with you soon!


Historical Sew Fortnightly
What It Is: Gloves
The Challenge: #21 Re-Do of #17 Yellow
Fabric: Silk dupioni
Pattern: Vogue 7708
Year: 1882
Notions: Nonwoven interfacing
How historically accurate is it? There are references to silk gloves in this time period but the interfacing makes them very non-historical. They are completely hand sewn so that's a plus!
Hours to complete? I didn't even try to track. This was one of the most difficult projects I have done this year. But now that I know what to do I would say you could make these in 4 hours.
First worn: Will be worn for the upcoming Manet painting photoshoot.
Total Cost: Using just 5/8 yard of fabric this pair of gloves would probably also qualify as a Re-Do of Challenge #13 Under $10.
Love always,
Jeanette


