Tuesday, July 15, 2014

Historical Sew Fortnightly - Challenge #13 Under $10

Have a place for every thing,
and keep everything in its proper place.
                                   Rev. Charles A Goodrich
                                                  1790-1862
 
Whether it's time or money spent, a corset is a major investment in an historical wardrobe.  It was probably the same during the appropriate time and a lady would have taken care to keep her corset wearable for a long time.  Four years ago I found this photo on auction for what was called a "corset bag".
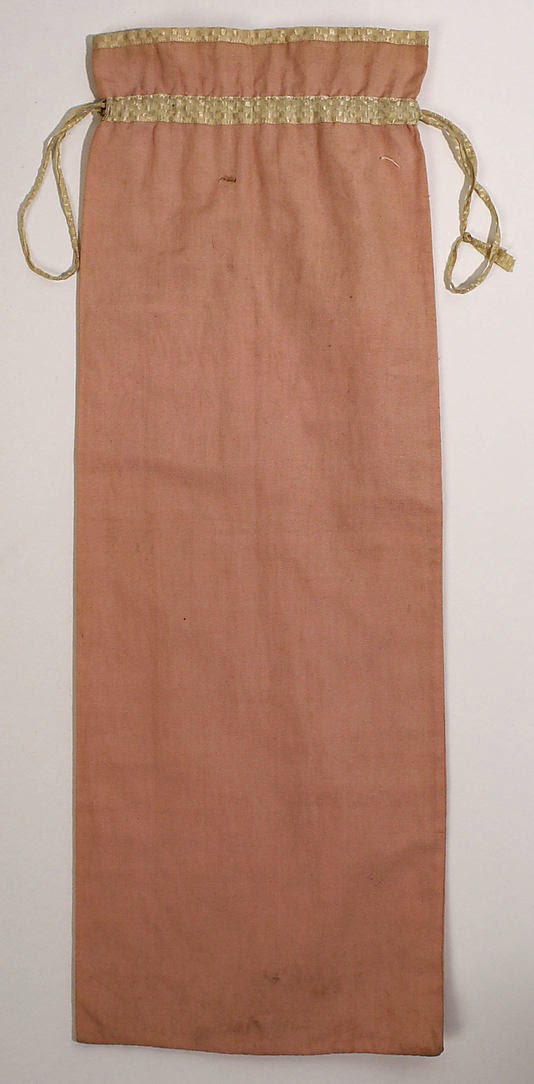
What a practical idea!  Of course a lady might have several corsets and she would want to keep them safe between wearings or have a place to carry them while traveling.  Recently, while researching for a 1910s corset I discovered this article at The Metropolitan Museum of Art:
 
And what a discovery!  Not only a beautiful corset....
...but a pretty matching bag!


For my corset bag I've used scraps left from making the pink/black polka dot underthings earlier this year and some small pieces of lace.  The black/white polka dot ribbon is left over from the corset parasol I made and the small satin rose is the last from a hat I made.  So all these little scraps get a new life!
I want my finished corset bag to be 7" wide and 19" long.  I cut the pink/black cotton the length of the corset plus enough to turn the upper edge inside to create a channel for the ribbon tie.  The width is double the width of the folded corset plus 1/2" seam allowances.  Cut 2 of these pieces.  One will be the outside of the corset bag, and one will be the inside.  My pieces are 15" wide and 22" long.
The lower edge will also have a 1/2" seam allowance and the trim can be attached now so that the unfinished edges will be caught in the seam allowance or it can be added once the bag is complete.  I added some additional lace and decided to attach the trim at the end of the project.
Allow 1/2" seam allowance for the top closure and then measure how far down you want the opening for your closing tie and place marks or pins so that you don't sew that area closed.  Here I've marked the 1/2" seam allowance for the top, 1-1/2" for the portion of the corset bag which will be above the tie closure, and 3/4" for the tie opening.  Now you can sew from the top to your tie opening, skip over the opening, and then sew from the opening down to the bottom.


Sew the second piece of fabric with a 1/2" seam allowance down the full length of the fabric.  Press the seams open, and turn one tube right side out.
Place one tube inside the other so that the right sides are together, aligning the top edges and the long seam.

Sew the top closed with a 1/2" seam allowance.
Press the seam.  Turn the tubes wrong sides together.  Make sure the tie opening is on the outside of the bag.  Sew a row of stitching above and one below the tie opening to create the tie casing.

Press the bag so that the long seam and tie opening are at the center back.  Turn the bottom edges inside 1/2" with right sides together and stitch close to the bottom edge to close the bottom of the bag.  Place your trim on the lower edge turning the raw edges under to create a nice finish and sew the trim to the bag just catching the bag in your trim and covering your bottom stitching.

Thread your ribbon (this is 33" of ribbon) through the casing and knot both ends together.

Add a pretty rose and your bag is finished!


Historical Sew Fortnightly
 
What It Is:  Corset Bag
The Challenge:  #13 Under $10
Fabric:  Cotton
Pattern:  None
Year:  1912
Notions:  Ribbon, lace, satin rosebud, thread
How historically accurate is it?  Verified by The Metropolitan Museum of art corset photo
Hours to complete?  30 minutes
First worn:  Will hold a corset while traveling to Costume College.
Total Cost:  All items left over from other projects but if purchased approximately $6.
 
Can you imagine the beautiful bags that could be made with embroidery, applique, and the assortment of leftover trims in our stash?  I'll definitely be making more of these as Christmas gifts!
 
Love always,
Jeanette
 

Monday, July 14, 2014

1910s Suit-A-Long - The Undies

New era, new undies.  All the costumers say that the difference in making the costume historically pleasing is to recreate the correct underthings.  The shape of the body, the posture, and the support of the outer garments all work together to give the historical impression.  I was very confused trying to find the appropriate underthings for the 1910s because the range of styles and hem lengths seems to vary so much through the decade.  Last year I made this costume from an Ageless Patterns pattern for a Titanic Museum visit.  It was a recreation of a 1915 gown:

This year I followed an historically correct pattern from Past Patterns (with a fun fabric) for a dress documented to 1917:

And now the 1910s suit pattern from Wearing History to recreate a suit similar to the green/white suit in this plate:
The only thing all these items seemed to have in common was a very fitted waist.  As I researched the proper underthings and silhouette I found the proper corset in multiple museum websites and ads but I took my cue from this ad as to what else was needed.
This Bazaar Patterns pattern BP9206 for a 1920s Brassiere & Bloomers would be perfect and will be useful for a 1920s dress I'm making soon.

The Folkwear Edwardian Underthings pattern is wonderful and I used it to make a full set earlier this year.
Because the 1910s Suit-A-Long suit will be worn in August in California at Costume College and I want to protect the corset I just finished, I decide I want a full camisole and will make the Folkwear underthings out of a lightweight ivory linen fabric.  Here are the finished camisole and bloomers.


I've left off the gathered flounces from both the petticoat and bloomers and replaced those with a fine pleated net lace.

This also shortened the bloomers for ease in attaching the garters to the stockings.


The petticoat:

This is the post where I made the Folkwear underthings earlier this year:
 
And this is the post where I made the 1910s corset:
 
Time to start sewing the suit!
 

Love always
Jeanette

Sunday, July 6, 2014

1910s Suit-A-Long - The Hat


I've been so excited to start the 1910s Suit-A-Long with Lauren at Wearing History!  In the last Historical Sew Fortnightly Challenge I made a 1910s corset and am currently sewing the camisole, bloomers, and petticoat.  I have a wonderful blue/green/ivory patterned fabric for the skirt, a very light ivory linen for the jacket,  and then I found this amazing lace in the remnant bin at Mary Jo's Cloth Store. 
These beautiful green flowers are left over from another project but the blue curled feathers and hatband are vintage and a perfect match for the suit.


For some unknown-to-me reason I woke up the other day with this crazy fear that the hat was not going to turn out well.  And without the hat the entire suit couldn't be worn to Costume College.  While I've made hats from both buckram and wire, I've never made a lace hat and I've never made a hat with a hat block.  Maybe that was the basis for my concern, but whatever it was I decided that to put all that to rest I best set everything else aside and make this hat.

The pattern is by Lynn McMasters and has many amazing options.  I've used her patterns before and they fit together beautifully.  This pattern has so many wonderful options for buckram, wire, and a combination of both.

I'm using the pink/black option on the pattern cover which is a combination of buckram crown and wire brim.  The first thing I have to do is create a curved crown tip with a hat block.  Lynn McMasters has information in the pattern on where to purchase a hat block and exactly what to purchase or how to use a shape you may already have from a bowl or other item.  The directions are perfect in how to form the buckram crown tip and how to cut it to fit the sideband.  This is the hat block with a gently curved top and covered with plastic to protect it while the buckram dries to the shape.
Using a 2-ply buckram, the layers have to be separated while wet and set on the form at angles to each other and then pinned to dry.
The next photo shows the cutting line that is created using a reverse cardboard template made from the crown tip pattern.  The instructions are in the pattern.

The directions are also perfect to instruct how to attach the tip to the sideband, attach the millinery wire to the sideband, attach the bias strip or French elastic, and then how to cover the entire crown with mull/flannel.
I had enough ivory flannel for the crown tip but had to switch to white flannel on the sideband.
Since my lace is slightly different than what the pattern calls for I had to alter the directions slightly.  I cut my millinery wire, connected the ends with a wire joiner, and then sprayed it with fabric spray paint so that it would blend in with my color.


I have a base lace for the brim and then an edge trim of braid and lace with small pearls woven through.
Both lace and trim are handstitched over the wire.  The sideband and crown tip lace have an ivory linen lining and the two layers are basted together and then treated as a single layer.
From this point I constructed my hat similar to other hats.  The crown tip lace/lining is attached first, the sideband lace/lining next.  The brim has an opening cut and is attached to the inside of the crown with stitching through the crown the same way you would attach a buckram brim.  I was so fortunate to find a beautiful organza ribbon with ivory stitched edges and with my flowers and feathers I love the light feel of this hat!  And here is my finished hat!  Please click on any image to see a larger version.


Now back to sewing the suit!
Love always,
Jeanette