.jpg)
The Greek philosopher Plato wrote: "our need will be the real creator" which has become the proverb "Necessity is the mother of invention".
.png)
In the world of costuming I believe that "Shortages are the mother of creativity". Whether the shortage is fabric or funds, trims or time, creativity kicks in and often brings forth ideas that would not have occurred if every need were easily met during the process.
.png)
So when Elizabeth offered bundles of limited fabrics and trim and a challenge to create drawstring reticules from the bundle, I jumped in. We could choose in a color range, or a surprise bundle. I decided that being surprised would be extremely fun.
I love reticules and believe they add so much to the impression of a costume as well as being useful if only for something to occupy your hands. I've collected some historical as well as modern reticule patterns.

Regency Rose
My surprise bundle arrives and everything looks so beautiful and interesting!

There are two pieces of silk taffeta in a coordinating antique gold and a stripe with a very muted red, antique gold, and pale blue. There is an inner bag of bits and trims.

The inner bag has bits of different but coordinating fabric and ribbon and trims.

There is a length of blue taffeta, a square of red twill, a bit of red velvet which has been salvaged but the stitches removed and is very usable, and a piece of wide blue satin.

In the trims is a length of pale blue rattail cord, a length of red grosgrain ribbon, a bronze tassel, a length of gold cord, and an ivory gimp trim.

In 2021 I used the Hamilton Spencer pattern offered by the Costume Industry Coalition as a fundraiser for members.

.jpg)


I made a wearable mockup using a linen fabric given to me. The blog post and video are still in edit for this project as I haven't taken finished photos yet. Partly because of my limited mobility with my leg injury, but also because I only have one Regency gown. It's white. And I was thinking of sewing another but Surprise Bundle X has given me an idea. If I make a Regency reticule it will show up beautifully against the white gown and pick up the color in my Spencer. I could also add other colors from the reticule in a coordinating bonnet.

With that plan I choose Vogue Pattern 7221, View D which has the required drawstring closure for the Challenge, but also has a square bottom which I think will work with the fabric bits from my bundle.
.jpg)

I start measuring and brainstorming how to best use the bundle fabric and trims for the reticule I envision.

I finalize a plan but it is going to mean some piecing and trusting my design and I begin by pressing and carefully measuring all fabric and ribbon and trim bits.

The pattern has a front section that wraps half way around the sides, and a back section that does the same. There is a square bottom. By inserting the blue taffeta strip through the center of the blue satin strip I get the width I need for the bottom. The blue taffeta strip can also be overlaid on the antique gold to create some interest.

The lining also creates the portion of the flaps that are visible when the reticule is closed with the drawstring. For the lining I use the red twill fabric which is just enough. For the front and back lining pieces I use narrower sections of the remaining stripe and antique gold taffeta with the blue taffeta strip to create the width I need. The blue taffeta is the same width as on the exterior and bottom sections. To give me the length I need I find some red silk from my own stash.

When I fold down the flaps as they will be when the reticule is closed I'm happy with the interest and variety in the reticule and the way I have stretched the fabric to best use.

This is how the pieces will be sewn to create the square reticule.

The ivory gimp is perfect to cover the edges of the blue taffeta strip on the lining and the exterior.
I hand stitch the gimp in place being careful to have the design running the same way when the flap is turned down.


With the front and back exterior and lining prepared I have just bits of the fabric remaining.

After sewing the side seams for both the exterior and lining, the bottoms are attached.


An opening is left in the lining at the bottom edge to insert the bottom support later.

The lining and exterior are sewn along the upper edges to the openings for the drawstring. Then the assembled reticule is turned through the opening in the lining.

The bottom support is cut from the cardboard back of an empty notepad.

The support is then inserted through the opening left in the lining and the opening sewn closed.


With the remaining fabric I sew a handle. The stripe and antique gold are joined by the blue taffeta repeating the design on the reticule body. The very last bit of ivory gimp covers the center seams. I use the red velvet ribbon bit to create flower petals with the bronze tassel centered to mimic floral stamens.


The seam allowances were stitched to the body at the drawstring openings on both sides to prevent fraying as the drawstrings are pulled open and closed. The handle end is inserted in the opening far enough to be caught securely when the lowest stitching of the drawstring casing is sewn. Two lines of stitching create the drawstring casing.


The blue rattail cord is cut in half. Using a safety pin the cord is inserted through the opening on one side, threaded all the way around the casing, and coming back out the same side. The process is repeated for the other half of the cord through the opening on the opposite side of the reticule. The ends of the same piece of cord are knotted on each side. When each knot is pulled the reticule draws closed.


My plan was to finger weave the blue and gold cords together to create the drawstring but the gold cord is very catchy against the silk fabric. So it went unused. I thought of using the red grosgrain ribbon for the drawstring but it was too short. So it went unused as well. But in the end there were the tiniest bits of fabric which my now nesting bluebirds are finding perfect nest building materials.

The Regency Rose Drawstring Reticule is finished and I can't wait to wear it with my white gown and Hamilton Spencer!


Edwardian Night Reticule
As costumers were requesting reticule bundles there were many requesting multiples. Several black/silver bundles were listed and unclaimed. While we could request a color (except for the surprise bundles) we would be surprised with the fabrics and trims. With an upcoming event where black and silver were my costume colors, I requested that color bundle.
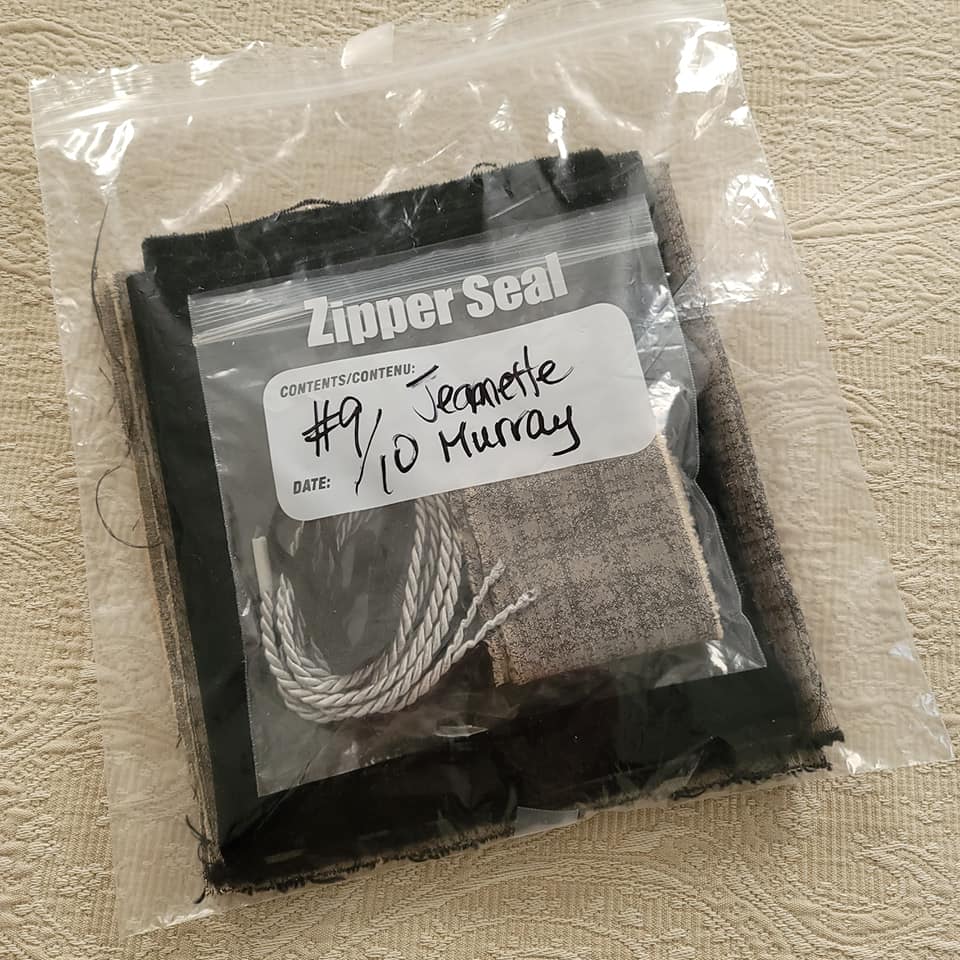
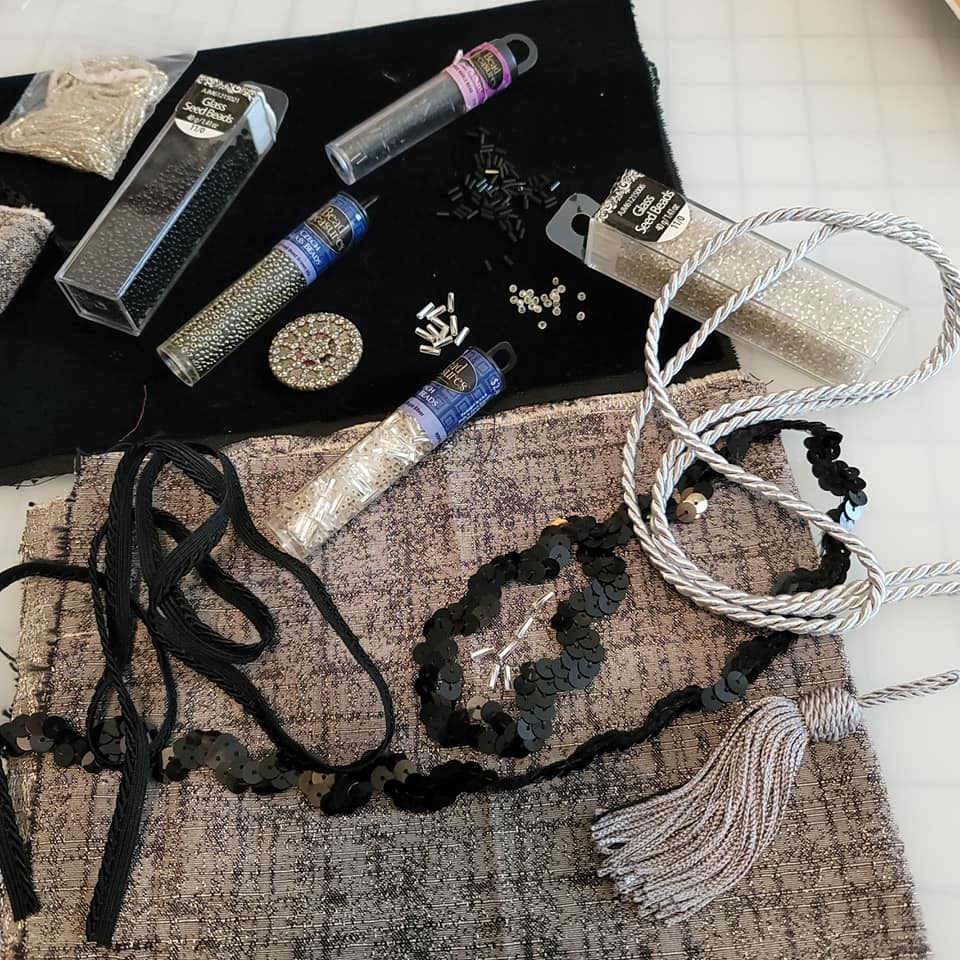
The bundle contained a beautiful piece of black velvet and an equal amount of a brown/black fabric.

The trims bag contained a narrow length of the same brown/black fabric, some black twisted braid trim, silver twisted cord, black serpentine sequin trim, and a silver tassel. A beautiful button completed the available trims.


My gown for the upcoming event is beaded with black and silver. I brainstormed some beading options while looking at my available patterns.
I've used the Out of a Portrait Petal Drawstring Reticule before and it seemed like the best choice for the fabrics and trims and my Edwardian style gown.

Drawstring Petal Reticule Blog Post 2021: http://theperfecttouchvictorian.blogspot.com/2021/05/making-regency-gathered-day-hat-
Drawstring Petal Reticule YouTube Video 2021: https://www.youtube.com/watch?v=WwphS3hxx6M
The pattern requires four pieces and is a generous sized reticule when finished. With the fabric in the bundle I had to reduce the reticule to three pieces and narrow those slightly. I cut the petals from both the black velvet for the exterior and the brown/black fabric for the interior.


I divided the black twisted braid into 3 equal pieces and pinned them to the edge of the upper petal. I tried several options for the sequin trim and felt that the trim alone needed a little sparkle. The single button in the bundle was beautiful and it inspired me to look through my own button collection until I found three matching rhinestone buttons. I sewed everything by hand to each lining petal. I filled the rhinestone button petals with sewn Czech glass beads.


The exterior pieces are sewn together to the point where the petal top will fold down. The same is sewn for the lining leaving an opening in one seam to turn the reticule right side out in a later step. This sewing can be done by machine that can handle a 1/4" allowance.

The tassel and cord are a beautiful silver and matching color. I insert the tassel loop through the bottom of the exterior and sew it in place.

Now the exterior and lining upper petal sections are sewn together. I do this by hand following closely to the stitching for the edge braid and leaving an opening between two sections where the drawstring will enter and exit the casing.

Now the reticule can be turned right side out through the opening left in one lining seam.


The petals are carefully turned to prevent damage to the trims and the corners coaxed open with a wooden stick through the opening in the lining.


.jpg)
Once everything is well turned the opening in the lining is sewn closed.

Two lines of stitching create the casing for the drawstring. They are sewn just below the upper petals. The drawstring is threaded through the casing starting and ending through the same opening. 

The reticule is large enough for my phone and strong enough to carry with the knotted silver cord. I'm excited to use this reticule!

Just bits of fabric are left over plus that gorgeous button which is destined for the gown to be worn with this reticule.

The reticule is large enough for my phone and strong enough to carry with the knotted silver cord. I'm excited to use this reticule!


Hugs,
Jeanette
Companion YouTube Video: https://youtu.be/Ek9npjBZxgE
Historical Sew Monthly - 2022
The Challenge: September: Colour Challenge: Blue: Make something in any shade of blue.
It was a fun challenge to participate in a reticule stash project. I received bits of scrap fabric and trims and was to create a reticule. The striped silk has subtle blue stripes and there were also pieces of plain blue silk and blue ribbon and blue cord for the drawstring. I made a flat-bottomed Regency style drawstring reticule.
Material: Scrap fabrics and trims
Pattern: Vogue 7221
Year: Regency
Notions: Cardboard for the bottom interior
How historically accurate is it? This box drawstring style is something I have seen in portraits of the period.
First worn: I've purchased another piece of the striped silk and will be making a sleeveless Spencer to coordinate with this reticule for a future event.
Total cost: $10 for packing and shipping, the fabrics and trims are all scraps


No comments:
Post a Comment