November is my birthday month. But in 2020 the world was still struggling with the global pandemic. Vaccine development in the United States had started six months earlier with Operation Warp Speed already established and officially announced on May 15, 2020. Our best scientific minds were in full force and we were full of promise and hope. Six months later, on November 14, 2020 we were just a month away from the first Covid vaccine being administered in the US on December 14, 2020 to Sandra Lindsay, a New York nurse.
November 14, 2020 was also the day the Regency Society of Virginia had organized a Zoom get-together including inviting Charles Burns, The Silhouettist from the UK. I reserved my place as a birthday gift to myself and had made the Regency Overdress which I detailed in this blog post and the first of a two-part video. Link for the video is in the blog post.
http://theperfecttouchvictorian.blogspot.com/2021/02/historical-sew-monthly-2020-november-go.html
I had purchased the Wingeo pattern for a Gathered Day Hat which was in the same time frame as the Overdress pattern also by Wingeo.
I traced the pattern and all markings onto single layer buckram and then doubled the buckram by wetting, layering together, and allowing to dry. This would provide a bit of extra strength so that the hat could withstand travel and packing.
The red silk outer fabric and the gold silk lining is cut for the crown tip, crown side, and brim.
Millinery wire is sewn to the crown tip at the seamline.
Millinery wire is sewn to the crown side at the lower edge.
Tabs are cut in the crown tip up to the seam line.
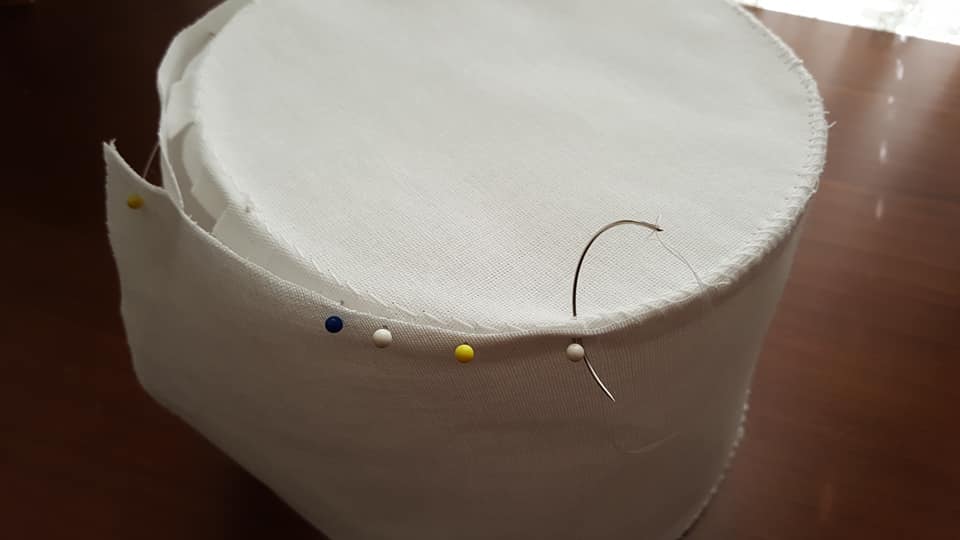
The center front and center back marks are aligned and pins temporarily hold the tip to the side.
I use a curved needle to sew through the crown tip behind the millinery wire and through the crown side.
The crown is finished and I can make adjustments at this point for fit before sewing the center back seam to the lower edge.

Following the pattern markings, I sew gathering stitches in a circle on the crown tip outer fabric.
The cover is basted over the crown tip and gathered in place.
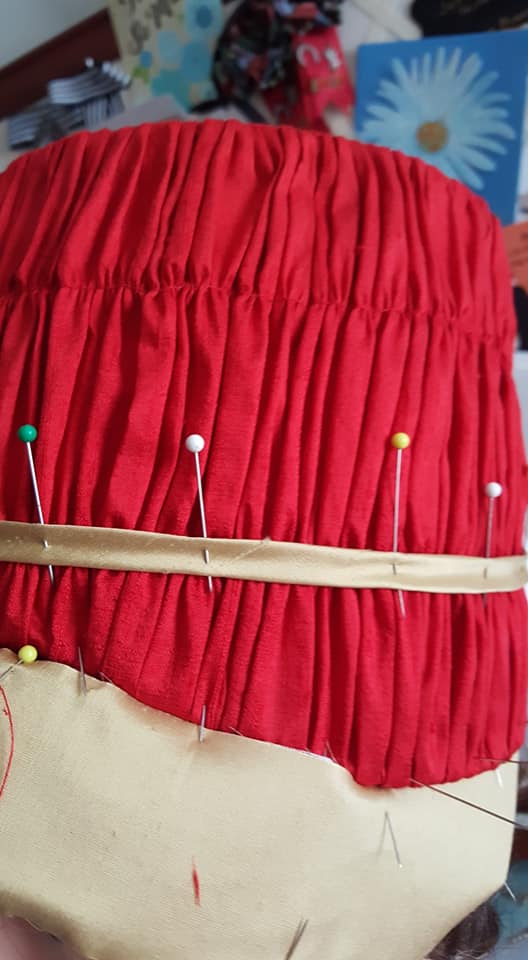
The gathering threads are sewn on the long side band according to the pattern markings. To make sure my sewing is even I temporarily tape a piece of ribbon to the machine to use as a sewing guide.
I've marked the center front and the center sides on the fabric and evenly gather until the fabric fits the crown.
The fabric is pinned at the crown tip edge and can now be stitched together easily with a curved needle.
After the top edge is stitched, the gathers are adjusted as necessary and the lower fabric edge turned to the inside and basted to the buckram.
The gathered crown is finished!
With the exterior of the hat complete I begin assembling the crown lining and the interfaced and lined brim.
I pin the lining to the interior of the crown and the brim to the exterior...
...stitch at the seamline...
...making sure to overlap the back seam...
fold the brim lining under to cover the seamline...
...and handstitch the brim lining to the interior just covering the seamline.
The basic hat is covered and completely sewn!
I had added some color to the Overdress with gold silk covered piping. There are a few bias strips left and as I was assembling the hat I started to think it might be fun to add some gold bias bands at the stitching lines on the hat.
Maybe some embroidery?
So I do a little sample and put it out to my friends for a vote.
Embroidered is the winner! The sample embroidery doesn't play well with my precut bias strips but I find one that does and it is beautiful with the floral on the buckle for the Overdress.
I trim the stabilizer to the width of the finished band and stitch the band closed at the back.
The bands circle the hat and create offset loops which will hold the feathers. This makes travel and packing easier as the feathers can be removed.
The bands and loops are tacked to the hat.
Having just 3 basic red feathers in my stash, I curled the feather around a large curling iron to give it a beautiful curve and curled the barbs over a scissor edge the same way you would curl gift ribbon, and then stitched them together with a ladder stitch.
The Regency Gathered Day Hat is finished!
Time to get ready for the Regency Society of Virginia Zoom get-together and what is secretly my Birthday Party! This calls for a treat! And life is better with what? Cookies!!
Time for the party!
After a wonderful presentation about the history of silhouette-making, Mr. Charles Burns is introduced.
He begins to cut the sihouettes for those in attendance who have commissioned and when my turn comes he cuts mine as well.
I'm thrilled to have such a beautiful memory created and several weeks later my silhouette arrives in the mail along with the rest of the page it was cut from. A treasure to remind me of creating peace and happiness during a difficult time in history!
Fast forward six months to May 2021. The world pandemic is still creating struggles in many countries. The United States has vaccinated 105,523,520 Americans, 31.8% of its population, and many states are relaxing their lockdown protocols. Sadly we have lost over 3,235,551 people worldwide and 592,181 in the United States as of the day I write this. Thankfully I have been vaccinated but remain cautious and have been isolated since March 12, 2020. 59 weeks and 5 days. As I'm a naturally hopeful and positive person I continue to create and write my blog posts and publish my videos, waiting for the day I may see friends and family again.
There were a few scraps of fabric left from the Overdress and Gathered Day Hat and I decide the gown and hat need a reticule. I had purchased the e-pattern for a Drawstring Petal Reticule from Lynn McMasters Out-of-a-Portrait and this is a perfect time to give those fabric scraps a purpose.
There is not enough fabric to cut the pieces on proper grainlines, but I improvise. I have some embroidery samples on bias strips left from the hat creation and I decide to wrap those around piping to edge the petals. I embroider a bit of additional bias.
All the pieces are cut for the reticule.
Piping is sewn inside the bias strips using the machine zipper foot.
I've never seen this done before and I've certainly never done this before, but I do like the special touch the embroidered piping adds.
Then I hit a snag. Should the reticule be red with gold petals? Or gold with red petals? I'm in a Zoom meeting and decide to ask the attendees and my Facebook and Instagram friends and it is an easy decision for them. Which would you choose?
The red bag with gold petals won the vote and the piping is sewn on.
The outside of the reticule is sewn together leaving openings on two sides for the drawstrings. The lining is sewn leaving an opening to turn the reticule right side out after it is sewn to the outside.
The outer fabric and lining are hand sewn together at the piped petals.
The reticule is turned right side out through the hole left in the lining.
And the hole in the lining sewn closed.
The junction where each petal meets is hand sewn closed turning the piping to the inside for a clean look.
I had already made one of the tassels according to the directions from Lynn McMasters and decided it was time to try that technique again. This was my very first tassel and I was really happy to make it!
I had purchased #50 Tire Silk from Superior Threads, still had some of the wood beads I used before, and had some red pony beads which will be a nice size for this reticule. I have all my supplies gathered according to the instructions and while I can't give you a complete step by step tutorial since this is the property of the original creator, I will tell you that the e-pattern and all instructions for the twist cord, bead covering, and tassel creation as well as everything you need to know to put it all together are available from her website here at a very affordable price:
This is her beautiful creation made with silk velvet.
So here is just a short picture show of my creating the twist cord and tassels.
 |
| Twist cord supplies. One completed twist cord. |
 |
| Pony beads covered with silk thread. |
 |
Supplies for making tassels. |
 |
| Start of creating tassel. |
 |
| 3 or 6 tassels to be sewn. |
 |
| Larger wood bead covered. |
 |
| 3 tassels ready for final assembly. |
 |
| 2 tassels steamed, 1 before steaming. |
 |
| 3 tassels steamed. |
With the tassels finished and a small rosette created for the bottom of the reticule where that tassel will attach, the Drawstring Petal Reticule is finished!
Time to put the Overdress and accessories together for another party of tea and cookies!
I'm not the only one who loves cookies! Tasha Puppy thinks I should share!
Wishing you Lots of Cookies and Hugs!
Jeanette
YouTube Video Link for This Blog Post:
The Historical Sew Monthly - March 2021
Small is Beautiful - Little things can make a big difference to the finished look. Make something small but perfect (bonus points if it exclusively uses materials purchased from a small business).
What the item is: Drawstring Petal Reticule
How it fits the challenge: Small and suited to the overall impression of this costume.
Material: Silk
Pattern: Out of a Portrait Reticule and Tassels
Year: 1815
Notions: Cotton cord for petal edges, silk thread for tassels, wooden beads for tassels.
How historically accurate is it? Reticules are accurate for many historical eras as seen in illustrations.
Hours to complete: 7 hours
First worn: May 2021
Total cost: Made from fabric scraps from the overdress and hat creations and $15 for silk thread and beads.
The Historical Sew Monthly - August 2020
What the item is: Regency Gathered Day Hat
How it fits the challenge: 2020 was to be a most amazing year for me personally as well as amazing as a costumer. I had worked hard to take what would be my only trip in my lifetime to Europe. The pandemic hit and all plans were cancelled. But I still had a very special birthday to celebrate in November and I did that through a Zoom meetup, creating this hat, and a silhouette from Charles Burns in the UK. It was a wonderful way to celebrate!
Material: Silk and buckram.
Pattern: Wingeo 1795 - 1825 #719 Gathered Day Hat
Year: 1795 - 1825
Notions: Feathers and thread.
How historically accurate is it? Period correct silhouette and fabrics.
Hours to complete: 20 hours.
First worn: November 14, 2020.
Total cost: $20
.jpg)


Love the little hat! Thanks for sharing your process of making it...it looks like an accessory I'd like to try some day! And your little cookies are absolutely darling.
ReplyDeleteThank you, Anna! I'm so glad you are inspired and enjoyed the process!!
DeleteLooking for professional tire services in chicago heights? Our expert technicians offer reliable tire repair, replacement, and maintenance to keep your vehicle running smoothly. With top-quality products and prompt service, we ensure your safety and satisfaction. Visit us for all your tire needs in Chicago Heights today!
ReplyDelete