.jpg)

Then there was The Plan and months of acquiring the right supplies.

The Plan Blog Link: http://theperfecttouchvictorian.blogspot.com/2021/11/bringing-victorian-barbie-to-life-plan.html
YouTube Video Link: https://www.youtube.com/watch?v=AVUuXQtvN_A&t=137s
The first piece created in life size was the velvet and feathered hat.

The Hat Blog Link: http://theperfecttouchvictorian.blogspot.com/2021/12/bringing-victorian-barbie-to-life-hat.html
YouTube Video Link: https://www.youtube.com/watch?v=rMK8rkWFSog

And now we are ready for the third part of this series of Bringing A Victorian Barbie To Life - The Skirt.
The pattern is from Truly Victorian TV291 1898 Walking Skirt.

It was the pattern of choice for our Lady Pinkertons at Costume College in 2017 and you can see my skirt in this group photo.

Haha! Well, not really as I'm in the back row! But here is the skirt from that costume in a single photo.

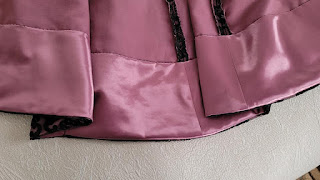
I used this skirt many times and here it is trunder my Victorian/Edwardian/Cottagecore apron creation. It has beautiful drape and hem support.


That skirt was made from a very lightweight wool as the color was most important, and each panel of the skirt is flatlined with cotton. The facing is a double layer of muslin and cotton.

The back panels are very full and cutting the pattern to my measurements gave me a single pleat on either side of the center back.

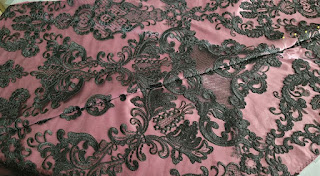
Recreating the color and pattern for the Holiday Traditions Barbie was a trial as I've already shared in the blog post and video The Plan, but I'm very happy with the mauve satin and the embroidered net for the skirt and the silk velvet for the jacket.


First I cut the skirt panels which consist of a single front panel cut on the fold,

and two panels each of the side front, side back, and back for a total of 7 panels. I mark each panel with pen on the wrong side so there is no chance for me to use an incorrect panel.

I cut one front facing on the fold,

and two each of the side front, side back, and back facings. And as with the skirt panels, each facing piece is marked with pen on the back on a seam allowance.

A waistband and skirt placket are cut from the satin.

The next step is to cut the embroidered net overlay. This will be a bit of a mess and I lay an old bedsheet on the floor with a table set up in the center.

When I purchased the embroidered net I laid my pattern pieces side by side where they would all be on the grainline and then doubled that total measurement. To cut the embroidered net I start from the center of the full length of embroidered net, find the center of a motif that will place the lower edge of the pattern near the lower edge of the embroidered net, and pin the net to the center front pattern piece at that center line.

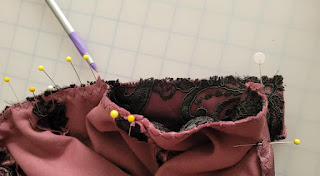
Since my table is narrow I have to slide the net slightly and pin the net to the remainder of the front panel pattern.


Keeping the pattern pieces in order I pin each pattern piece under the net keeping the grainline designated on the pattern in line with the pattern on the net.

Once all 4 pattern pieces are pinned under the embroidered net, I slide everything back to the front panel piece and fold the net onto itself matching the design at the lower edge and the motifs. This will create the front panel on the fold and mirror images of the side front, side back, and back panels.

Then I pin the folded net to the pattern again.

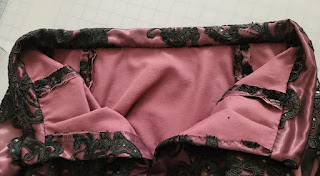
With everything pinned in place I turn the folded net completely over so that the pattern is now showing. This makes it easy to cut the doubled net away from the pattern. I cut each panel, remove each layer of pins, and now I have two perfectly mirrored panels of embroidered net with the main motifs in the same area of the skirt around the skirt.


Each net panel is placed over its corresponding satin panel and pinned within the seam allowance on the top and sides leaving the lower edge free.


The net is also cut for the waistband and placket.

And when all this is finished all the cutting mess is wrapped up in the sheet and tossed outside for the birds to line their nests.

I pin the panels to the dressform and allow them to hang for a 24 hours to permit any drape that may occur to happen before I begin sewing.


I'm happy with the pattern matching on the back panels!


The center back seam is sewn leaving the opening for the placket. The placket is sewn to the left side of the opening.

All remaining panels are sewn to each other and the seam allowances pressed flat and then pressed open on the inside and the outside.


The waistband is pinned right sides together to the skirt with the center front of the waistband moved 1" to the left of the center front of the skirt to accommodate the placket and beyond both skirt back edges by 1/2". Here I'm following the pattern instructions closely.

The waistband is pinned from the center front of the skirt along both sides up to the notches. The extra fabric from the notch to the edge of the skirt can be gathered or pleated. I already know from making this skirt before that I will have a pleat on either side of the center back.
Now the waistband is sewn to the skirt.

The raw edge is turned under 1/2" and the waistband folded in half. The ends are sewn closed and the seam allowance clipped and turned right side out.

The folded raw edge is pinned to cover the stitching line and the waistband is hand stitched in place to the inside.7 The raw edge of the skirt opening is also hand stitched.


A tailor's bar and hook are sewn on the waistband.

The last step will be the facings and hem. But first a moment to have a cup of tea and enjoy the progress!


The facing pieces are sewn together, the seam allowances pressed open, and the top edge pressed under 1/2".


The facing is pinned to the skirt wrong sides together matching all panels.


The lower edge is machine sewn, the seam pressed, the facing turned to the inside of the skirt and the top edge hand stitched. I took care to catch only the satin fabric leaving the embroidered net free.

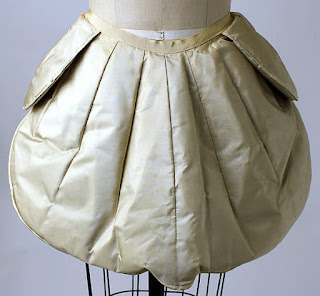
Before I show you the finished skirt I want to share what I use to create the silhouette for this Victorian period. I don't like to lace my corset tight to create the hourglass shape and instead use a hip and bum pad. This photo shows the change in silhouette hip spring and bum enhancement without padding on the left and with padding on the right.

Of course padding happened in many periods of history and this is a bustle/hip pad from 1900 from The Met. https://www.metmuseum.org/art/collection/search/109161

This pad is also from The Met from..................are you ready?.................the 1950s!
Blog Post Link for Hip/Bum Pad: http://theperfecttouchvictorian.blogspot.com/2016/02/historical-sew-fortnightly-2016.html


The foam is cut to shape with a razor.


The foam is sandwiched between the satin and silk layers and sewn around the edge with two additional rows of stitching to taper the edge. The edge is bound with satin ribbon and grosgrain ribbon ties added.


I would wear the hip and bum pad over my corset and then smooth the curves with two petticoats. A cotton petticoat with a smooth front with front ruffle and a back with pintucks for structure and a ruffle.


And with the proper structure ready for the skirt here are some finished photos!


With the 1890s Velvet and Feathered Hat complete, and the 1898 Walking Skirt complete, it's time to move on to the final part of Bringing A Victorian Barbie To Life - The Jacket. Then the 1890s suit will be complete and ready to be worn! But that will be in another blog post and video. Thank you for sharing this journey with me!


Hugs,
Jeanette
Companion YouTube Video Link: https://youtu.be/4RO8cTgaXE0


Jeanette, that is an amazing black lace fabric you found. I was really confused with all the pattern pinning and the way you cut them, but I see why now and the finish is fabulous!
ReplyDeleteVal
Thank you so much!! I do love the pattern circling the skirt!
DeleteThis article was very helpful for me
ReplyDeleteThank you!
Delete