.jpg)

YouTube Companion Video: https://youtu.be/sEXUdZ2mJT8

The Magic Library Book Nook. A moment frozen in time. A moment frozen in miniature. A place we dream of visiting, gently curling into our favorite chair, drawing our slippered feet under us, sipping on a cup of hot tea, and letting the flow of words in our favorite leather-bound book carry us into a dream world.
Have you created a Book Nook of your own? This will be my first and I welcome you to share my journey.
Opening the Treasure Box
The Magic Library Book Nook arrives from Amazon.


I remove the cellophane cover and open the box to find it filled with the most amazing pieces!


A ruler, a package of beads and bits, and other pieces I can't even identify.

A 30-page Instruction Book and a bottle of White School Glue.

Pages of a beautifully paper with portraits and paintings, correspondence, book covers, and many pages of other very detailed and very necessary library and magical accessories.

The first five and one-half pages of the Instruction manual are some general instructions and then a complete picture inventory of all parts.

Beginning in the middle of Page 6 are very detailed instructions for all the creation of oh so many books (because it is a Library after all!),

the furniture,

and the wiring for 4 illuminated areas of the Magic Library powered by two batteries.

There are sheets of pre-cut wood in different colors. All parts are clearly marked and the pieces can be punched from the main sheet. (Just a note here, that at times I found a craft knife to be helpful in removing the part from the main sheet.)


Creating the Books, So Many Books!, Furniture, and Furnishings
The very first piece I will create of my very first Book Nook is a tiny Book. This begins on Page 6 in my kit. It will be an open book with pages folded and glued to a cover so that the pages will fan open.


First book finished! Not exactly pretty but we'll just pretend it is a well-loved and therefore, very well-used book. It is the History of Magic any may have been a textbook for the owner's classes. Could be!


The open books and rolls are complete.


The larger size books finished.


The indicated parts are snapped out of the appropriate wood piece.


The pieces are fit and glued.

The papers are also glued to the edge of the bookcase that will eventually face out to the opening of the Book Nook. Such a perfect touch!


In addition to the books and rolls for this bookcase, there are some metal pieces that will be glued and added.


The finished bookcase is just 4" tall.


This book grouping is for the next bookcase which is a different color and a bit fancier.


At times, snapping the pieces from their wood sheet doesn't work out exactly right, but a bit of glue solves all ills.

The three sections of the bookcase are complete.

The book cubes and books are complete.


Each section is complete.


Now at Page 10 and 1/2 there are three bookcases filled with wonderful books and interesting metal accessories. So tiny!


Now to Page 11 to create a wall shelf with 8 books of different sizes and one of the History of Magic open page books.


Following Pages 12 and 13 for two more wall shelves with book silhouettes made from paper cutouts and wood blocks for backing.


The last wall shelf is a single shelf with supports, 3 small books, and a framed picture with a stand.

It was important that I pay attention that the back would be attached to a wall and couldn't have any parts beyond the back edge.


On to Page 14 to create a 9-drawer supply cabinet. Beginning with notecards that have incredible detail which will be barely visible in the finished Book Nook but were worth their own photos.


The notecards are cut, folded in half, and stacked to be placed in a drawer later.


Of course the notecards will need envelopes which are cut, folded, glued, and stacked to be placed in another drawer later.


Then there is a collection of.....um.....I'm not sure what....but I imagine since this is a Magic Library, they might be Magic Potions brewing.


The 9-drawer cabinet has two semi-open drawers for the notecards and envelopes. An imaginative piece of furniture leaving one to wonder what treasures are inside the other seven drawers.


A library wouldn't be complete without a writing desk and accessories. Beginning on Page 15 are instructions to create a row of books, a feather quill with inkwell, a desk light, and a candleholder and candle.


The writing desk begins on Page 16 and in addition to the accessories already created, has brass drawer pulls, correspondence and an envelope, a vase, and a silver teacup.


Page 17 gives instructions for a chair for the writing desk and books that have been left in the chair while the reader goes to heat the water for tea.


A stack of books that will be on the floor because, as we all know, there is never enough space on the shelves for all the books.


A library is also the home for the daily news and a crate of newspapers is next. Such detail which will be mostly hidden in the finished Book Nook but here to see and enjoy.


The finished creations through Page 17 in my kit which is the halfway point of the instructions.

While it is up to our imaginations to decide who occupies the Magic Library, I'm building this kit for some Spooky Magic Season crafting. On Page 18 we see some clues as to who might live here.
A Lantern:


A Broom:


A Suitcase, a Hat, and a Very Official Document:


Page 19. Book cubes which will be used later. Great detail! And I love the Defensive Magical Theory on one end and Romeo and Juliet on the other. A reader with a wide range of interests!


Which will be in a prominent place atop a beautiful, glowing, fireplace.


Fountain pen for scale.

Page 20. A floor vase with rolled maps and posters.


There will be two wall-mounted candleholders with candles.


A wonderful collection of portraits and paintings cut from the heavy paper and mounted on wood blocks of an identical silhouette.


Page 21. A clock so our reader remembers to eat and sleep.


Wall lanterns. Three for the right wall, three for the left. The paper cutout mounts on opposite sides of the wood silhouette.


The roof is a wonderful design made of wood backed with a clear piece. The cuttings pop out of the wood sometimes needing a gentle prodding with the craft knife. Sandpaper included in the kit removes any of the excess wood and a Sharpie covers any light wood.


The heavy paper for the the paper cutouts and wall and floor coverings had a slight curve from the kit packaging. Not a problem for the paper cutouts, but to flatten the larger pieces I placed heavy books on the pages.


Now on Page 22 beginning with the Upper Back Wall.

Another beautiful detail!


The Floor.


The Lower Back Wall.


The Left Wall and Balcony.


The Right Wall and Balcony.


Page 23. The Wallpaper for the interior walls has markings indicating where all furniture, furnishings, and structural items will be placed on each wall.


The Right Wall is created.


Oops! No matter how careful I try to be, there will be mistakes. I forgot the balcony ends and we don't want any Book Nook occupants falling off the balcony, do we?!


The furniture for the Upper and Lower Back Walls will be placed during final assembly.


But the Left Wall is complete and the Right Wall will have the desk placed during final assembly.


The Wiring. Oh my!
The instructions for wiring begin Page 24. First, the chandelier is assembled. That wasn't as easy as it could have been as I mixed my parts and used a chandelier part for my inkwell. Oh well! While everything didn't always make sense to me (why have a white wire and a red wire but connect the other white wire to the red wire and the gray wire to the white wire?) But there it was and I followed everything exactly as directed. There is a motion sensor which connects to the battery box on one end, and to the four LED lights on the other end. I scored the insulation on each wire with scissors (very carefully!) and removed 1 cm of the insulation for every wire. A shrinkable insulation is threaded over one side of the wires, the wires twisted together, the insulation covering the join, and the insulation passed over the heat of a candle flame to shrink. Batteries in. Battery pack activated. Motion sensor activated. Whoa!! They work!!


Page 25 begins the full assembly beginning with the base piece and a support for the motion sensor. All wiring is positioned toward the Right Wall.


The Lower Back Exterior is attached to the base.

The Floor is installed to the motion sensor support and Lower Back Exterior creating an open space for all the wiring. The Lower Back Interior is installed. One LED light is placed in the notch on the back left which will be used for the fireplace light. Another LED light will be placed in the notch on the right which will be used for the desk light.

To keep the Back Exterior and Interior and the Floor and Base in line while the glue dries, I dry fit the Left Wall. This also gave me a chance to again check the effect of those lights. I'm so amazed that my wiring was a success I shared this photo with the social media world.


The light is positioned through the fireplace hole and into the light fixture, the wires glued to the fireplace interior, and the fireplace attached to the wall.


Now the Upper Back can be placed. First the Balcony floor, the railing, and then the Back Wall. The Left Side Wall is still used to insure alignment.


Now on Page 27 where the furniture and furnishings for the Upper Back area and Lower Level Floor are placed.


Who knew I could make such a big mess out of such a tiny project!


With the base, Floor, and Back complete and the lights still working, I can wire the Desk Light, glue the wires to the inside of the desk, and place the Desk with the wires over the notch and the Desk is the correct position as I've measured on the Right Wall.


With the interior wiring and furniture and furnishings complete the Left Wall can be permanently assembled.


On Page 27 the Roof Supports are installed. These are also the pieces which hold the wiring for the Chandelier and Back Balcony light. First the rear Support.


Page 28. The Center Support which will hold the Chandelier. I used wood scraps to create a holder for wiring although that wasn't necessary.
.jpg)


The light on the Rear Support is also fixed through a wood scrap. The wiring for this light is glued to the back side of the support.


To place the Center Support with the Chandelier I measure the distance between the Support wall notches and then glue the Chandelier wiring in place alongside the wiring on the Rear Roof Support.


Both the Center and Rear Roof Supports can now be permanently set in place. Page 28. The wiring is affixed to the back of the Inner Lower Back Wall and then through the notch and the excess wire pushed under the Floor.


Keeping the wiring loose enough for the battery pack which is between the Inner and Outer Lower Walls, all wires in the large notch on the right side of the Floor in the battery pack compartment, and any other wires safely pushed under the Floor, the Right Wall can be permanently placed.


Let's Finish This Magic Library
With the wiring and lighting installed and miraculously still working, it's time to finish this Magic Library. Just inside the front of the Book Nook are markings for Front Guides and a Front Roof Support. These are slightly inset to allow space for inserting the Dust Cover later. The Roof sections are placed in their notches to keep everything in place while the glue dries.


Page 29. The Front of the Book Nook is in two pieces. The lower section has the hole for the motion sensor. I did not permanently glue the sensor in place to allow myself to move the sensor as necessary when placing the Front.


You may have noticed that the last photos are a bit dark. It had been raining heavily on Thursday, September 26th, and the rain gauge had already overflowed for the day at 8". There was a river flowing through my back yard and down to the nearby creek. Then on Friday, September 27th Hurricane Helene churned through the Piedmont and Mountains of North Carolina. My power stopped at 8:36 AM EDT that morning. As the days passed without power, and since my farmhouse is supported by a well that also meant no water, we were without news but knew that Helene had been devastating as we had also lost cell service and internet. Fortunately we had been warned of this potential and we were prepared with drinking water and canned goods.


We received an emergency notice that our power was due to be restored on Friday, October 4th at 11:45 PM, one week and 12 hours after it was lost.

We used our solar-powered radio for news of the lake levels and critical dam issues near us. We used candles to save batteries and the canned goods supplies dwindled to the lesser favorites now fondly referred to as Yams 'n Spam.


The Magic Library Book Nook became a safe moment in an otherwise stressful time. I placed the other accessories on the Library floor and enjoyed the only space that had full illumination - the Magic Library!


The Roof pieces and Roof Ridge can be permanently glued at this point but I've chosen to leave them loose in case I add or change furniture or furnishings later.


The Left and Right Exterior Wall covers are trimmed and applied.


The battery pack is set to the ON position and the battery pack door latched.


Page 30. Gasp! The final page! The Dust Cover protective covering is removed and the Dust Cover slid between the Front and Front Inner Supports.


The Perfect Touches
It seems that I'm being reminded that even in the midst of rain and a hurricane it is still Spooky Magic Season and Tasha Puppy is usually included in projects with that theme. She has a set of bat wings and loves playing outside with me in my themed costume and her in her themed costume.


.png)
.png)

A miniature German Shepherd Dog colored to match Tasha Puppy and dressed in bat wings is created and added to the Magic Library Book Nook.


Tasha Puppy approves!

There is a fun YouTube Channel named Daniel Builds. Daniel creates kits and shares those creations in real time length videos. I had searched for anyone who may have already created the Magic Library Book Nook and one day YouTube recommended Daniel's channel. The channel has an 11-video playlist for the build of this kit and I'll link the channel and playlist below for full video of this build.
.png)
YouTube Channel Link: https://www.youtube.com/@Dbuilderguy
Magic Library Book Nook Playlist Link: https://www.youtube.com/playlist?list=PLV84knAhtibITck1PGcbfGisfaw8bxD6u
In one video I noticed a part being added that I had missed. An odd little blue ring just glued to the left wall. So I glued my little blue ring to my wall too, although I'm not sure what it is supposed to be and it all but disappears in that back corner.


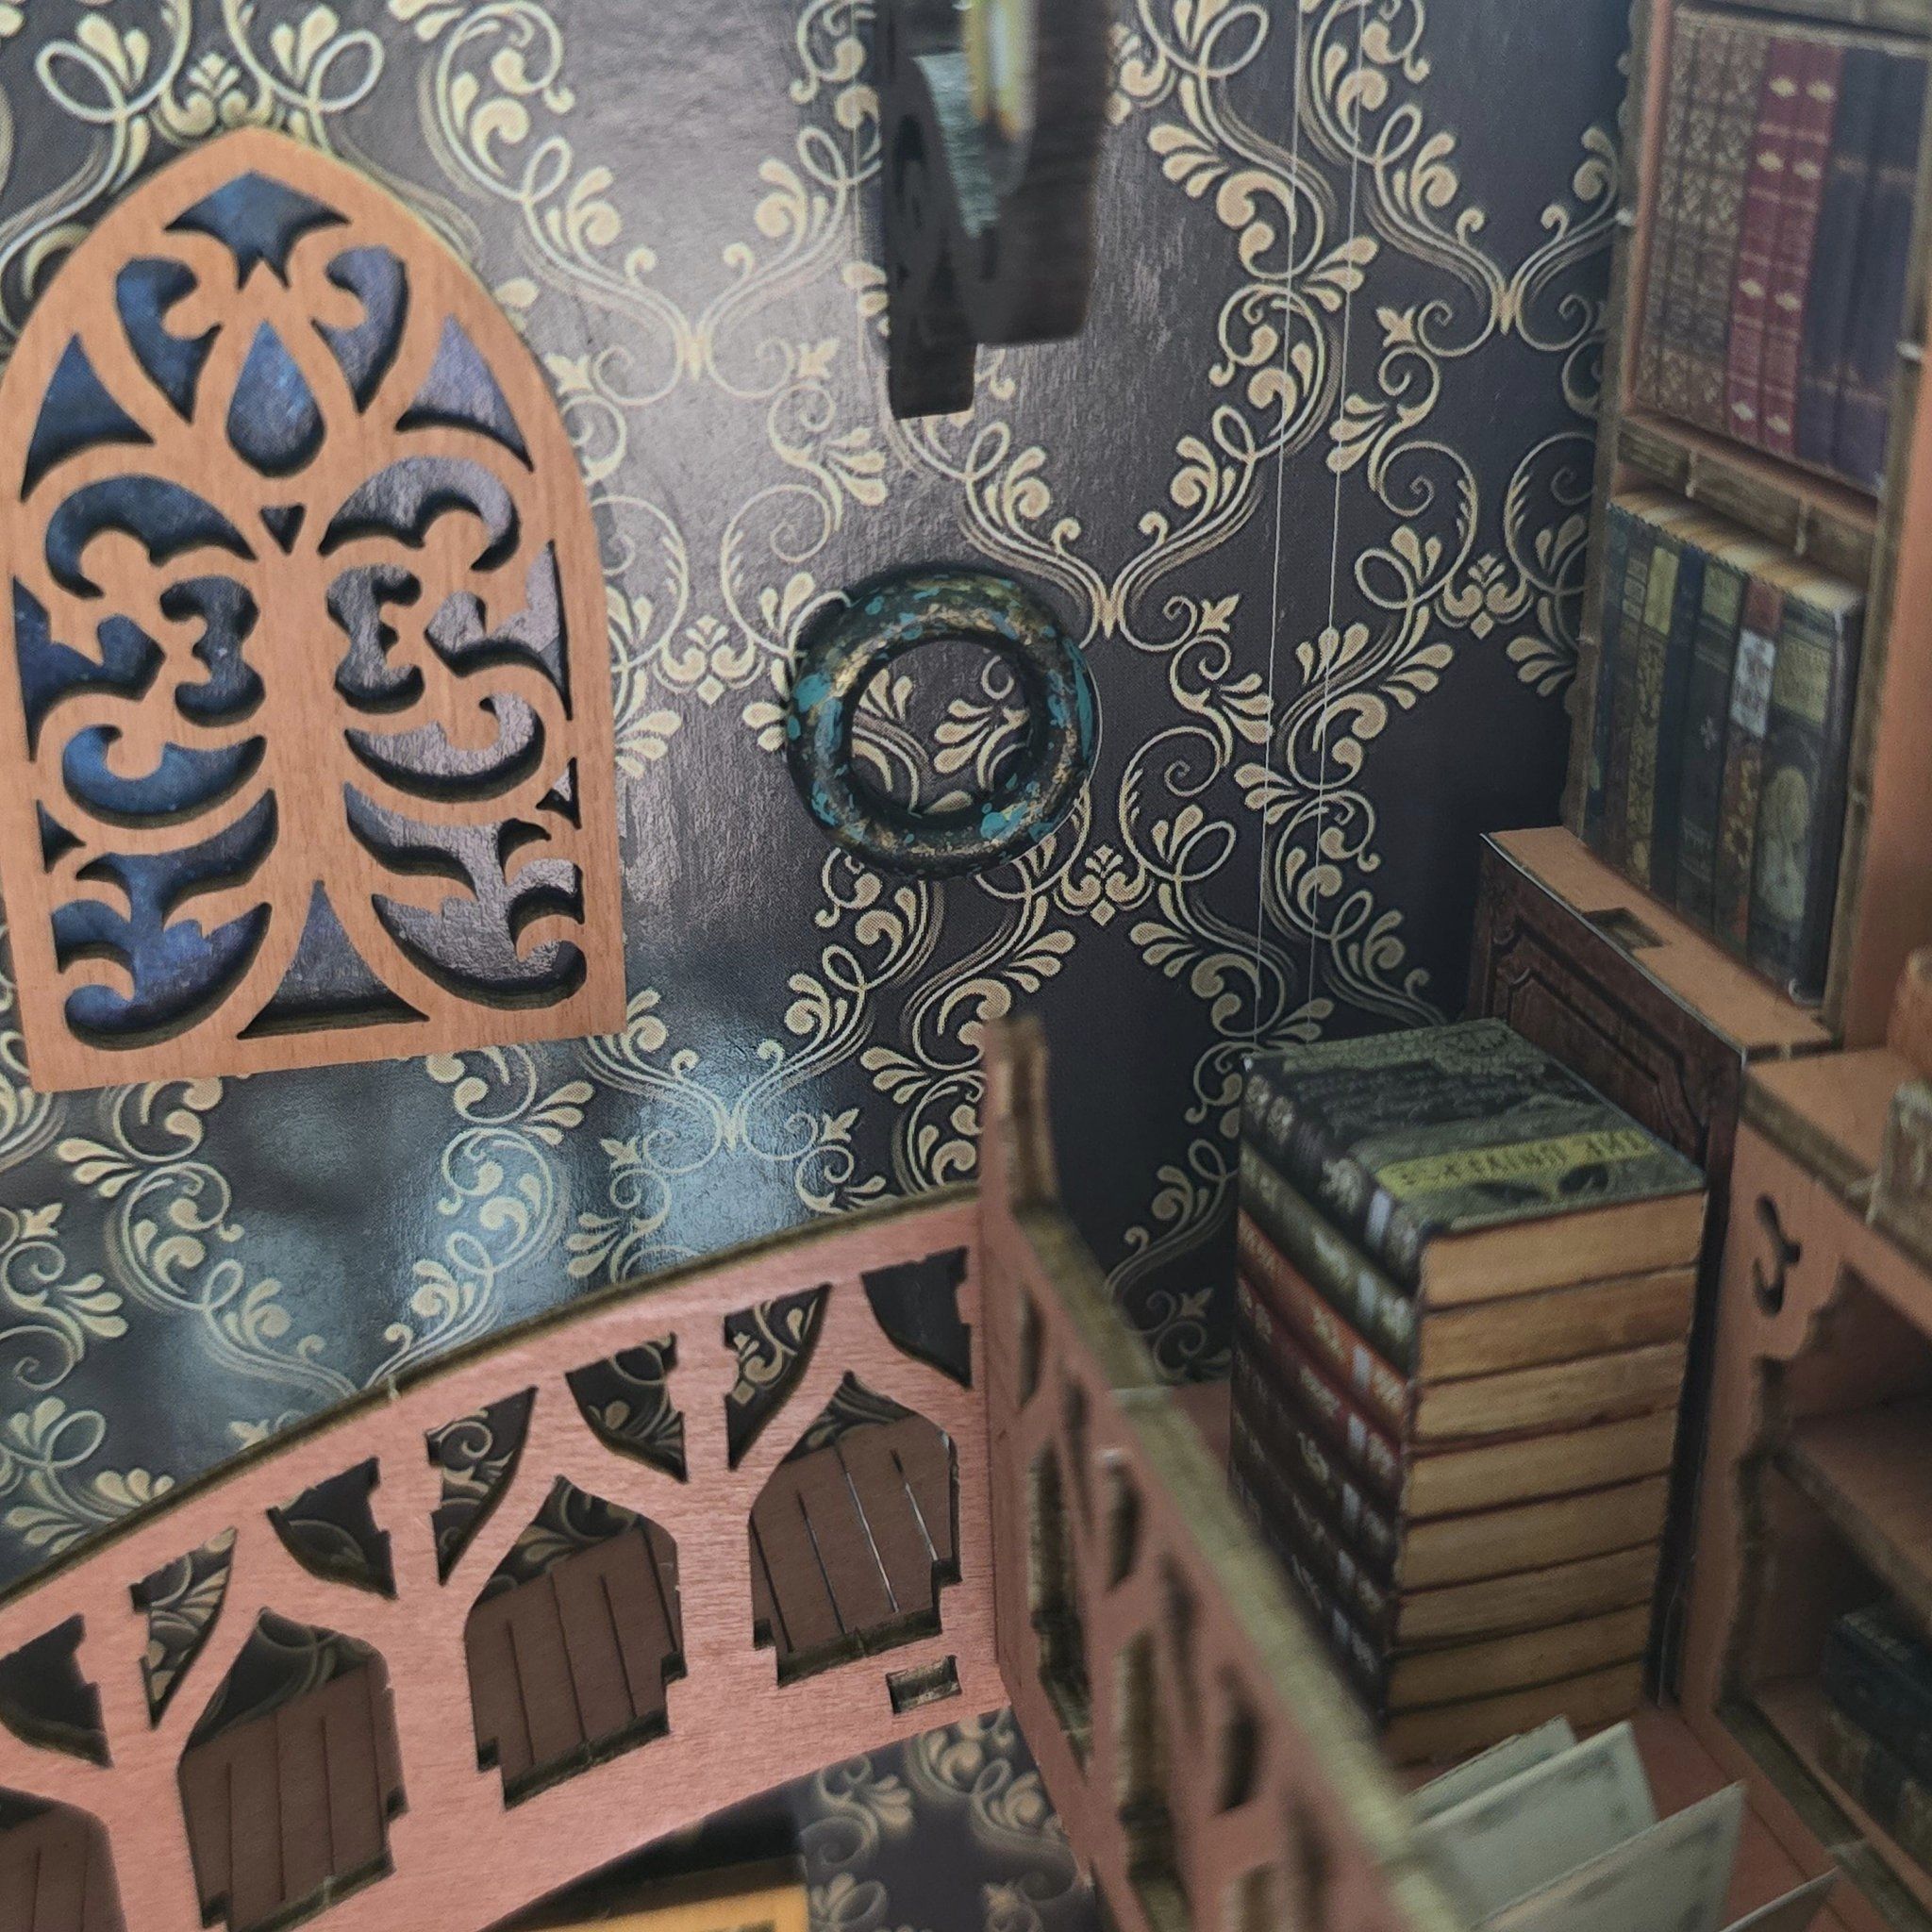
With a miniature Tasha Puppy in the Magic Library I thought it might be fun to have a portrait of us in there as well. There was a scrap piece of wood punched from a bookcase door and it looked like a perfect frame. I found an old photo that seemed like the right size, photocopied it, and cut a piece for the new "frame". A little trim. Some glue. And the new portrait has a a fun place on the upper balcony covering the almost invisible ring.


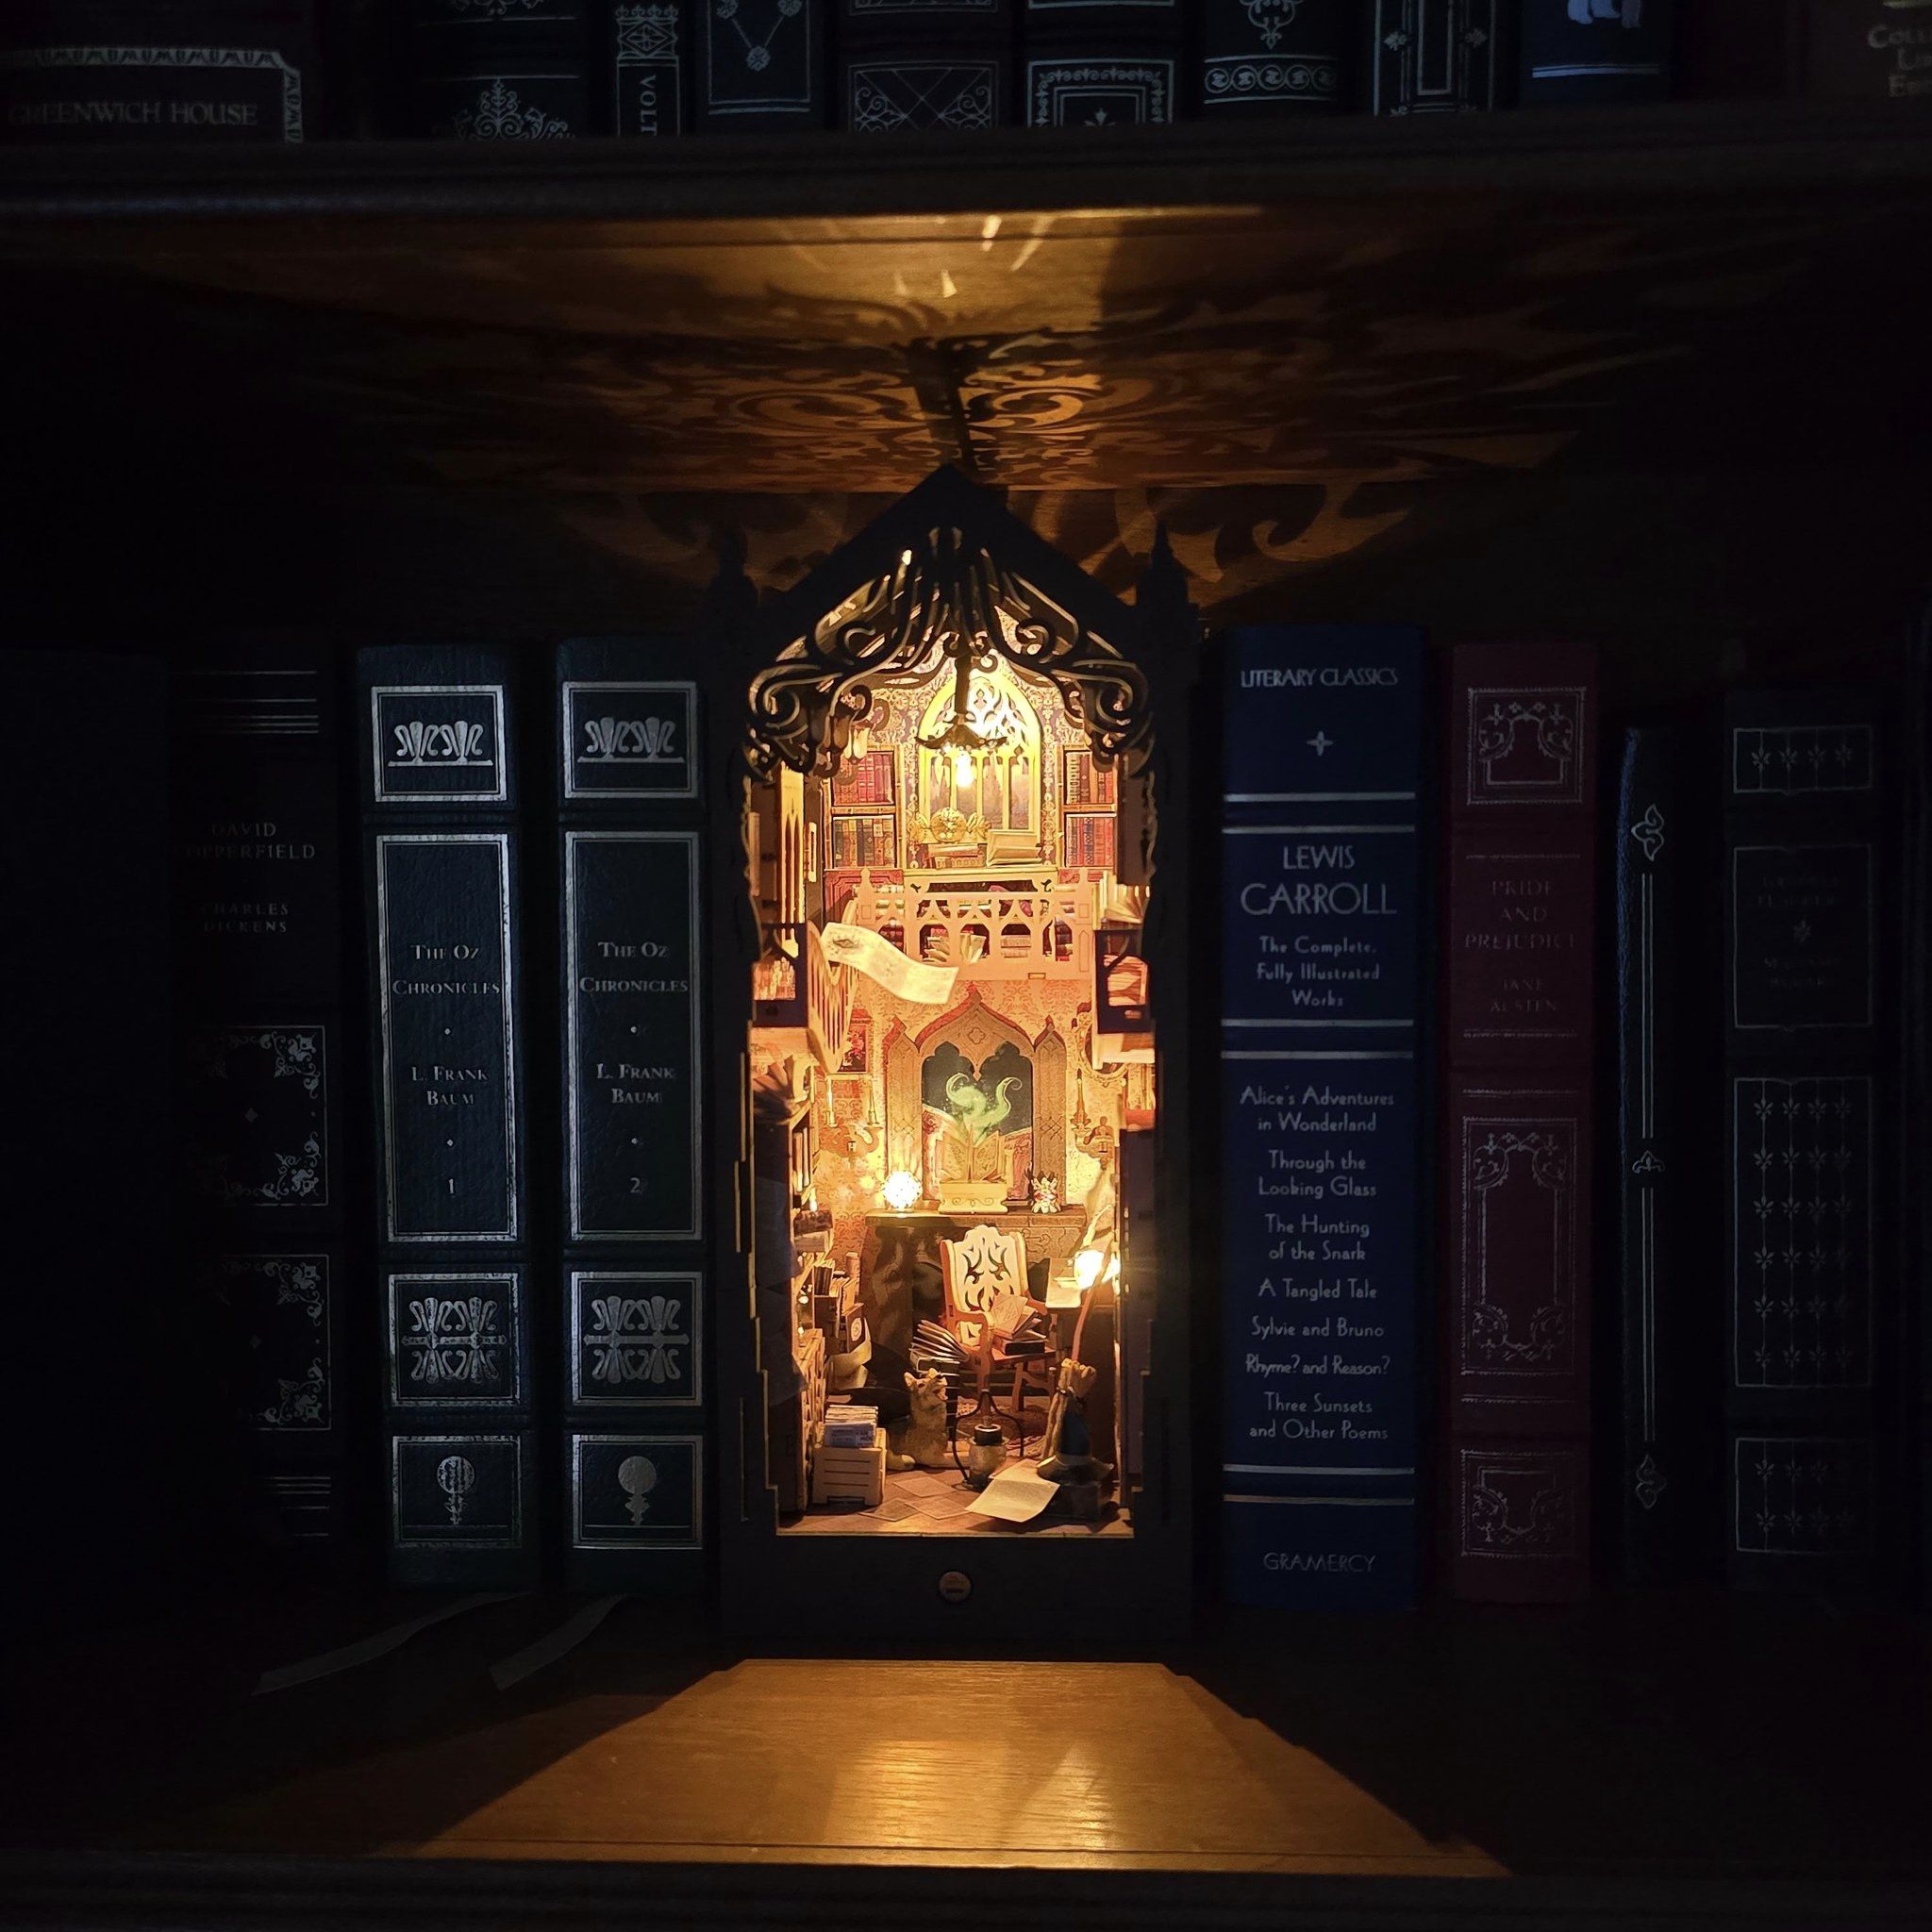
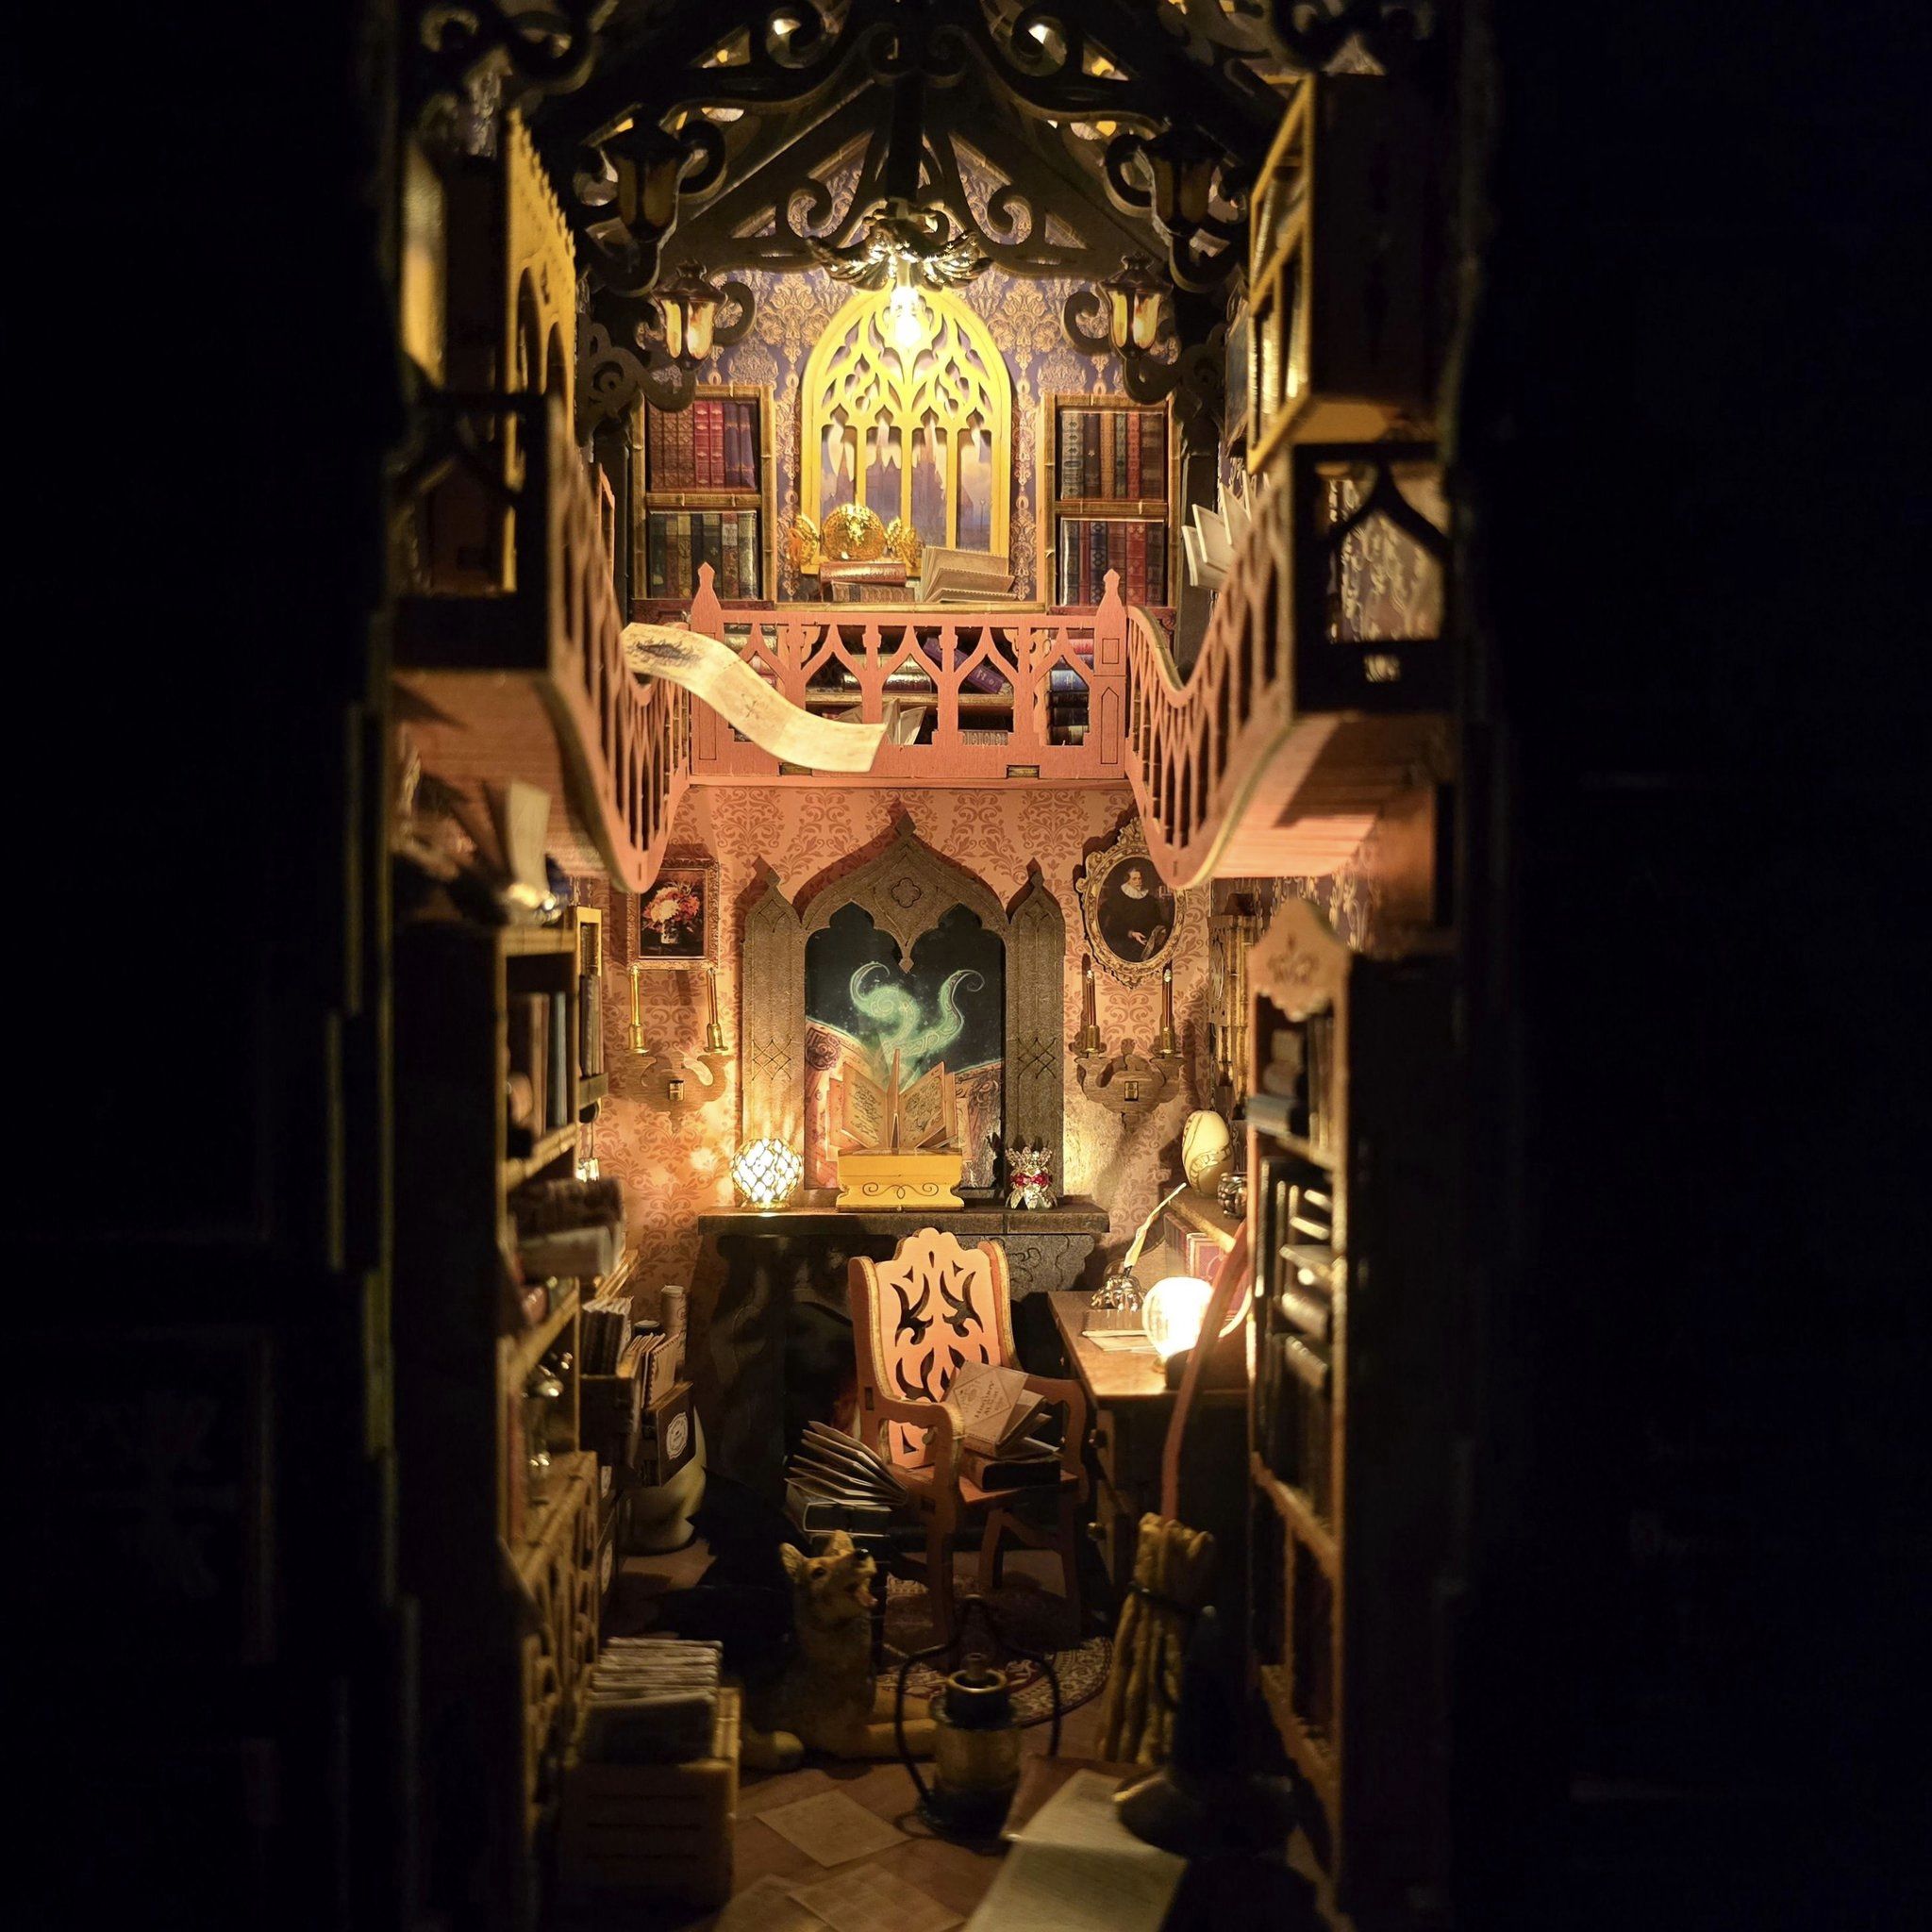
The Finished Magic Library Book Nook


From Tasha Puppy and both of us, Happy Halloween and wishing you All Things Magical!


Just wonderful! A son of mine would love to build one of these.
ReplyDeleteGlad you are safe after Helene...we didn't get as much here in Kentucky, but it took far too many trees.
Very best!
Thank you! Very fun to build! The tree damage everywhere is so sad.
Deletegood one
ReplyDelete