.jpg)

Imagine you are a young working woman half a century ago. It is the early 1970s. You live in the United States. The war continues and friends and family receive their numbers in the military lottery and serve as required but not always as desired.


At the same time there is a gasoline shortage and rationing and appointments and number assignments are common to provide some level of equity for everyone.

Even while the taxes keep rising to fund the war, and what gasoline is available becomes precious and expensive, the music of the 1970s is plentiful and potent.


Meanwhile, in San Francisco, California in 1967, Eleanor Bailey and Carol Miller co-founded a fashion label of designs which picked up many elements popular in the late 19th and early 20th century American fashion. Lace, gingham, and calico were associated with the prairie, Victorian, and Edwardian styles. The enterprise was named after the gunny sack or burlap trim used on some of the early designs and the play on the spelling resulted in the name Gunne Sax.


The name gunny sack may have come from "goni", an Indian word which meant fiber. Made of hessian fabric, burlap, formed from jute, hemp, or other natural materials. The gunny sack is an inexpensive and natural transport for items such as potatoes, grains, and coffee.


You could call the now retired Gunne Sax look by a more current name: Cottagecore. Although the Cottagecore Aesthetic has been named and in fashion since 2017, the popularity rose during our pandemic as a return to simpler times where people baked bread and put seeds into dirt and grew their own produce. Simpler rural clothing has been a part of the aesthetic. And so it was in the 1970s when we were looking toward a time that seemed happier, calmer, and where our lives seemed more completely within our control. Fashion does follow what is happening in society, doesn't it?

But back to the 1970s and Order No. 4 Affirmative Action for women in the workplace. Being given positions of responsibility and authority meant a wardrobe designed to "dress as you want the world to treat you", as my grandmother would say. Lace, ruffles, calico, and gingham trimmed with burlap were not for women now competing with men for the same positions as summarized here by PBS.

We opted for a more conservative and oftentimes more masculine style.

And so it was with me. As my career and education took priority, a Gunne Sax dress never found its way into my closet in the 1970s.
But here we are in 2021, 50 years later, and it's going to happen! Thank you to Gwen's Shenanigans who invited all costumers to collaborate for a Gunne Sax style using Halloween themed fabric. It was too fun to resist creating for #gunnesaxoween!


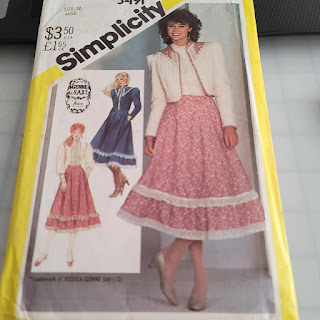
I located a Gunne Sax licensed Simplicity pattern from 1982. I like the simple style and the quilted jacket will be wonderful for the cooler autumn. Of course I'm immediately attracted to the idea of the prairie/American west styling on the pattern front and immediately pull my boots and hat out of the closet from my horse riding days.

I find a Studio E cotton fabric on Etsy in a fun Halloween print and love the color tests on the selvedge edge.


In keeping with the original designs of the Gunne Sax founders, I also find on Etsy a burlap Halloween colored and themed ribbon.

With some trim from my stash I'm ready to begin my #gunnesaxoween creation.

The first thing I will have to do is adjust the pattern. I add where needed and note all changes for future reference as I'm sure I will need another Gunne Sax creation to another theme perhaps during the holidays? :)

The Skirt
Do you see what I see in the skirt pattern pieces? Pockets!!!

I add width to the skirt side seams by simply marking with a chalk pencil.

The skirt pieces are cut from fabric...

... including those glorious pockets!

The pattern is designed for a zipper and I have none in the stash so I decide to create a simple placket from a scrap and will use buttons.

Two pieces are cut from the scrap.


Sewn right sides together to the skirt opening.

Last, a seam is turned under on the other side of the placket and stitched close to the edge.

And the simple placket is in! On the other edge I turn the fabric under at the seam allowance and stitch close to the edge.

Since I have not reinforced the buttonhole side I machine some buttonholes onto the fabric but will only sew buttons at the edge of the buttonholes and will close the skirt with snaps.


Then the side seams are sewn closing the pockets and creating the pocket opening by stitching slightly above and below the pocket bottom and top.

Pockets!!

The waistband is sewn to the outside upper edge of the skirt and the ends are sewn closed, clipped, and turned.


The seam allowance has been turned under and pressed and sewn to the inside of the skirt.

Now there is a skirt without the lower ruffle.
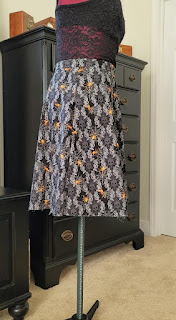


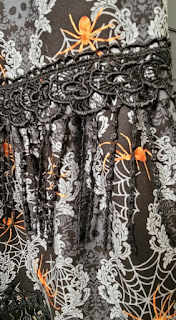
The lower edge trim is sewn.

Sadly there isn't enough for the trim at the top of the ruffle. So I dig through my trim remnants and find one that I think will be compatible and sew it on before I'm tempted to go shopping.
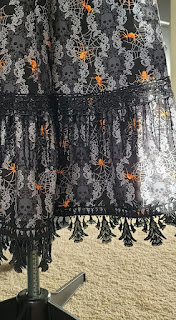
I remember using this trim on Monarch butterfly wings I created for a Steampunk Monarch. Now that it's on I'm actually liking it and it gives me some inspiration for the design of this project.
Remember those boots I pulled from the closet?

The jacket has very simple pattern pieces. A back, front, sleeve,and side. And a contrasting yoke and collar.

The jacket can be made with pre-quilted fabric. The right shade of black can be difficult to find but I do find a beautiful black cotton that matches the black in the skirt fabric and I pair it with an on-sale cotton in a pewter floral which will blend nicely with the pewter in the skirt fabric if the jacket interior shows. I find the correct batting for apparel and set out to quilt my fabric because, really, how difficult can it be to sew a zillion straight lines?


If you are a quilter you are laughing uncontrollably at this moment because YOU KNOW!! But I'm still clueless at this point and I prep my inside layer, my batting layer, and my outside layer.


Following the pattern instructions for quilting I baste the layers together.

Then I start sewing lines using a guide which was, thankfully, provided with an envelope of goodies in my machine. I've had my machine since 2008 and it was used then and I never knew what this little gadget was for but now that I do I'll be quilting all the time. Right? Well, maybe not, as I was sewing the length of my fabric piece and every inch from selvedge to selvedge. 42 inches! Also, thankfully, my machine warns me of low bobbin thread because I used miles of thread!


At this point I've had to take a long break from the project for general life stuff and it gave me time to think about my design. Always a dangerous process! I began wondering if the pewter side of the fabric would be better on the outside than the black? The inspiration on the pattern envelope shows all one design of fabric or a design mixed with a plain. But iconic Gunne Sax can contain a mix of patterns and so I pin and repin my pieces on my dressform and wait for a decision to form.

After looking at Gunne Sax on Pinterest I decide that while I love the pewter color, the floral is not defined enough to be true to Gunne Sax and so I decide to follow the 1982 pattern sample and stay with the black exterior.

I've cut the yoke and collar from the skirt fabric trying to align the print to mirror on each side of the yoke and align the spiders and skulls on the inside and outside of the collar. Details!


The yoke is prepared and sewn to the jacket front and the collar is supported by a midweight fusible interfacing.


Putting the jacket pieces together was also a learning experience. Once the seams are sewn the excess batting has to be removed from inside the seam allowance and then the outer and inner fabric stitched closed on each side of the seam.


The inner collar is sewn to the inside of the jacket top edge.


The outer collar lower edge is turned under at the seam allowance and attached to the jacket and inner collar with machine stitching close to the edges.

The instructions outline placing the sleeves on at this point but I opted to add the ribbon trim along the entire edge of the jacket before setting the sleeves. I measured the length of ribbon for each sleeve edge and what I would need around all edges of the jacket. As this was wired ribbon it was easy to remove the wire once the lengths were cut.

To mimic the quilting effect I decided to machine sew the ribbon to the jacket. A bit trickier as the ribbon is not bias cut, but I marked the interior of the jacket with Frixion pen slightly less than half the width of the ribbon, hand gathered the portions that would curve at the lower front and collar, and machine sewed the ribbon to the interior. Then I folded the ribbon over the edge, gathered the curves by hand, and machine sewed the ribbon to the exterior.


Now, the sleeves. The caps of the sleeves are pleated and basted. The ribbon is added to the lower edge using the same technique used on the rest of the jacket. With just inches of the fringe trim remaining I added it to the lower edge of the sleeve to mimic the fringed gauntlets of western wear. Then the inner seam is closed and the excess batting removed and the seam allowances sewn closed.


One sleeve sewn in! But my least favorite part of sewing is having one sleeve in and fitting well and now I have to do it all over again. Ack!

A Finished Gunne Sax for Halloween


And The Perfect Touch!

Happy Halloween!!


Rare photos of the Elusive Batpupper who only appears this time of year!


Companion YouTube Video: https://youtu.be/qWnRkGRny6E


No comments:
Post a Comment