As I studied Sedeptra's illustration of the overskirt I realized the hip width would likely not be accomplished with the draped fabric alone. I printed the illustration and using my own height as a guide, I calculated the life-size dimensions of all parts of the illustration.

Locating hip pads online and purchasing on Amazon was surprisingly simple and inexpensive. The pads are smooth on the interior and nicely shaped on the exterior to follow the curve of the hip, extend down the thigh, and curve around to the backside.
The hip pads increase the hip measurement over the petticoat and underskirt from 41-1/2" to 48-1/2". A very nice curve!
I covered the pads with the faux taffeta fabric and then pinned them to the underskirt so I could adjust and remove them as necessary.
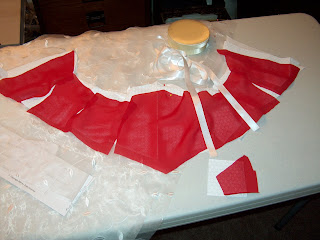
The overskirt appears to be pleated and overlapped and then draped over each hip dipping low on each side.
I pleat one edge of the fabric in 40 1/2" pleats which will take up 60", drape the fabric to mimic the length of the drape and pull it up to the center back. I decide to double that length and repeat the pleating and draping for the other side.
The pleated ends are overlapped and pinned and the sides draped into position and everything is pinned in place onto the underskirt.
With the front and sides in place I bustled up the back, pinned, and determined the placement of bustling tapes.
Everything is then carefully removed from the dressform, a waistband added which is the same width as the waistband of the underskirt, and the bustle tapes moved to the interior. Everything is sewn and secured.

The bustled overskirt and hips are finished!
The Waspie Corset with Back and Bust:
While I have previously made five corset and stays patterns I have never drafted my own. I have become aware of some extraordinary corset pattern designers and follow their work and offerings. I had already made the CorsetsbyCaroline Colette 18-Panel Waspie with Bodice and Bust Sections a favorite on Etsy. It was a downloadable pdf pattern and the back and bust option would allow me to keep the shrug short in the front and back while displaying the corset laces beautifully. I purchased the pattern and in a short time had the pieces taped, cut, and pinned to the dressform to visualize the assembly.
I transferred the pattern to coutil adding seam allowances as indicated in the directions. My corset will have 17 panels with the front panel a single piece to follow the artist's illustration.
The illustration looks like a patterned fabric and I consider many techniques to replicate the look.
I narrowed down the options to a black applique or a black beaded and embroidered net overlay. Since I will have some black touches in the overall design I think either of the black options are beautiful. To help with the decision I put the options out for a vote to both Facebook friends and Instagram followers.
Which did you choose? The overwhelming choice was the beaded and embroidered net overlay and I decide that some touches of the applique might be perfect as well.

With all decisions made and the coutil cut, the faux taffeta, the net overlay, and a burgundy lining layer are all cut. The bust pieces will be faux taffeta with the burgundy lining, and the underbust support has an additional layer of coutil. Now to keep everything organized!
The center piece will not have a busk and instead I create a channel and will use a piece of reed for support.

In the pattern instructions are several methods for the corset construction. I choose the sandwich method which encases the finished panel between the outer and lining layers of the next panel and the seam is then sewn. For this method each outer panel of overlay, fashion fabric, and coutil is sewn together at one edge.
When the next panel is to be sewn I lay the previous panel over a sewing ham to allow the fabric to naturally curve and be pinned as it will naturally curve over the body.

All but the back and grommet panels are sewn together.
I decide to add the grommets before sewing the final panels to the corset as it is easier for me to handle the fabric rather than the entire corset. This panel is different than I'm used to as it is a single piece folded at the outer edge. I've sewn the boning channels and hammered in all those lovely grommets.
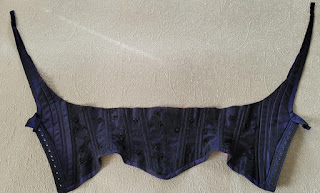
Next I've sewn the boning channels for the other panels. There is a boning channel on each side of each seam. Here the boning channels are sewn on the what would be the left half when the corset is worn. You can see the shape beginning even before the bones are inserted.
Now the back bodice panels and grommet panel are pinned to check for alignment.
The back panels are sewn as are the bust supports and bust sections.
All the sections are fitting together well.
Bias strips are cut from the fashion fabric for the upper and lower edge of the corset and back and all edges of the bust.
I sew the bias binding to the lower edge of the corset and outside edges of the back first by machine and then turn the bias binding to the inside and sew by hand.
What do they say about the best laid plans? No matter how careful I try to be there seems to be something I miss and in this case it was with the boning. I was prepared to cut my own steel boning until I read the instructions again and realized I needed spiral boning. Spiral! And I can understand that as I have so many bones and some drastic curves in this corset. Luckily I place my order and the bones arrive within days!
Everything is staged. I choose not to bone panels 7 and 8 as they require synthetic whalebone and I don't have any on hand nor do I want to invest in a large amount right now. I can always remove my binding and add the channels and bones at a later date if I purchase the synthetic whalebone for another project.
Time to insert many, many bones!
The shape of the corset is beautiful with the boning added.
The binding is added to the upper edge of the corset and around the bust sections.

The bust cups can now be sewn to the corset front.
Handling the beaded embroidered overlay and sewing the seams and boning channels meant removing much of the beading. With the corset finished I can reattach the saved beads.
And the corset with bodice and bust section options is complete! This could be beautiful worn just as it is with the underskirt, bustled overskirt, and corset with bust.
Shrug and Gathered Bodice:
Recreating this part of the illustration was the most difficult for me as it meant drafting so many pieces for which I had no experience. So I started with something familiar, the Truly Victorian pattern TV420 1879 Cuirass Bodice. I chose this pattern for the standing collar, the sleeves, and basic bodice body.
From this pattern I cut the two-piece sleeves from the striped silk organza, and the bodice front, back, sides, and side backs for both the bodice and bodice lining. I didn't know just yet how long I wanted the bodice to be so I kept all the length to the natural waist.
I drafted the front opening shape and transferred my pattern to the fabric.
The shoulder detail reminded me of 1980s full caps and so I used a vintage Vogue pattern to create the pads I felt would provide the right silhouette.
I drafted a large collar using the dimensions of the standing collar from the bodice pattern. I also drafted the shoulder embellishment pieces using the shoulder pads as a starting point and cut fabric and the same beaded overlay used on the corset. I cut strips of the silk organza for the upper arm detail, sewed the sleeve pieces together, and now all pieces are ready for final assembly. I'm amazed at how many pieces it takes to create this 'simple' shrug!
To double check that I have everything I think I need I pin the pieces onto the dressform and check that the silhouette looks right. I do love the touches of black against the purple/black shot faux taffeta! I sew the narrow standing collar and sleeves to the bodice, and sew in the lining.
I decide to complete the large collar next. I baste the undercollar to the buckram and then sew the upper collar right sides together, notch, turn and press.
To add stability and shaping ability I sew channels at the corners where the curve meets the straight side, and at both front edges. I insert #19 millinery wire in the channels leaving the wire long enough so that I can cut it to the correct length when attaching to the standing collar.
A black trim is hand sewn to the collar edges.
In the illustration the front of the shrug just below the standing collar has a beautiful triangle in the illustration. I cut two squares of fabric to the size I determined, sewed two edges, turned and pressed.
I will use the same trim that I just used on the large collar and I have AB crystals in two sizes. The perfect touch for A Wicked Witch will be the sterling silver whistle which I purchased from graybeardtrading on Etsy.
"...so she blew upon a silver whistle that hung around her neck." L. Frank Baum,
The Wonderful Wizard of Oz, 1900
The next challenge...the shoulder embellishment...
I begin with cutting bias strips for piping along the sides of the shoulder piece and between the furthest shoulder edge and the gathered upper sleeve.
I baste the beaded net overlay to the shoulder pieces and then sew piping down both long edges of each piece and then along the curved edge leaving enough piping on each side to attach the gathered upper sleeve.
I had measured around the upper sleeve to determine how much fabric I would need to gather and multiplied that by three. I sewed two gathering threads on each edge of the fabric strip, pinned the strip to a quilting board, and evenly gathered the fabric and pinned. I sprayed the fabric with water and held an iron over the fabric to help set but not press the gathers. Then I let the gathered fabric dry overnight.
I carefully removed the fabric from the board leaving the pins in place and machine stitched over the gathering threads to hold the gathers in place. Then I attached the gathered fabric to the shoulder piece.
Now I have two shoulder embellishments with upper sleeve gathers ready to attach to the bodice.
The pads are stitched to the shoulder pieces and the shoulder pieces are hand stitched to the bodice at the piping inner seam. And I hand stitch an applique over the center back seam. The upper edge of the standing collar has been machine stitched 1/2" away from the top edge creating a channel to insert the large collar. I test that fit of the collar and take photos to determine if I am satisfied with the silhouette and recreation.
The front lower edges of the shrug did not extend as far as I liked so I added an extension which gives some added dimension to the shrug. But I quickly realize that although I extended the shoulders to balance the width of the hips, I'm not satisfied with how far they extend.
As I look at the back of the shrug I'm happy with the length but decide it needs some weight. I think more piping will be perfect. And even relative to the widened hips, the shoulders seem too wide. I remove and reattach the shoulder embellishments creating a narrower shoulder width and it feels much more balanced to me.

Then I open the lower edge of the shrug.
And add piping. Then I hem and trim the gathered upper sleeves.
Although they will be covered by gloves when worn, I add the similar trim to the lower sleeve edges.
Time to add the large collar. I pin the collar inner edge into the top of the standing collar to both the exterior bodice and the lining and hand stitch each side. Where the millinery wire will go into the standing collar I take out a few stitches, cut the wire to the correct length, and thread the wire down into the collar. The wire is then secured inside the standing collar with a few stitches along its length. The wire at the front edges of the collar is also cut to the correct length just before stitching the opening closed.
With the collar secure I can finish the shoulder pieces where they follow the standing collar.
With the collar and shoulders and additional piping added I stand back and feel the back is lacking something. The illustration only shows the front of the gown so this is my chance to add my personal touch. I add more applique with more beading and some dimension in my placement and stitching.
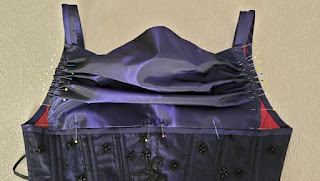
With the shrug complete except for the closure I move to the gathered bodice. Earlier I thought this piece would be attached to the shrug on one side and hooked to the other side. As I constructed the corset I decided the gathered overlay would be best attached to the corset bust. I measured the fabric I would need for width including the center front dip, and the length with the pleats to form the gathers and added seam allowance on all sides.
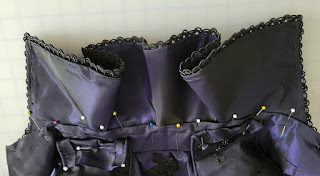
The fabric is pleated, pinned to the corset bust sides and lower edge, and hand stitched.
The center gathering strip is created with the fabric and the net overlay.
The gather strip is threaded through an opening left at the lower edge and the ends sewn together inside the gathered bodice. The pleats are adjusted and I love the effect of this bodice!

The shrug fits over the gathered bodice beautifully and now I can finish the shrug front. There are some details I can see in the illustration and some that are not as clear to me. I have some black glass buttons left from a Victorian gown made years ago and they blend nicely with the crystals on the triangle. I sew 4 to the shrug.
I test the trim that I can see in the illustration on either side of the buttons and try the trim on the edges of the shrug front opening.
I decide I like the edges without the trim and finish stitching the trim on the standing collar, add the embellished triangle, and complete the closure with snaps.
I can hardly believe it!! The shrug is complete! Actually the entire gown and project are complete except for photos and video! Here are a few of the completed shrug and I'll include a few of the completed gown but the full wearing will be in Part 3.
Finished Gown:
Lighting has beautiful effects on the fabric!
Thank you for following Part 2 of A Wicked Witch! I'm so very touched that my blog posts and videos are read and watched by so many of you and I'm so very pleased that you find my content interesting enough to spend your precious time reading and watching. I'm already working on the blog post for Part 3 - The Hat, The Broom, The Magic and there will be a surprise at the end of Part 3 so don't miss it!!
Hugs,
Jeanette
.jpg)


