.jpg)

I once had the wonderful joy of living with a Saint Bernard puppy! Calm, bright, cuddly, and....big!! Like all puppies, physical growth is rapid in the first year bringing the smaller female from 10 to 130 pounds and the larger male from 10 to 166 pounds.


Also, as with all puppies, and children as well, emotional and mental growth isn't always as rapid as the physical growth. So when my 100 pound Saint Bernard puppy, Tropie, escaped the back yard and began gnawing on the neighbor's house it was a hard task to convince my neighbor that the puppy was physically large but still very much puppy!
As historical costumers we often have what I've come to call Saint Bernard Puppy Syndrome. We may be completely new to sewing or experienced in one era but not another, but just because we are adults does not mean we know what we are doing. We are often still costuming puppies!

I was completely overwhelmed and intimidated by 18th century fashion. While there is a lot of information on the internet, I found myself without a clear path to guide me. So to quietly learn the very basics of 18th century I focused on a Simplicity pattern 8579. It had been designed by people knowledgeable of the era and I knew that while Simplicity may not have followed historically accurate techniques, the directions and illustrations would be good and I would learn enough to then make sense of the offerings around the internet.

In the quiet of my sewing cubbyhole with no one but me to judge my failures and successes, I made a shift. Then I made a pair of stays. And lastly I made panniers. Now I at least had enough knowledge of these undergarments, handsewing, supplies, and basic construction to venture out into the world of the 18th century as a puppy still, but with a bit more experience.


I've learned so much with those few pieces and am ready to begin a...deep breath...exterior garment! I have dreams of creating an 18th century riding habit similar to this beautiful piece from the Victoria and Albert Museum dated 1770 - 1775. Look at that incredible trim!


So when these two unused patterns by J. P. Ryan were offered in a costuming destash group on facebook I snatched them up.

The Pattern
An 18th Century Riding Habit Shirt with Cravat and Neck Stock.

And a 1770's Riding Habit Composed of Jacket, Waistcoat with Half-Belt, and Petticoat.

The pattern paper is sturdy and includes all sizes. The instructions provide historical background, cutting diagrams, and numbered directions with great illustrations. Perfect for a novice 18th century sewist like me!


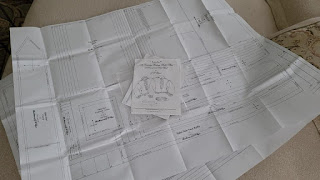
Following the instructions I cut the pattern pieces to the largest size, XXL, then fold to my desired size.


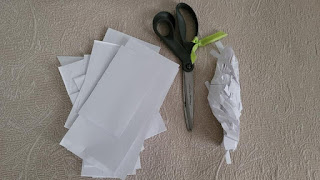
There is very little paper waste after cutting. I cut the larger bits for notes and wad the smaller bits for starting the firepit.
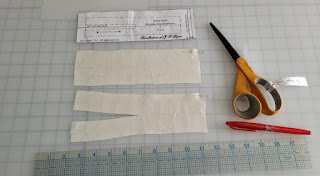
As the pattern instructions note, a white linen shirt would have been worn by both genders at the time. I still have some of the ivory linen remaining and choose to use what I have on hand. I cut all the necessary pieces to create View B with the ruffled collar which will not use a cravat or neck stock but a neck ribbon.


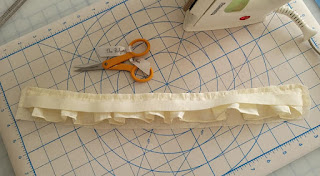
Preparing the Ruffles
Before any other sewing happens, the ruffles are prepared. In a recent Zoom presentation the instructor recommended a video by Retro Claude. I want to share that with you if you need a tutorial for rolled hems as it is a gem!
The rolled hems are a repeat of a 2-step process of stitching and then tightening the thread to roll the fabric and hem and the results are beautiful.


The collar, sleeves, and front ruffles are hemmed as instructed and two rows of gathering stitches sewn on the raw edge.


Front Ruffles and Facings
This project has quite a few steps and steps that are very unfamiliar to me. I will also be sewing over a long time as time permits. To become completely familiar with the process I write a summary of the steps and will use that as a checklist to track my progress as I move back and forth between this and other projects.

The ladies' version of the Riding Habit Shirt is longer in front and shorter in back and has ties that hold the shirt securely closed and in place under the waistcoat. It would be a simple modification to make this shirt for modern wear by lengthening as necessary but I choose to stay with the historical method. So I follow the pattern and mark where the center front slash will be made on the shirt body and cut that opening.

The front ruffles are pinned to either side of this opening as indicated on the pattern and divided evenly. The ruffles are basted in place.


The front facings are hemmed, pinned over the ruffles, sewn and turned.


Shoulder Reinforcement Panels and Neck Gussets
The neckline slash is cut between the markings that have been transferred from the pattern.

The shoulder reinforcement panels are prepared by cutting to create a Y shape and turning under seam allowances.
The neck gusset is pinned to the shoulder reinforcement panel.


The neckline slash on the shirt body is prepared by turning the seam allowance and then the neck gusset is pinned to the shirt body with the reinforcement panel continuing at the shoulder to the sleeve opening. I wanted to quickly finish this step and the instructions gave me the option of hand or machine sewing. I chose machine but as the seam allowances are small and the layers need to be just so, I would do this by hand in future. This puppy is learning!


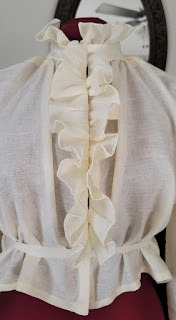
Neck Ruffle and Neck Band
The neck ruffle was hemmed and prepared with gathering stitches along with all the other ruffles and can now be attached to one piece of the neck band. The ruffle is pinned to the neck band evenly dividing the ruffle along the band before gathering.


The gathering threads are anchored at one end by catching them around a pin in a figure eight. Then the threads are pulled at the other end gently pushing the gathers along the threads and pinning in place. The gathers are then stitched to the band.


The lower seam allowance of the inner neck band is pressed, the upper edge pinned over the ruffle, and stitched over the top and ends.

The seam allowance is trimmed, pressed, and turned. I love this neck ruffle!


A gathering stitch is made around the neckline and through the gussets avoiding the front facings.

To make sure the neckline is gathered evenly into the neckband, I've pinned both at the half and quarter points.

The neckband is pinned and the neckline gathered until all the markings align. The seam is stitched and trimmed.

Then the inner neckband is pinned over the seam and stitched closed over the neckline and front facings.


The side seam is very short and the directions indicate sewing between the notches. I was unsure as to which notches were correct and wrote an email to the pattern designer. The response was quick and clear and I was on my way once again. I never hesitate to ask questions of independent designers. They want us to succeed!

Now I can create a narrow hem along all lower edges.


Sleeves With Wristbands and Ruffles
Two rows of gathering stitches are sewn along the top and bottom edges of each sleeve.

The wristband ruffles were previously hemmed and gathering stitches sewn. Now the wristbands and placket facings have seam allowances pressed as instructed.
A ruffle is gathered and pinned to three sides of a wristband leaving a portion of the ruffle free on both ends.

Then the other side of the wristband is pinned over the ruffle.


With the second ruffled wristband created and all parts ready, the inner,sleeve is sewn between the notches.

The wristband is pinned to the lower sleeve adjusting the gathers on the sleeve.

The wristband still has two free ends of the ruffle. The free edges will be closed with a French seam creating a continuous ruffle.

The free portion of the ruffle will now be pinned to the opening in the sleeve and the plackets will be stitched to both sides encasing the raw edge of the ruffle.


With the ruffled wristbands finished the gusset can be attached to the opening in the sleeve at the upper edge.

Before attaching the sleeves to the body of the shirt I trim one side of the seam allowance, fold the other side over the trimmed side, and handstitch the folded edge to the sleeve.


The sleeve is fit to the body placing the center of the sleeve gusset at the body side seam and matching top center of the sleeve and the sleeve opening. The gathers are adjusted to fit and the seam is sewn.


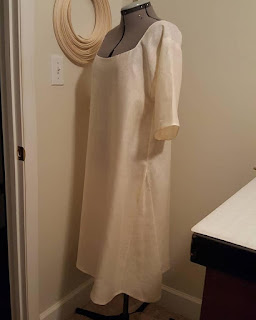
Final Touches and Finished Garment
The center back lower edge is pleated down to a final width outlined in the instructions and a tape stitched inside over the pleated area at the top and bottom edge of the tape.


This shirt is beautiful and I'm looking forward to wearing with the 18th century Riding Habit, I also envision how it could be adapted for modern wear, or even a poet or pirate shirt. The front and back of the shirt body could be easily lengthened and a placket created on the shirt front for button closures under the ruffle. I'm looking forward to making this beauty again!


Companion YouTube video: https://youtu.be/4Y5qfgwEGiI
Hugs,
Jeanette
Historical Sew Monthly - November 2021
Zero Waste - Make something that creates zero waste. You could either sew a garment like a shift that uses clever geometry to use all the fabric, remake an old costuming item to extend its life, or create something entirely from re-used materials.
What the item is: Riding Habit Shirt
How it fits the challenge: All pieces of this shirt are cut from squares and rectangles. The pieces make best use of fabric by allowing all parts to be cut without waste. A very brilliant design!
Material: Linen
Pattern: Collections of JP Ryan
Year: 18th Century
Notions: Ribbon for ties. This also fits the September HSM Challenge of Closures.
How historically accurate is it? All ruffle hems are handstitched rolled hems. The only machine sewing on the seams is in the shoulder gusset reinforcements and I wish I had hand sewn those as it would have been more controllable versus using the machine.
Hours to complete: 32 hours
First worn: Saving for my 18th century riding habit being sewn in 2022.
Total cost: $18


No comments:
Post a Comment