Companion YouTube Video: https://youtu.be/66jMtOmF9UA
The blog entitled Untold Lives (I'll leave a link for you) shares The British Library's collection of stories of people's lives worldwide. A 2013 post entitled Queen's Hallowe'en tells the story of Queen Victoria's enthusiastic participation in the Hallowe'en celebrations at Balmoral Castle in Scotland. Queen Victoria wrote about one celebration in her 1877 diary describing the parade with her daughter, Princess Louise, walking alongside the carriage looking to the Queen like one of the witches in Macbeth.
A Victorian Apron and Headpiece
The year I joined the YouTube collaboration of Whimsical Witches I made an apron from Butterick Making History B6229.
I'll share a link for that full blog post and video.
Blog Post Link: https://theperfecttouchvictorian.blogspot.com/2021/10/sewing-victorian-edwardian-cottagecore.htm
YouTube Link: https://youtu.be/M_51N8z_5JU
It was a very fun collaboration and I was a Whimsical Tea Witch!
The perfect fabric is available in a costumer's destash group. A light white cotton with black embroidery and a lace edge. It pairs well with the vest.
The pattern pieces I will use for this version are #15 Front, #14 Side Back, #12 Waistband, and #13 Tie End.
The fabric is prepared and ready for cutting on the kitchen island.
The front is cut on the fold and shortened since this apron will not have pintucks nor need hemming.
Two side backs are cut also shorter since the pintucks and hem allowance are not being used.
Two pieces are cut for the outside and inside of the waistband.
Four pieces are cut for the tie ends.
A lightweight sew-in interfacing is basted to both the inside and outside waistband pieces.
Two tie ends pieces are sewn right sides together on the two long and one short end, the seam allowance trimmed, and the sewn piece turned right side out and pressed. This is repeated for the second tie end.
The raw short ends of the tie ends are sewn to the outside of the waistband at the markings indicated on the pattern.
Since the fabric is semi-sheer, a French seam is used to sew the side backs to the front. Two gathering stitches are then sewn at the upper edge.
The waistband is marked at the center front and the side seams for evenness in gathering. The apron is pinned to the waistband front, right sides together with gathers adjusted as desired.
The waistband is sewn to the apron over the gathers.
The interior waistband is sewn to the exterior waistband right sides together at the upper and side edges.
The upper corners and seam allowance is trimmed as desired, the inside waistband is folded to the back, the lower seam allowance turned in along the lower stitching line, pinned, and hand stitched in place.
The cute headpiece is a simple sew of just two pieces. The Headpiece #16 and the Headpiece Ruffle #17.
A line is stitched and then pressed 1/2" from the entire edge of the headpiece, and from the curved edge of the headpiece ruffle. The raw edge is turned to the stitchline and the folded edge is then stitched through all three layers close to the folded edge.
Two stitching lines for a casing for elastic are marked. The raw edge of the headpiece ruffle is folded in and placed just slightly above the top line and pinned in place. Both lines are sewn through both the headpiece ruffle and the headpiece.
The elastic piece is cut, threaded through the casing, and secured at both ends.
A small piece of black trim makes a fun addition.
The Finished Victorian Apron and Headpiece
Victorian Halloween Cookies
Evil Cake Genius has such amazing offerings and I was powerless to resist the kit for Victorian Halloween Cookies!
A Filigree Borders mold and Silicone Oreo mold.
Such detail!
Shiny as Hell Sunny Gold Edible Luster Dust.
Wicked Sticky Edible Glue.
Edible Icing Sheets. Amazing!!
In addition to the kit I'll need Oreos, melting chocolate, corn syrup, and cornstarch.
First I'll make the chocolate covered Oreos topped with the Halloween icing stickers. I remove the icing sticker sheet from the sealed package, peel the stickers from the sheet and place them face down in the mold.
The milk chocolate wafers are melted in a double boiler although you could also use a microwave oven.
The melted chocolate is poured into the bottom of the mold over the icing, an Oreo pressed into the mold, then more melted chocolate poured into the mold to fill.
The filled mold is placed on a baking sheet, tapped on the counter to level the chocolate, and placed in the refrigerator.
While the cookies are hardening it's time to make the Filigree Borders. The mold, luster dust and brush, glue and brush, corn syrup, chocolate chips, cornstarch to prevent the melted chocolate from sticking to my hands, and measuring tools.
The recipe from Evil Cake Genius calls for 2/3 cup melted chocolate and 3 tablespoons of corn syrup to create a paste for making the filigree borders. I learn that melted chocolate and chocolate chips will weigh the same and 2/3 cup of melted chocolate is 115 grams. Luckily I have a scale, zero it with a container, and pour the chocolate chips in the container until I have 115 grams.
I measure the corn syrup into a small bowl.
The chocolate chips are melted in the double boiler, the corn syrup added to create a paste, and the paste placed in the refrigerator.
While the paste sets up a bit, the chocolate covered Oreos can be removed from the mold.
Aren't they fun?! They would be fun even without the filigree borders! Even children would enjoy joining in on making these cookies!
The filigree mold is brushed with the edible luster dust.
A bit of the white chocolate paste is rolled and pushed into each filigree border. The filled mold is placed in the refrigerator for a few minutes to harden the chocolate again.
This was my first attempt using a mold like this and I overfilled each section which was readily apparent when I removed the finished filigree borders. But now I know and a small knife removed the excess for this batch. The gold is so striking and so much detail!
Some edible glue brushed on the back of the border and the border is now warmed and pliable enough to place however you wish on your cookie.
And here is my first try using Evil Cake Genius' Victorian Halloween Oreo Cookie Kit. A milk chocolate covered Oreo with a gold colored white chocolate filigree border. Yum!
The Victorians were fascinated with the occult and self-analysis. Tea leaf reading to divine what the future may hold was a simpler and perhaps safer form of divination.
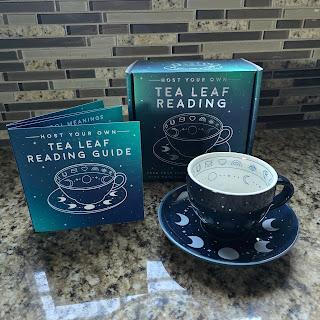
Today it is easy to find books, videos, and a myriad of supplies to get you started on this art form. This package of Host Your Own Tea Leaf Reading by Gift Republic is available on several websites and I found mine on Amazon.
As with many sets available today, the interior of the teacup contains symbols.
There is a deep saucer for containing excess liquid.
A full guide.
A short summary of the history of tea leaf reading and instructions to prepare your tea.
And how to read your tea leaves and the meanings of the symbols.
I've chosen a favorite tea of mine, Victorian London Fog, by Harney & Sons. London Fog originated during the Victorian era and is traditionally an Earl Grey served with steamed milk. This blend is a black tea. Oolong tea, bergamot oil, lavender, and vanilla.
I'll use glass teapots without the infuser.
Before I serve my family I practice preparing the tea and a simple reading. One-half teaspoon of the loose leaf tea straight into the teacup.
Water brought to a boil, poured over the tea leaves, and allowed to steep 5 minutes. To add some fun to this time you may call on the quarters because all the elements are represented: Earth in the tea leaves, Water poured over the tea leaves, Fire in the heat from the water, and Air in the steam from the water.
Time to clear and focus your mind on what you want to find and learn from your reading. The clearer your thought or question, the more the reading will mean to you. Time to sip tea!
Tea Break
Leave about a half teaspoon of liquid in the teacup. Hold the cup by the handle with your left hand and swirl it around three times counter-clockwise.
Slowly and carefully turn the teacup over onto the saucer. Wait at least one minute to allow any remaining liquid to drain away.
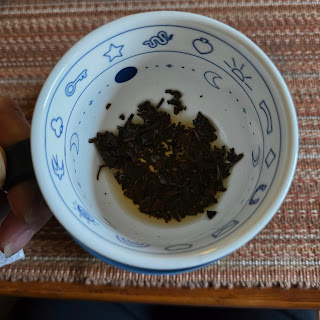
Now you can turn the cup right side up. The person receiving the reading is the Sitter and the person giving the reading is the Seer. If you are doing this alone you are both. The cup is divided into three sections: The Rim reflects the Present and those symbols will happen in the next few days. The Sides reflect the Future and any symbols here will happen in the next few weeks. The Bottom is the Far Future and any symbols will happen in a month or more.
On my Rim is the Key - problems solved and business improvement.
On the Side are tea leaves very near the Eye - a protective symbol in many cultures eyes also symbolise new ways of looking at problems.
Here, a tea leaf at the Full Moon - romance and new love.
The Bridge - a bridge leads to something or someone. It can represent a change of circumstance or a journey.
Waning Crescent Moon - release something that no longer serves you. Some formations may strike you and you can find many interpretations available for these. Here I see a person riding on a horse with cape billowing behind and a bow and arrow raised.
Here I see a fiery dragon with mouth opening and wings ready for flight.
And a bird resting on a branch looking upward to the Waning Gibbous Moon - gratitude and giving thanks. All of these interpretations will be meaningful when applied to the personal questions I formulated during my tea sipping.
The Victorian Hallowe'en Tea
The Victorian Hallowe'en Tea items are gathered and ready for a fun family gathering!
Oops! I just couldn't wait!
Hugs and Happy Halloween! Thank you for being here!
Jeanette
The Historical Sew Monthly - November 2024
The Challenge: Worn By All: Make a garment that would be worn as everyday clothing by most social classes during your chosen time period and/or place.
What the Item Is: An apron.
How it fits the Challenge: There were social classes such as people working in service, the trades, shopkeepers, industry, and farm workers, who all wore aprons daily to protect their clothing. This apron is made to protect clothing while serving tea.
Material: Embroidered cotton with lace edging.
Pattern: Butterick Making History B6229
Year: 1890s Victorian Era
Notions: Thread, lightweight interfacing.
How historically accurate is it? A very simple construction of three panels with waistband and tie ends. The woven interfacing may have been another layer of heavier cotton.
First worn: Serving a Victorian tea to family.
Total cost: $27
.jpg)


.jpg)


