Foundations Revealed is an online membership community dedicated to skill development for all levels and in all areas and eras of fashion. Each year Foundations Revealed hosts a Competition to showcase the creations of members and non-members alike.
I have taken the plunge and overcome the fears and nerves and participated in five of the competitions. The first was in 2010 for the Dual Period Project where I created fashion from 1788 ...

... and then from 1879.
In 2018 the Competition theme was Insects and I created the Edwardian Blue Butterfly.
I was beyond thrilled to place second in my category that year and exhibited my entry at Costume College that summer.
In 2019 the theme was Architecture. I was inspired by the art of Frank Lloyd Wright and created a corset inspired by his art and time and displayed the corset on a vintage dressform.
While I wasn't able to complete my entire planned design before the deadline, I submitted my entry with only the corset finished and later that year I added the fan lacing and remainder of my dream design.
A Bas Bleu was my entry for the 2020 Competition with shift, stays, pocket, pocket hoops, garters, and cap for 18th century.


That was a fun walk down memory lane! The very best part of entering the Foundations Revealed Competition is just doing it. Truly! Committing, researching, planning, and then executing a dream project. Then that most nerve-wracking time for me - filling out the entry form and hitting the Submit button. I get physically shaken right at that moment. I have tea. I sometimes cry thinking how silly I am for putting myself out there for the world to judge. But I make myself press that button and then, magically, all the fears vanish. The Foundations Revealed team uploads my entry in its very best light, I scroll through all the entries, am in awe, inspired, and so very humbled to be part of so much creativity and courage. The Competition is less competitive and more of a showcase and if you have thought about entering, do it! You will be so very amazed with yourself and the stretch you accomplished! I'll make it easy for you. Here is the link to the details:
The Theme for 2021 is Once Upon A Time... and when the theme was announced in the spring after the 2020 Competition was complete, I immediately knew my inspiration.
The 1939 American fantasy film The Wizard of Oz was a childhood favorite of mine and each year my family would gather around the television to watch the annual showing. It was truly magical! I still have a VHS tape and player and watch the movie each year just as I did as a child.
Many years later I was gifted a two-volume set of The Oz Chronicles by L. Frank Baum.
The Wonderful Wizard of Oz was written by Baum in 1900 and is the first of fourteen full-length books all now in the public domain.
If you haven't read the full series give yourself a literary treat and do it now. It is still magical! There is much more to the Land of Oz than the Emerald City.
I created a Facebook group of friends who were thinking of creating their Competition entries from the Oz series. While we each would create our separate characters, we would be part of an overall group called There's No Place Like Home. It all seemed appropriate for the time when the world was in lockdown against the spread of the novel coronavirus.
I had selected the Tin Woodsman as my hair went entirely silver after an accident many years ago and I thought it would be a chance for me to wear my own creation with my real hair instead of a wig.
I gathered my supplies and created a Pinterest Board of inspiration. Then another member of the group who had chosen the Wicked Witch found herself lacking inspiration and I offered to trade characters with her. It was now August but since I hadn't started my sewing I instead started research. Whoa! The witch has no clothes! Not really I'm sure as when Dorothy throws water on her she melts into a "brown, melted, shapeless, mass". What the literature does say is only this:
"Now the Wicked Witch of the West had but one eye, yet that was as powerful as a telescope, and could see everywhere. So, as she sat in the door of her castle, she happened to look around and saw Dorothy lying asleep, with her friends around her. They were a long distance off, but the Wicked Witch was angry to find them in her country; so she blew upon a silver whistle that hung around her neck."
Well, that's a start. One eye and a whistle.
"There was in her cupboard, a Golden Cap, with a circle of diamonds and rubies running round it. This Golden Cap had a charm. Whoever owned it could call three times upon the Winged Monkeys, who would obey any order they were given. But no person could command these strange creatures more than three times."
Now we know about the Golden Cap.
The book also says that "Dorothy followed her through many of the beautiful rooms in her castle..." So The Wicked Witch appreciates beauty. Perhaps she appreciates beautiful clothes as well?
But that is all we know other than she is aquaphobic, and is afraid of the dark which is why she cannot steal the silver shoes from Dorothy's feet during the night, and she melts just several pages later and is not heard from again.
Which means I don't have much solid inspiration. Which means I can clothe the Wicked Witch in most any way I choose!
And I choose an inspiration from Sedeptra on Deviantart which has inspired and haunted me since she released it November 2015.
Being a bit of a Cowardly Lion myself, I finally summon the courage to write her to ask her permission to recreate the art. She says YES!! I'm thrilled and scared at the same time!!
I have printed, enlarged, studied, and gathered supplies for the execution of this amazing art. I'll share photos here of my supplies with both your and my understanding that anything could change at any moment as I have no good experience with anything I'm doing but a base hat and skirt. Everything else will be learning and doing as the project progresses.
The project feels a bit overwhelming...well, more than a bit...so I have broken it down into manageable pieces.
First, the underskirt: The fabric I chose is a faux taffeta in purple and black shot with a beautiful drape. I'm using the Truly Victorian Fantail Skirt pattern and will add the train as I purchased enough fabric to reuse the skirt and sew a bodice and overskirt later.
Next, the corset. I've purchased the downloadable Colette Pattern by CorsetsbyCaroline. It has that beautiful point in front, laces only in the back, and has a back and bust option that will allow enough support to hold the draped overskirt. Attaching the overskirt to the lower edge will give me the full hips further enhanced by hip pads, and minimize the bulk at the waist. Rather than find a patterned matching fabric I will applique these designs to the corset panels. The gathered bust portion will attach to the corset upper edge and straps.


The next part of the project I'm calling a shrug. It will consist of the sleeves attached to a short jacket with front, back, and shoulders and standing collar. The shoulders will be further enhanced with shoulder pads with piped edges, a gathered upper attaching to the sleeve, and applique on the shoulder pieces. The sleeves will be made with a striped silk organza and the remainder made with the purple/black shot faux taffeta.
And for that amazing, incredible, fantastical, glorious HAT!
Where do we start!?!!! With a hat base. As with everything in this project I had printed the art and then worked out a scale relative to my height. The hat has an oval rather than round appearance and I'll use Lynn McMasters Universal Oval Brimmed Hat Pattern. I've made this pattern before and it's fabulous! I will have to enlarge the sides to create the extreme upturn and space for all the embellishments. Supplies here will be two-ply buckram and millinery wire.
The entire hat will be covered with the purple/black shot faux taffeta. The underbrim will be gathered and embellished with an applique with cut steel beading.
The hat is large and carries a lot of embellishment which means I have to keep weight down wherever I can. A floral foam cone will be a great base for extending the crown to create the twist and turned-down peak. Some floral foam glue and more millinery wire will help build the movement into the spire. Double-sided purple satin ribbon and ivy are used throughout the hat.
Then there are books. Again to keep weight to a minimum I will use foam pieces covered with parchment paper at the edges, fabric on the covers, and a printed replica of the covers of my actual books to add an authentic graphic to the books.
The black roses will be made from black ribbon and floral wire and the pages and scrolls from the parchment paper. Small crystals will hang from gunmetal-colored chain on the underside of the brim.
Now for those magnificent and completely scary-to-make candles. My idea is to use a paper tube stuffed with tissue leaving a well for these battery-operated tealights. A costuming friend told me that the candle drips can be created using a glue gun. I didn't own a glue gun! But now I do with a package of glue sticks and some cream-colored paint and I'll do my best. If I'm not happy with the glue I can always use Royal Icing and a #12 Wilton Tip. Because I do know about icing. It will be an adventure!
You've already seen most of the items that will be used in the broom. I found a 60" pole in the barn which will be stained and fitted with parchment paper, satin ribbon, and ivy.
There are several pages on the broom with writing and I will copy the Wicked Witch's tale from my copy of The Oz Chronicles book and use my fountain pen with purple ink. I'll probably hang this broom on my sewing room wall when the Competition is over. You know, in case I need to make a quick getaway!
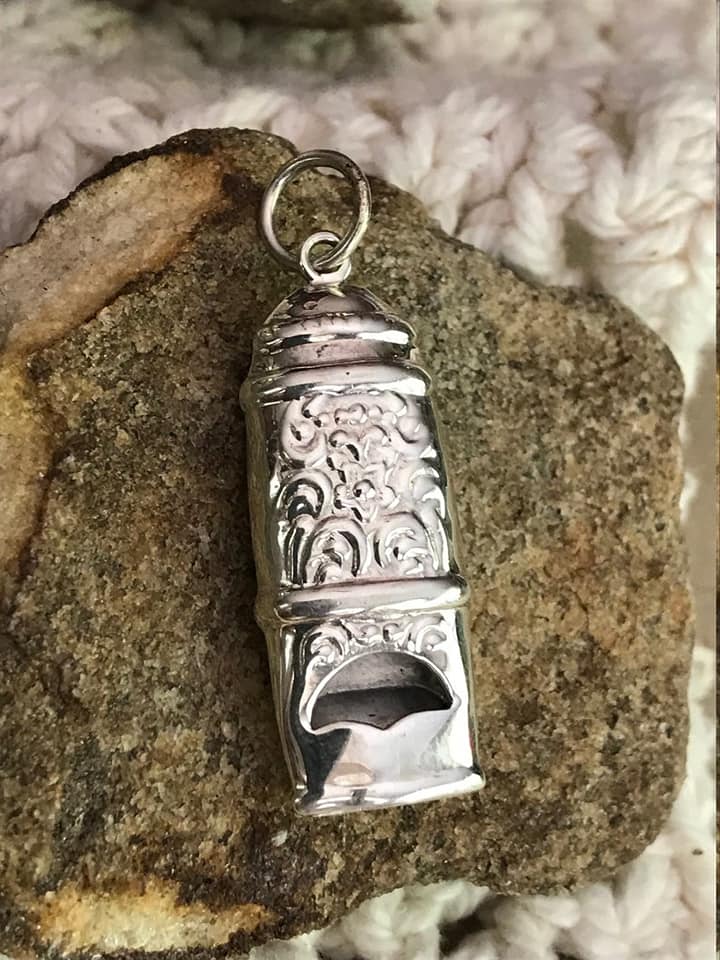
To be true to L. Frank Baum's description of the Wicked Witch of the West I have found a silver whistle. But I promise not to call in any wolves, crows, or bees.
The clock is ticking toward the deadline for my entry. I will take photos and video during the process and share them in February. Until then I'll be locked away in my sewing tower...er...room.
Now close your eyes and repeat after me...
There's No Place Like Home,
There's No Place Like Home,
There's No Place Like Home!
.jpg)